Oscillators
The oscillator is the part of a synthesizer that makes the raw sound. Before any shaping, this is the tone you start with. Kiwisynth has three main oscillators, a sub oscillator and a noise source, and you mix them together. OSC2 and OSC3 are silent by default. Turn their Level up to bring them into the mix.
The Oscillators page shows one oscillator at a time. Pick it with the OSC1, OSC2 and OSC3 tabs along the top; the FM tab beside them holds the FM controls. The Sub, Noise and Voice cards on the right stay in view whichever tab is open.
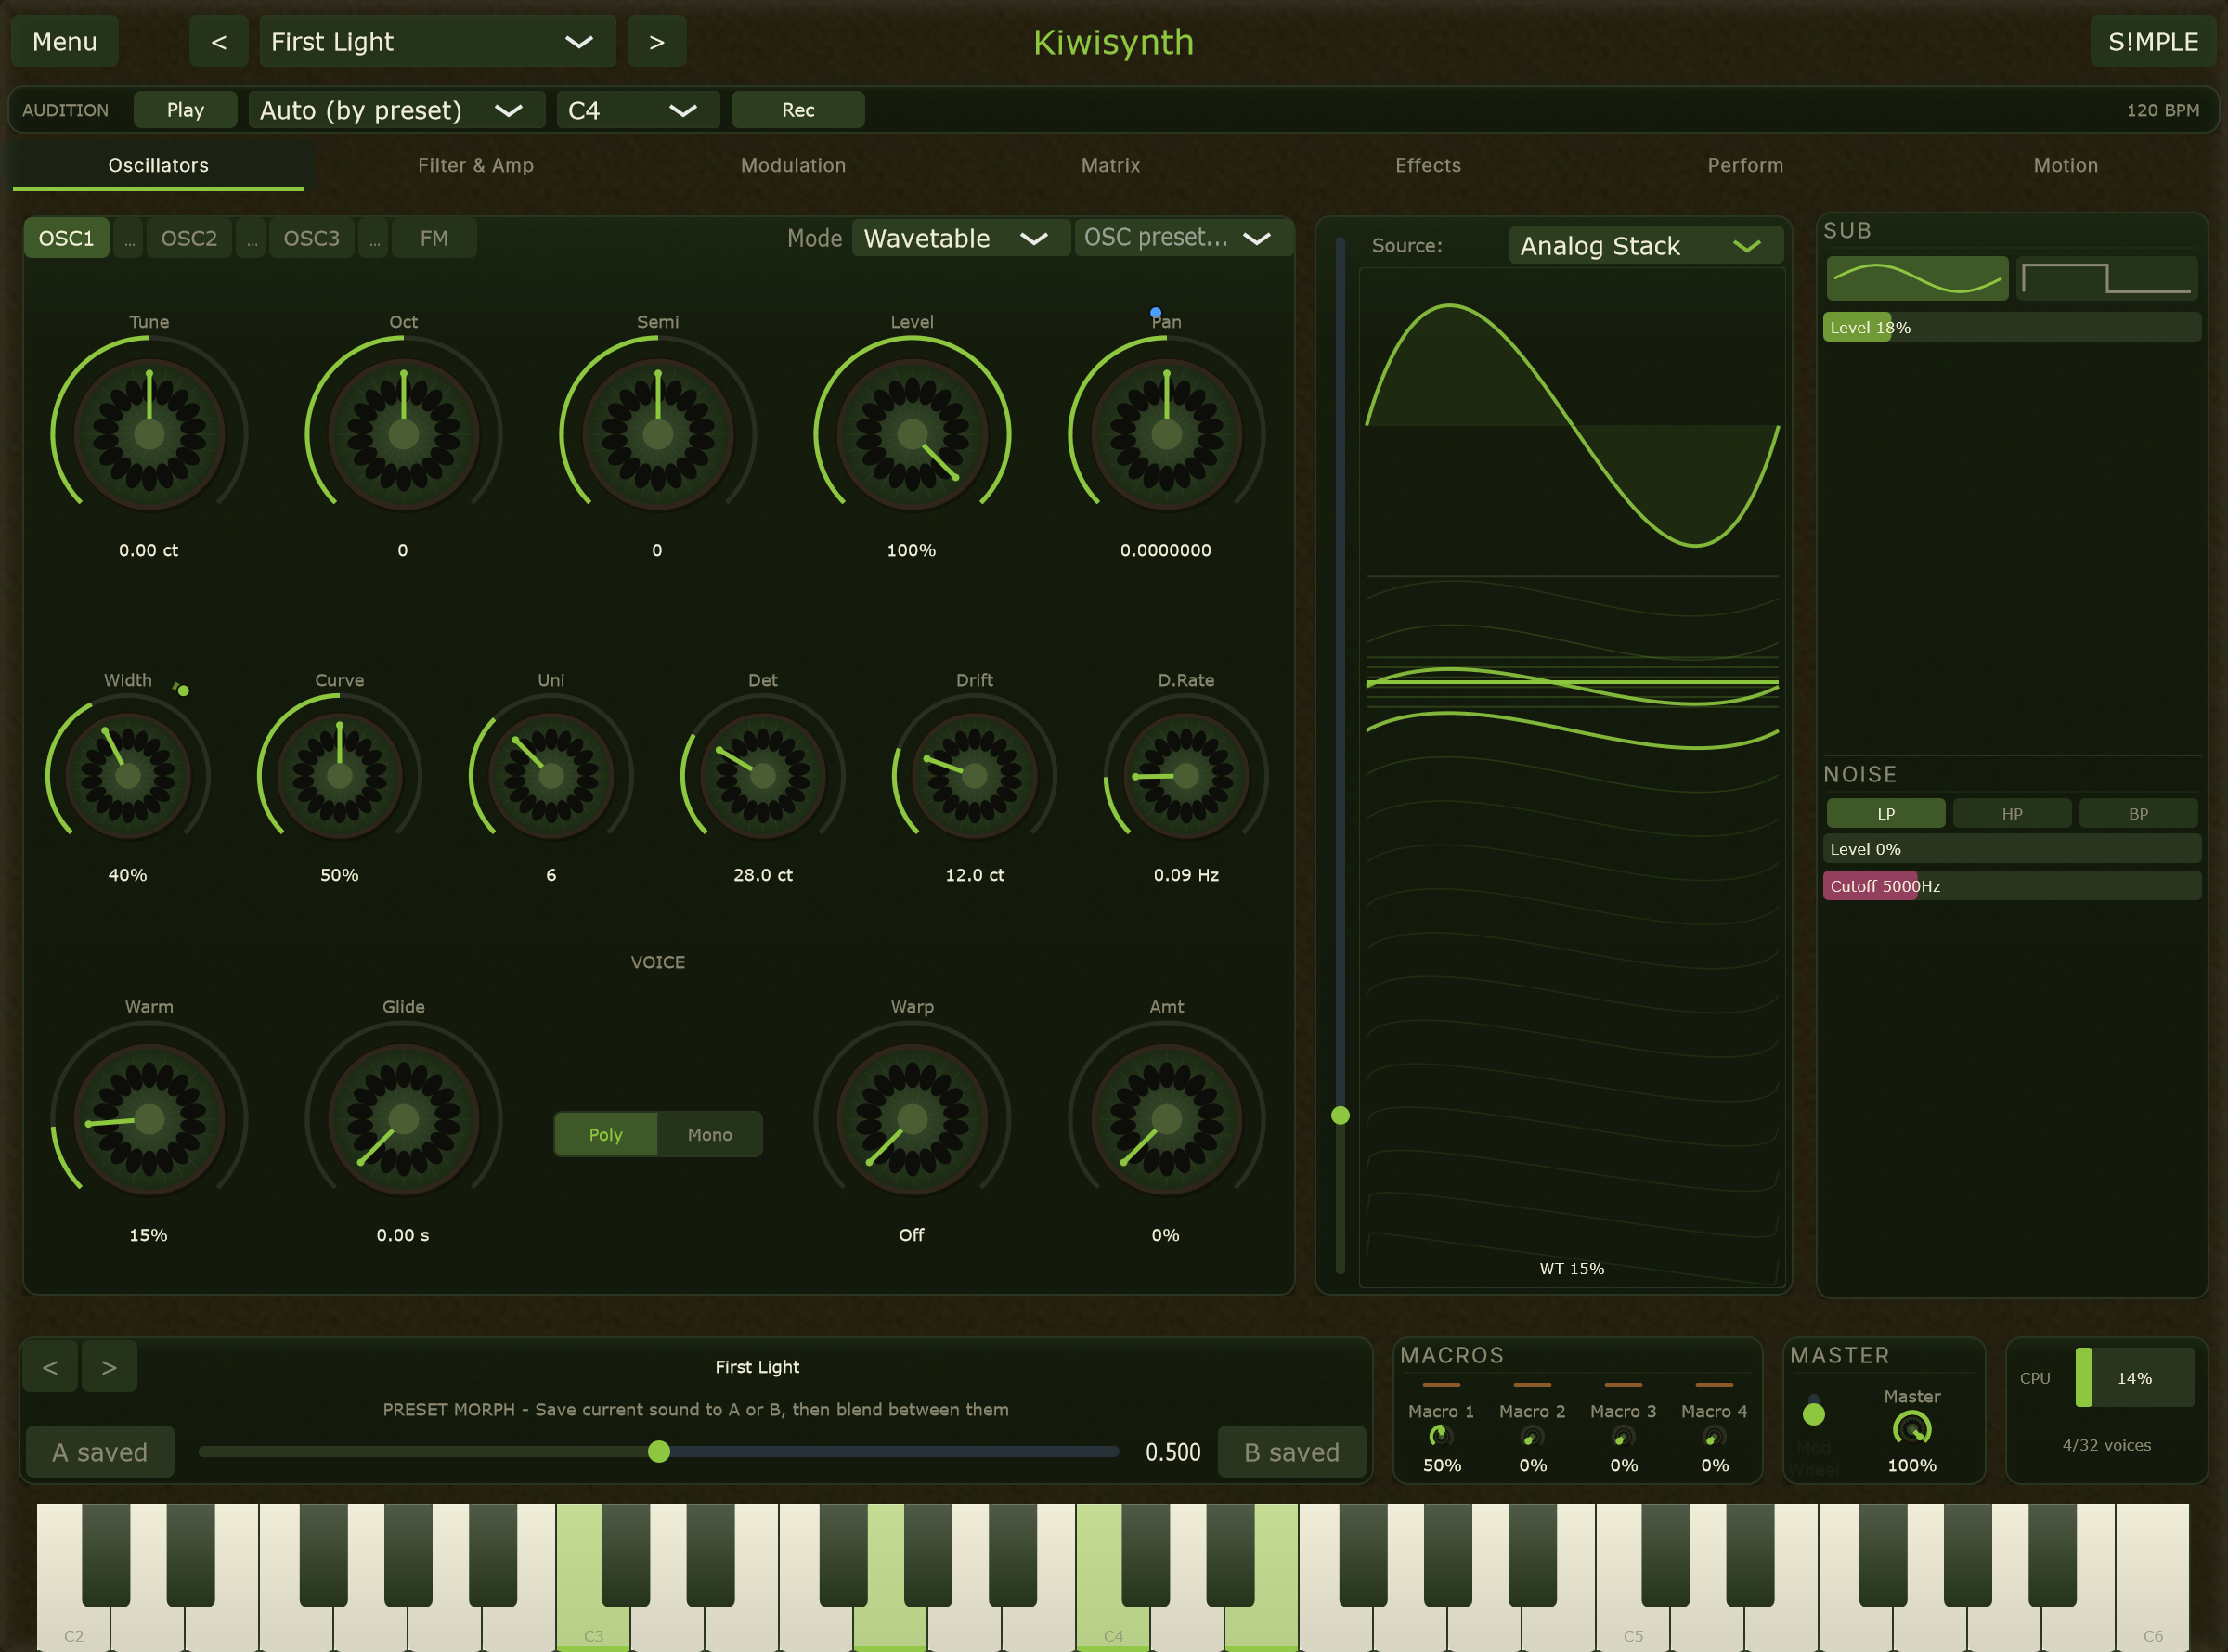
Osc preset... Loads a section preset: a ready-made set of oscillator settings, including every source and the amp envelope, without changing the rest of the sound.
Choosing the wavetable
The Wavetable card under the oscillator's knobs shows the table it plays. The button on its right carries the table's name; click it to open the source picker. The picker draws each factory table as a single cycle, so you can see it before you pick it, grouped in two:
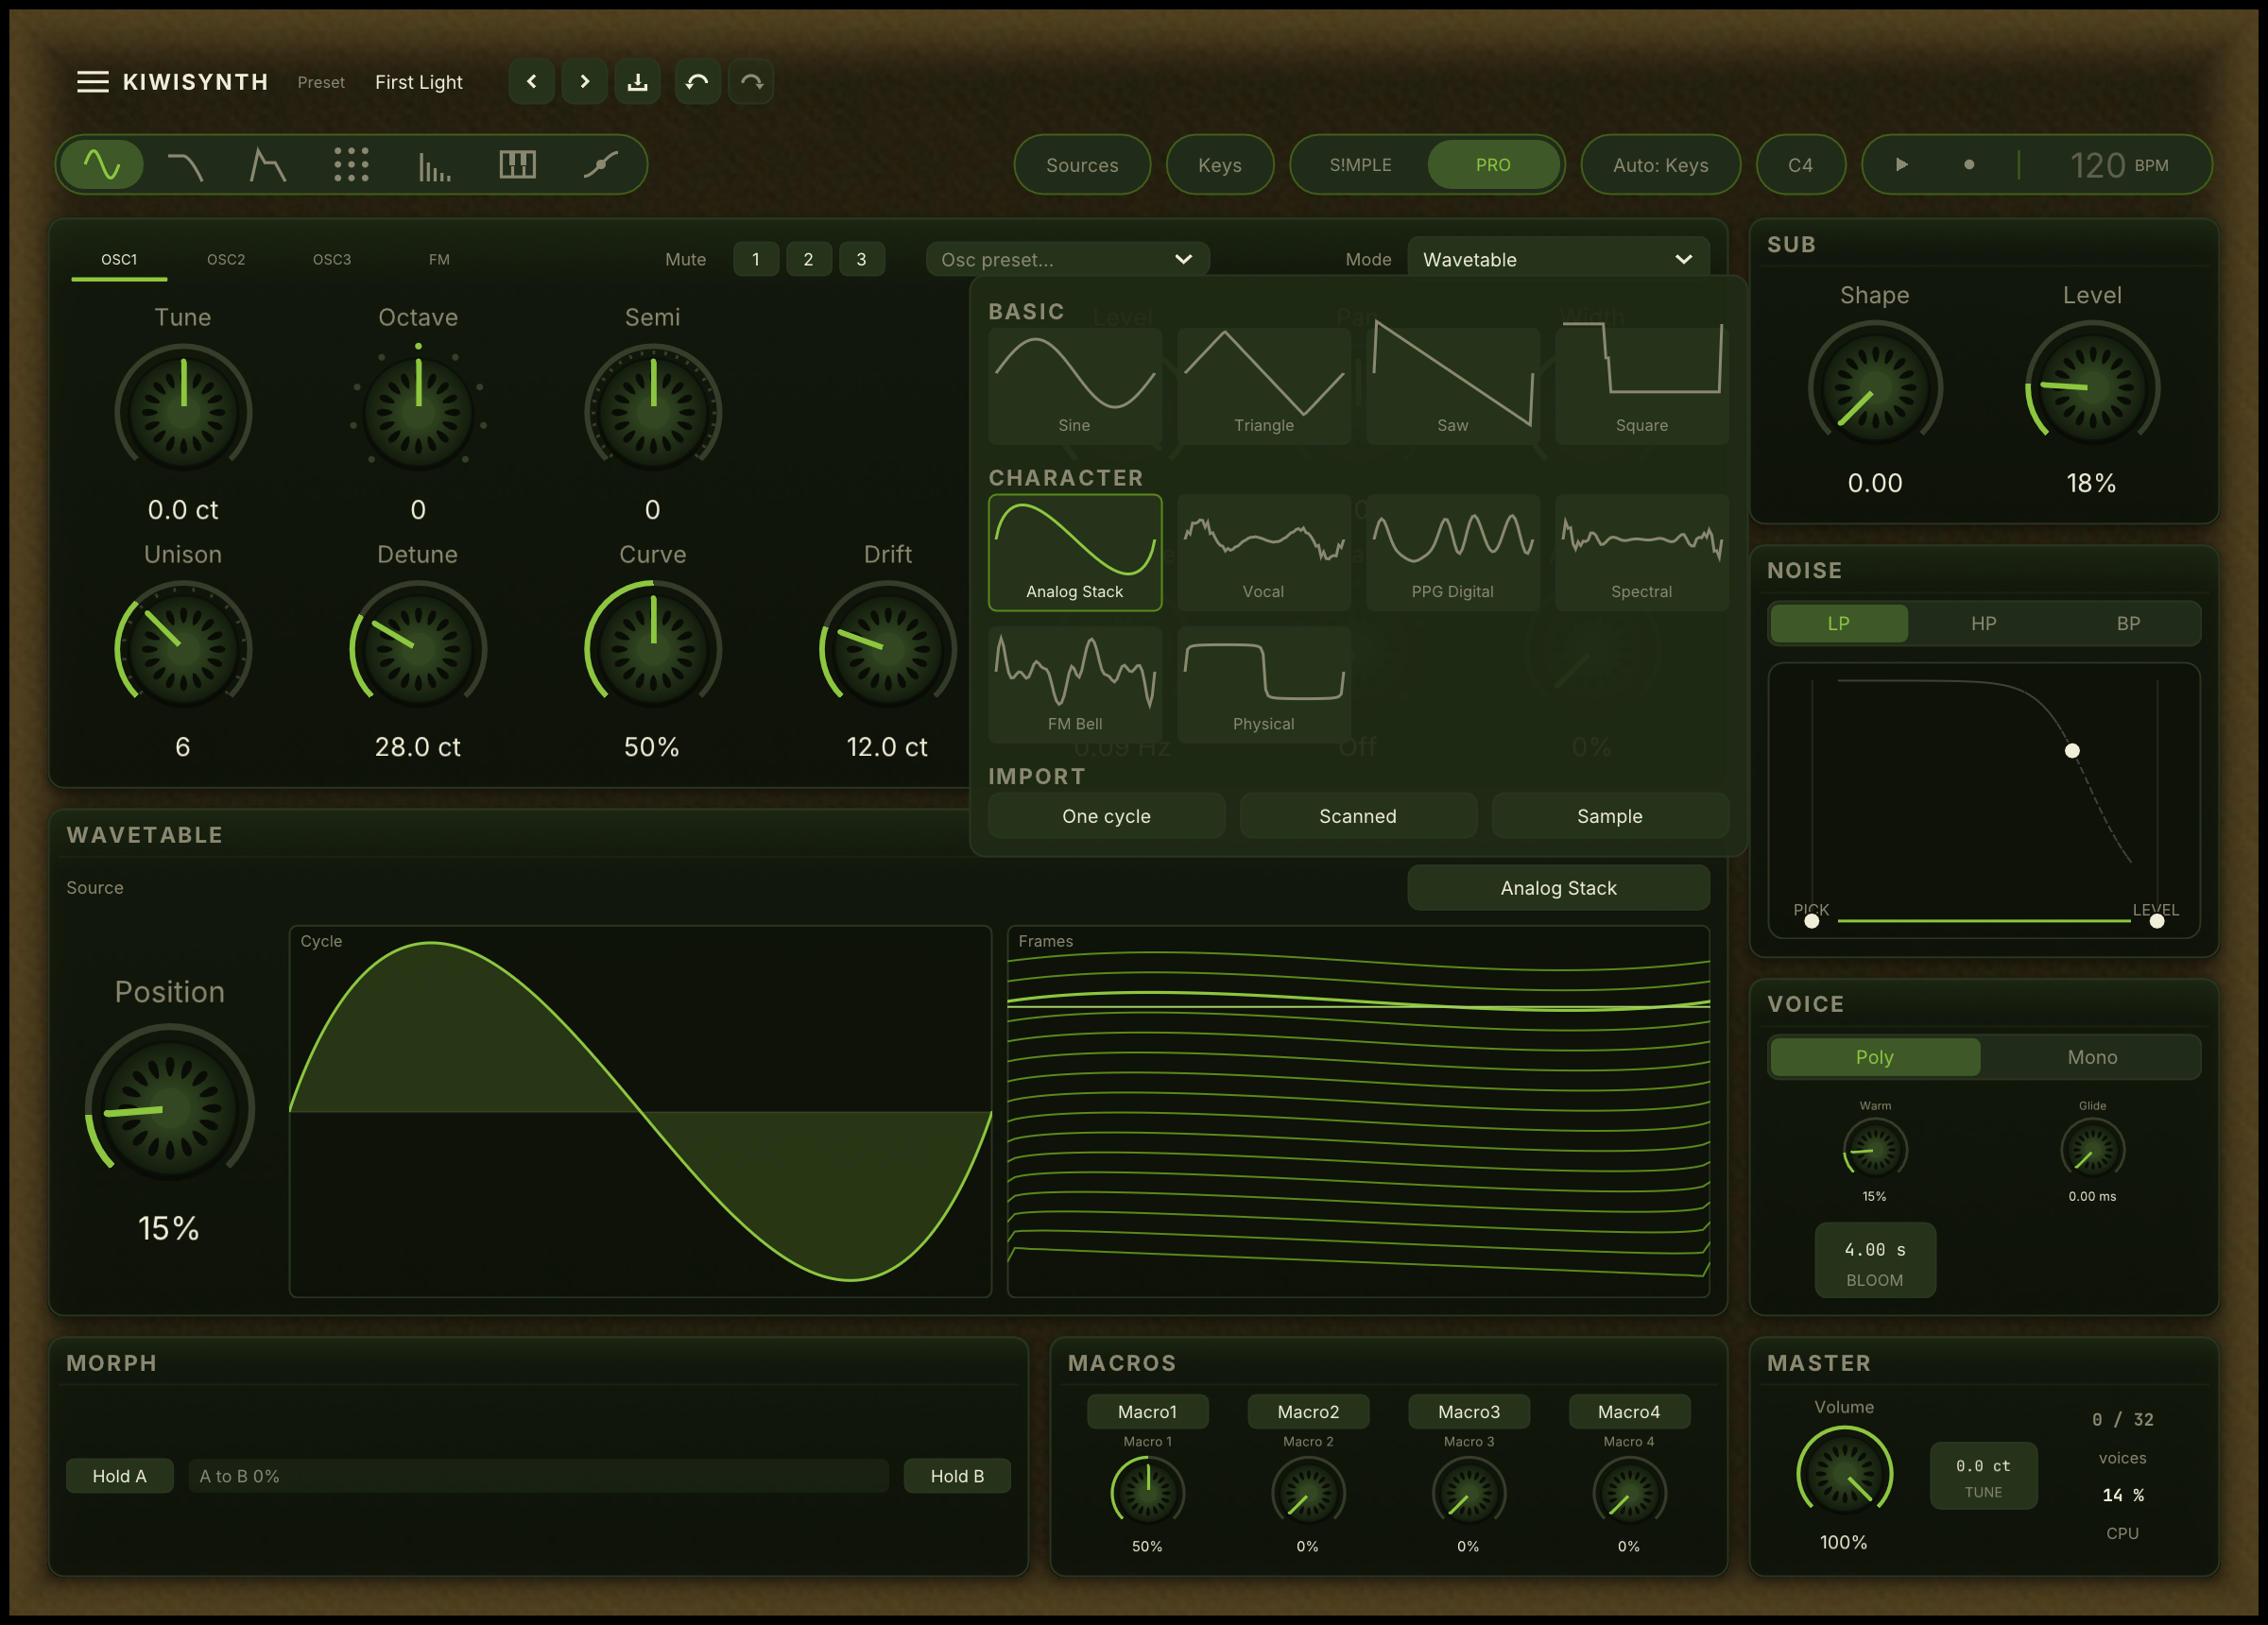
- Basic. The four textbook analog shapes: Sine, Triangle, Saw and Square. Start here when you want a plain waveform to build on.
- Character. Richer tables with more going on: Analog Stack (a detuned saw blend and the default), Vocal, PPG Digital, Spectral, FM Bell and Physical.
Click a table to load it into the current oscillator at once. Below the grid, Import brings in your own audio, described in the next sections.
OSC3 has no table of its own: it plays OSC1's. Its picker works the same way, and a table chosen there changes OSC1 as well.
Only Wavetable and Granular modes read a table, so the source button is available in those two modes and greyed out in the others.
Position. Which waveform in the table you hear. A wavetable is a row of single-cycle waveforms, and moving through it changes the tone. Adding movement here gives a sound that evolves as it plays.
Cycle. The waveform at the current Position, drawn as one cycle.
Frames. Every waveform in the table stacked from front to back, with the current one marked. Drag across it to set Position.
Choosing how an oscillator works
Each main oscillator has a mode. The mode decides how it makes its sound.
Mode. Five choices.
- Wavetable. The oscillator plays through a row of waveforms and you can move between them. This is the main mode, and the controls below assume it.
- SuperSaw. The oscillator becomes a thick stack of slightly detuned sawtooth waves in one step, the wide sound used in dance leads.
- Karplus-Strong. The oscillator models a plucked string instead of playing a waveform. Its controls are described further down.
- Modal. The oscillator becomes a tuned resonator, like striking a bell, a marimba bar or a chime. It rings at the played pitch and then decays. Its controls are described in the Modal section further down.
- Granular. The oscillator becomes a cloud of tiny overlapping grains read from a source, either a loaded sample or the oscillator's own wavetable. It is the mode for time-domain texture, evolving pads and broken, scattered sounds. Its controls are described in the Granular section further down.
Only two of these modes read a wavetable: Wavetable, which plays it, and Granular, which scans it for grains. SuperSaw builds its own sawtooth waves, and Karplus-Strong and Modal are physical models, so none of them touch the table. In those three the Wavetable card is greyed out and says "No wavetable in" the mode, rather than leaving you controls that look live but change nothing. The card stays where it is, so the layout does not jump around as you try the modes.
Karplus-Strong, Modal and Granular each replace the second row of knobs with their own controls.
Warp
Warp. A second way to reshape the waveform, on top of the wavetable. Choose a style: Bend reshapes the wave, PWM thins and fattens it, Sync adds a hard edge, Wavefold drives it until it folds over for bright harmonics. Off means no warping.
Amount. How much the chosen warp is applied. Turned down, there is no effect.
Warp reshapes a wavetable, so it belongs to Wavetable mode alone. A SuperSaw builds its own waves and has nothing to warp, which is why Warp is not shown there. SS Mix takes its place as its own shaping control.
Importing your own wavetables
Import in the source picker loads your own audio file (WAV, FLAC or MP3) as the oscillator's wavetable, so you are not limited to the factory set. Two of its buttons make a table, and they read the file in two ways:
- One cycle. Treats the file as one waveform and resamples it to a clean, pitched table. Use this for a single-cycle wave or a short, clear tone when you want a precise custom timbre.
- Scanned. Slices a longer file into many frames laid out in order, so Position scans through the recording as a moving sound. This is the one for vocal phrases, field recordings and other evolving textures: sweep Position, by hand or with an LFO or envelope, to travel through the source.
After import, every wavetable control applies as usual, and the imported table is a normal modulation destination through Position.
The imported audio is saved with the sound. Share a preset or a project and the person who opens it hears exactly what you made, with no need for your original file.
Tuning
These set the pitch of the oscillator.
Octave. Shifts the oscillator up or down in whole octaves. Use it to place the oscillators in different registers.
Semi. Shifts the pitch in semitones, the steps between neighbouring keys.
Tune. A fine pitch offset, smaller than one semitone. A small amount of tune between the oscillators makes the sound thicker.
Degree. OSC2 only. Shifts the pitch in steps of the key set under Perform, rather than in semitones, so the interval changes quality as you move around the keyboard. Set to two steps in C major, OSC2 plays a major third above a C and a minor third above a D. That is the difference between a second oscillator that harmonises what you play and one that transposes it: a fixed semitone offset is right in one chord and wrong in the next, which is why it is normally only usable at octaves and fifths.
Degree adds to Semi rather than replacing it, so an octave of Semi plus two steps of Degree puts OSC2 a third above the octave. With no key set, which is the default, a step is a semitone and the control does nothing Semi does not already do. It cannot be modulated: a step of a scale only means anything as a whole number, so use Semi or Tune when OSC2's pitch should move under a modulator.
Notes you play outside the key are read as the nearest note in it, so OSC2 stays in the key even when your hand does not.
Unison and drift
Unison stacks several copies of the oscillator for a fuller sound.
Unison. How many copies are stacked. One is a single, plain voice. More copies give a wider, thicker sound.
Detune. How far apart in pitch the copies are spread. A little gives gentle thickness, more gives a broad, shimmering sound.
Drift. Each copy slowly wanders in pitch on its own. Drift sets how far it wanders. This keeps the sound alive and stops the copies locking into a fixed pattern.
Drift Rate. How quickly that wandering happens.
Level and placement
Level. The volume of this oscillator in the mix. OSC2 and OSC3 start silent, so you will not hear them until you raise their level, or until OSC2 is used as an FM source described below.
Mute. Beside the tabs, the buttons 1, 2 and 3 mute each oscillator. Click one to silence that oscillator without changing its Level, then click again to bring it back. Because it leaves the Level untouched, it is the quick way to audition one oscillator on its own while you shape it: mute the other two, listen, then unmute. Alt-click a button to isolate that oscillator in a single step, muting the other two at once, and alt-click it again to bring all three back. A muted button changes colour, and the mute is saved with the preset. The buttons stay visible on every tab, so you can silence OSC2 and OSC3 while you are looking at OSC1.
Pan. Places the oscillator to the left or right. The oscillator keeps its loudness as it moves, so a hard-panned oscillator is a little louder in its one channel than a centred one is in each.
Width. How widely the unison copies are spread across the stereo image. More width gives a bigger, more spacious sound.
Curve. Shapes how the unison copies are distributed across the detune range and stereo image. The middle setting spreads the copies evenly. Turn Curve down to pull the copies in toward the centre: the inner voices cluster near the centre pitch and the centre of the stereo image, leaving a strong fundamental with a halo of detune around it. Turn Curve up to push the copies out toward the edges, so voices fan out away from the centre, giving a hollow, swarming sound with no clear fundamental. Centred is the versatile starting point; clustered is the right shape for chord stabs and trance leads that need a present centre; pushed-out suits psy growls and aggressive wavetable scrubs where the spread is the sound.
In SuperSaw mode Curve owns the shape of the classic supersaw stack. A value just above the middle matches the classic character; the default centre is slightly more even, and the extremes give characters the original hardware could not.
SuperSaw splits its character across two controls, the same way the original hardware did. Detune sets how far the stacked saws spread in pitch, from a tight, focused stack to a broad, shimmering wall. SS Mix sets the balance between the centre saw and the detuned side saws: low keeps a strong, present centre pitch, high pushes the side saws forward for the hollow, wide chorus. The saws are band-limited, so the stack stays smooth and clean as you play up the keyboard instead of turning harsh and gritty in the high register.
Choosing SuperSaw sets up a ready-made stack at once: it raises Unison and Detune to a classic seven-saw spread, so you hear the wide sound straight away without dialling it in. Adjust Unison, Detune and SS Mix from there to taste. Loading a preset never triggers this, so a preset's own settings are kept.
FM
FM, frequency modulation, uses one oscillator to modulate another. It produces metallic and bell-like tones that the oscillators cannot make on their own.
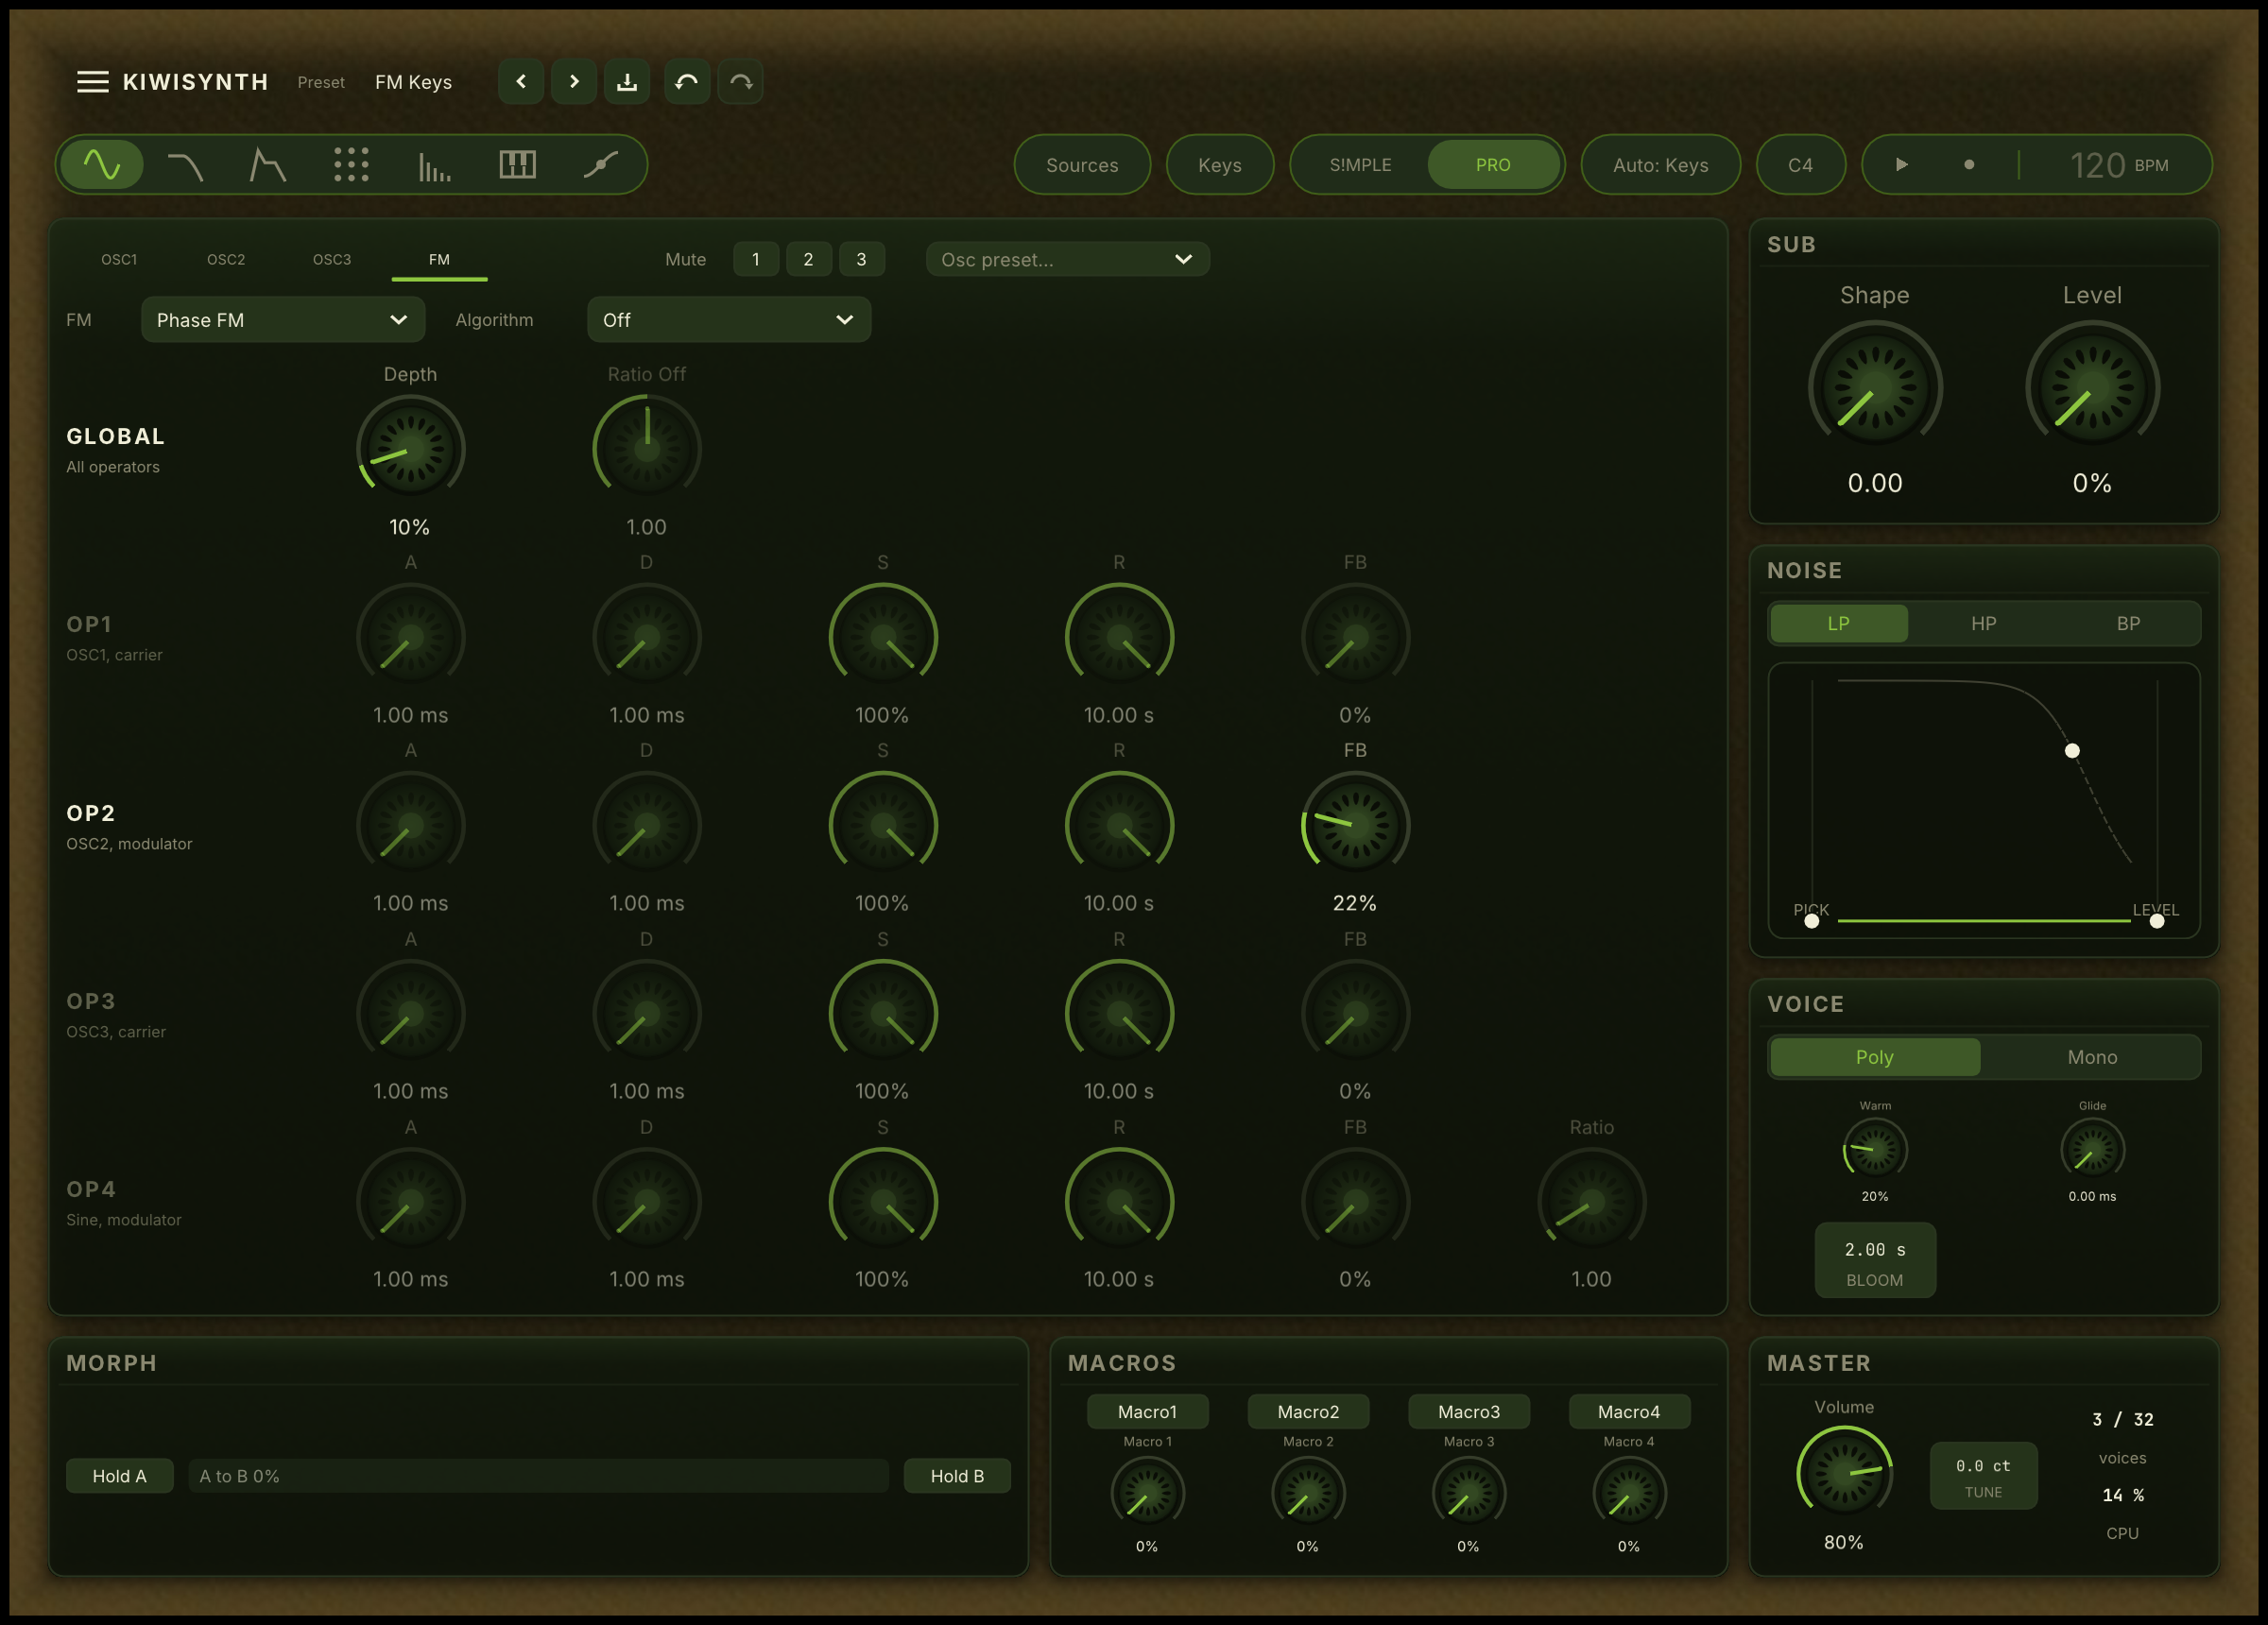
The FM controls have their own tab, next to OSC1, OSC2 and OSC3. FM is not an oscillator mode: it is a layer on top of the three oscillators, which become its operators, so it keeps whatever modes and waveforms you have already set. That is also why the operators have no pitch controls of their own. OP1, OP2 and OP3 take their pitch from the Tune, Octave and Semi knobs on their own oscillator tabs. Only OP4, which has no oscillator of its own, carries a Ratio.
The page greys out whatever the current setting ignores, and the control's tip says why, so a control you can turn is a control that does something.
FM. Off, or Phase FM to switch FM on.
Algorithm. How the operators are wired, described below.
The Global row acts on all operators:
Depth. How strongly a modulator shapes its carrier. More depth gives a more extreme, more metallic result.
Ratio Off. A small global detune of the modulators against the carriers. Just off 1.00 the modulators beat slowly against the carriers for a living, shimmering drift. At 1.00 it is off.
When FM is on, a modulator is heard through its carrier even if its own level is down.
Algorithm
An operator is an oscillator acting as a carrier (heard directly) or a modulator (heard only through the carrier it shapes). There are four, each with its own row and a caption that names its oscillator and its role: OP1 is OSC1, OP2 is OSC2, OP3 is OSC3, and OP4 is an extra pure-sine modulator with its own ratio and feedback.
Off and Two Op Stack. The classic pair: OSC2 modulates OSC1. OSC3 plays on its own.
Dual Pair. Two modulator and carrier pairs played together: OSC2 modulates OSC1, and the OP4 sine modulates OSC3. The two carriers are summed. This is the bell and carillon sound, where two independently moving pairs give a rich, inharmonic ring.
Stack Of 3. A three-deep chain: OP4 modulates OSC2, which then modulates OSC1. Deeper, more complex spectra from a single carrier.
Dual To One. Both OSC2 and the OP4 sine modulate OSC1 together. OSC3 plays on its own.
Operator rows
A, D, S, R. Each operator's own attack, decay, sustain and release. For a modulator the envelope shapes the modulation amount over time, so a fast decay gives the bright metallic strike of a bell that quickly settles into a purer tone. For a carrier it shapes that carrier's own level, so one carrier can ring long while another fades fast. By default every operator envelope holds a steady full level, so the FM behaves as if the envelopes were not there until you shape one.
FB. Feedback: the operator also modulates itself, adding a rougher, brighter edge. A little feedback on the top modulator gives a noisy strike at the attack.
Ratio. OP4 only. The pitch of the OP4 sine relative to its carrier. Whole numbers stay harmonic; in-between values like 3.5 or 7.02 give the inharmonic, clangourous partials that make convincing bells.
Karplus-Strong controls
When an oscillator is in Karplus-Strong mode it models a plucked string.
Damp. How quickly the string loses energy and the note dies away. Less damping rings longer.
Bright. How bright or dark the string sounds.
Pick. Where along the string it is plucked. Plucking near the end gives a thinner, sharper tone; nearer the middle gives a rounder one.
Stretch. How much the decay differs between low and high notes, so the string behaves more or less evenly across the keyboard.
Direction. The direction of the pluck, Down or Up. A subtle change to the attack.
Modal controls
When an oscillator is in Modal mode it becomes a tuned partial-bank, a physical model of an idiophone, the family that includes bells, marimbas, glockenspiels and tubular chimes. Striking the keyboard excites six tuned partials that ring and decay together.
Damp. How quickly the partials die away. Turned down, the note rings for a couple of seconds; turned up, it taps and is gone. Lower partials always sustain longer than higher ones, which is how real bells and bars behave.
Inharm. Inharmonicity: where the partials sit relative to the played pitch. Turned down, the partials are pure harmonics, giving a rod-like, near-tonal sound that still has a struck character. Turned up, they follow the stretched series of a tubular bell, with that characteristic shimmering, slightly-out-of-tune bell tone.
Position. Where on the imaginary bar or bell the strike lands. Strikes at either end excite every partial brightly. Strikes in the middle sit on the nodes of even partials and kill them, leaving a warmer, hollower tone.
Two of these three keep working after the note has started, and one does not. Damp and Inharm describe the ringing material, so modulating them changes the sound while you hold the key: a rising Inharm pulls the partials away from the played pitch as the note sounds, which is the sound of metal being bent rather than metal that was already bent when you struck it. Route a mod envelope or an MSEG to Inharm and that bend becomes the gesture of the patch.
Position is different. It describes where the strike landed, and the strike has already happened, so modulating it does nothing until the next note. There is no physical sense in which you move the hammer after the bell has been hit. Set it before you play, not while you play.
Modal mode is mono and ignores Width, Unison and Detune. Like a string, the resonator is a one-dimensional object.
Granular controls
When an oscillator is in Granular mode it stops playing a continuous waveform and instead sprays a cloud of short, overlapping grains. Each grain is a tiny windowed snippet read from a source. Play a note and the cloud tracks the keyboard pitch, the same way a sampler would.
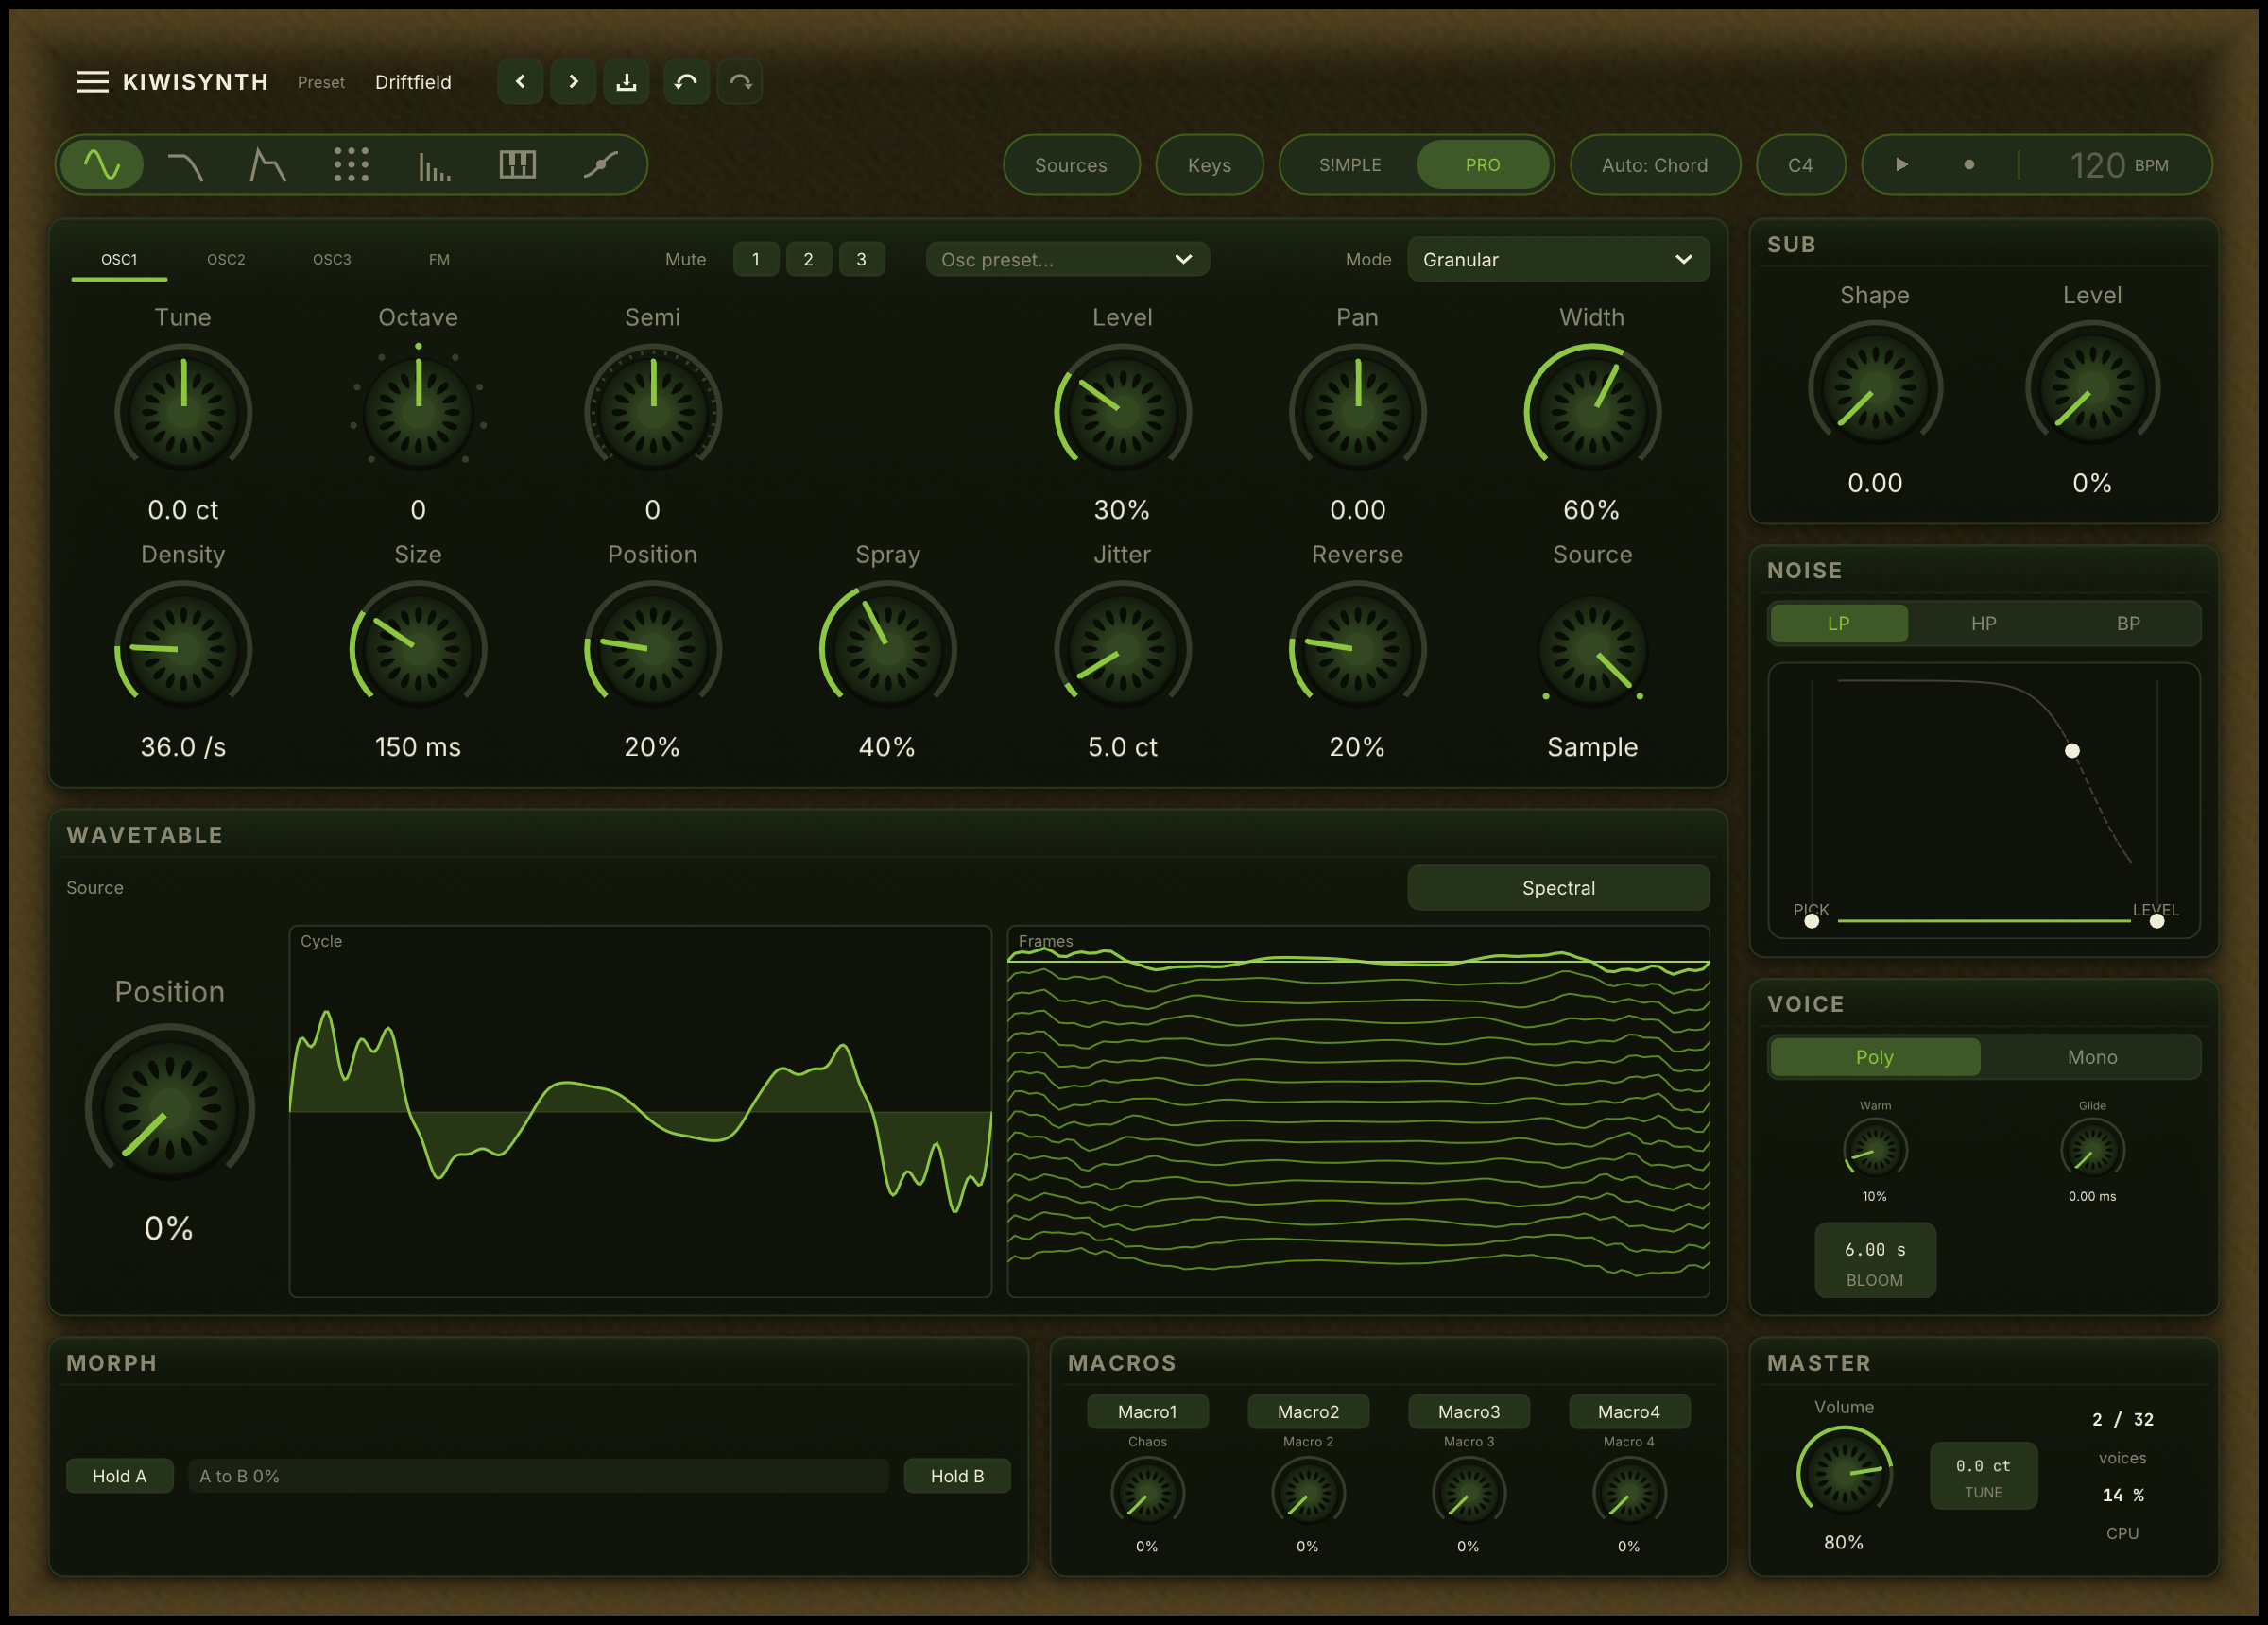
There are two ways to get a grain cloud, and they answer different questions. Granular mode here makes a sound, out of a wavetable or a loaded clip, and it costs an oscillator slot. Texture on the Effects page takes the sound you already have and sprays grains of it back over itself, so the cloud carries the patch's own filter sweep and movement. Reach for Granular when the grains are the instrument, and for Texture when you want to smear a patch you have already built.
Source. Where the grains read from. Wavetable scans across the oscillator's own wavetable, turning a static table into evolving texture. Sample reads from a loaded audio clip (see Sample sources below). With no sample loaded, Sample falls back to the wavetable scan so the slot always makes sound.
Density. How many grains are spawned each second. Low densities are sparse and rhythmic, with audible gaps between grains. High densities pack the grains into a continuous, smooth cloud. This is the main control for how thick the texture feels.
Size. How long each grain lasts. Short grains buzz and sound granular and broken; long grains are smooth and tonal because each one carries more of the source waveform. Size and Density together set how much the grains overlap.
Position. The point in the source the grains read from. Sweep it slowly, by hand or with a slow LFO, to drift through the source material for a continuously evolving pad.
Spray. Random scatter applied to each grain. It jitters both the read position and the stereo placement, so higher values spread the cloud wider and make it looser and less repetitive.
Jitter. Per-grain random detune in cents. A few cents adds gentle shimmer and chorus-like thickness; large values pull the cloud into chaotic, dissonant territory.
Reverse. The chance that any given grain plays backwards. A little adds a sucking, blurred quality; turned all the way up, every grain reverses.
Granular mode is its own time-domain process and ignores Unison, Detune and FM. When Density and Size are pushed very high the engine caps the number of simultaneous grains and reuses the oldest, so the cloud stays smooth and never runs away.
Sample sources
A Granular oscillator set to the Sample source reads from an audio clip loaded into that slot. The factory clips (a struck metal tone, a breath noise bed and a vinyl-crackle texture) are built in and ready to granulate. This is also the path that brings your own recorded audio into the synth: a granular cloud over a sampled voice, field recording or drum loop is a different starting point from a wavetable, and it is what lets Kiwisynth granulate both a resynthesized wavetable and a real recording in the same patch.
Sample. The third Import button in the source picker loads your own audio file (WAV, FLAC or MP3) as the granular sample for the current oscillator. Importing switches that oscillator to Granular mode with the Sample source selected, so you hear the grain cloud at once. Stereo files are summed to mono and the clip is capped at about 30 seconds. The imported audio is saved with the sound, so a shared preset keeps its sample.
Layering with three oscillators
With three oscillators you can build patches that need three independent voices breathing inside one note:
- Chord-octave stacks for keys and pads. Set OSC1 to the root, OSC2 to +12 semitones, OSC3 to +19 (a fifth above the octave) and route ModEnv2 to OSC3 Level so the top voice rises in after the chord. The result is the breathing-octave feel of a Rhodes chord or drawbar organ.
- Pluck = transient + body + ring. Use OSC1 in Wavetable for the body, OSC2 in Karplus-Strong for the ring, OSC3 in Modal for the bell-like attack transient (high damping, low position).
- Pad layer-cake. OSC1 for the analog body, OSC2 for a vowel/formant mid layer, OSC3 in Modal with high inharmonicity for the slowly-evolving bell-like top.
- Bass = sub + body + grit. Sub oscillator for the fundamental, OSC1 for the mid-body saw stack, OSC3 with low damping and high inharmonicity for the formant-grit top.
Each oscillator's amplitude can be shaped independently by routing one of the mod envelopes to its Level. See the Modulation page for the pattern that routes a mod envelope to an oscillator's Level.
Sub
The sub oscillator adds weight below the main oscillators. It plays an octave below OSC1 and follows OSC1's Octave, Semitone and Tune, so transposing OSC1 takes the sub with it.
Shape. Morphs the sub between a pure, smooth sine and a fuller square.
Level. The volume of the sub in the mix. Raise it for more low end.
Noise
The noise source adds an unpitched layer: air, breath, or the noisy part of an attack.
The noise is a picture rather than a row of knobs. Frequency runs from left to right across it, loudness from bottom to top, and a dashed line shows the shape the noise filter keeps even while the noise is turned all the way down, so you can see where it sits before you bring it in. Drag any of the three grips, or right-click one to type the value.
LP, HP, BP. Noise has its own simple filter. This picks whether it keeps the low part of the noise, the high part, or a band in the middle. The dashed shape follows your choice.
Cutoff. The grip on the dashed shape. Drag it left and right for where the noise filter acts, which is what makes the noise dark and rumbling or thin and airy.
Level. The column on the right. Drag it up for more noise in the mix. The band fills in as you raise it, so you see how much of the sound is noise.
Pick Attack. The column on the left. It adds a short burst of noise at the start of each note, like the click of a pluck or a key. Turned down there is no burst. Turned up the note starts with an audible strike before it settles into whatever the oscillators are doing. It is separate from the noise level, so a patch can have a sharp attack and no noise afterwards.
Voice
These controls sit with the oscillators because they affect the raw voice.
Poly, Mono. Poly lets several notes sound at once, for chords. Mono allows only one note at a time, the usual choice for basses and solo lines.
Warm. Warmth: a gentle saturation added before the filter. It thickens the tone and adds harmonic richness. It is always slightly present, and is part of the Kiwisynth character. It is peak-preserving, so heavy settings add tube-like grit without making the patch noticeably louder than a clean note.
Glide. When raised above its lowest setting, the pitch slides from one note to the next instead of jumping. Also called portamento.
Note Bloom Rate. While a note is held, its tone fills out, gaining harmonic richness. This happens on every preset, and short notes never reach it: the rise starts the instant the note does and climbs steadily, so a stab is over before it gets anywhere while a held note keeps opening. That difference between a stab and a held note is the whole point of the control.
Note Bloom Rate is the field marked Bloom, below Warm and Glide. It reads in seconds: drag it, hold Shift while you drag for single steps, or double-click to type a time.
It sets how long a held note takes to reach its full bloom. Turned down, the sound has filled out almost as soon as you play it. Turned up, it keeps opening across a long sustain, and at the top of the range it opens so gradually that most of the change lands after you have let go. The default is short, because the bloom is part of the Kiwisynth character and has to arrive while the note is still sounding. The same timing drives the Bloom modulation source described on the Modulation page.