Modulation
Modulation is movement: a filter that opens while you hold a note, a pitch that drifts, a level that follows the mod wheel. Kiwisynth adds modulation at the knob you want to move.
Adding a modulation
Every modulatable knob carries a thin ring; hover one with nothing on it yet and the ring shows as a faint outline inviting you in. Click the ring, or right-click the knob, and a movement editor opens right on the knob. It is the single place to shape a control's movement: the curve it draws over a note, and every source routed into it.
Under "Add movement" is a list of intents:
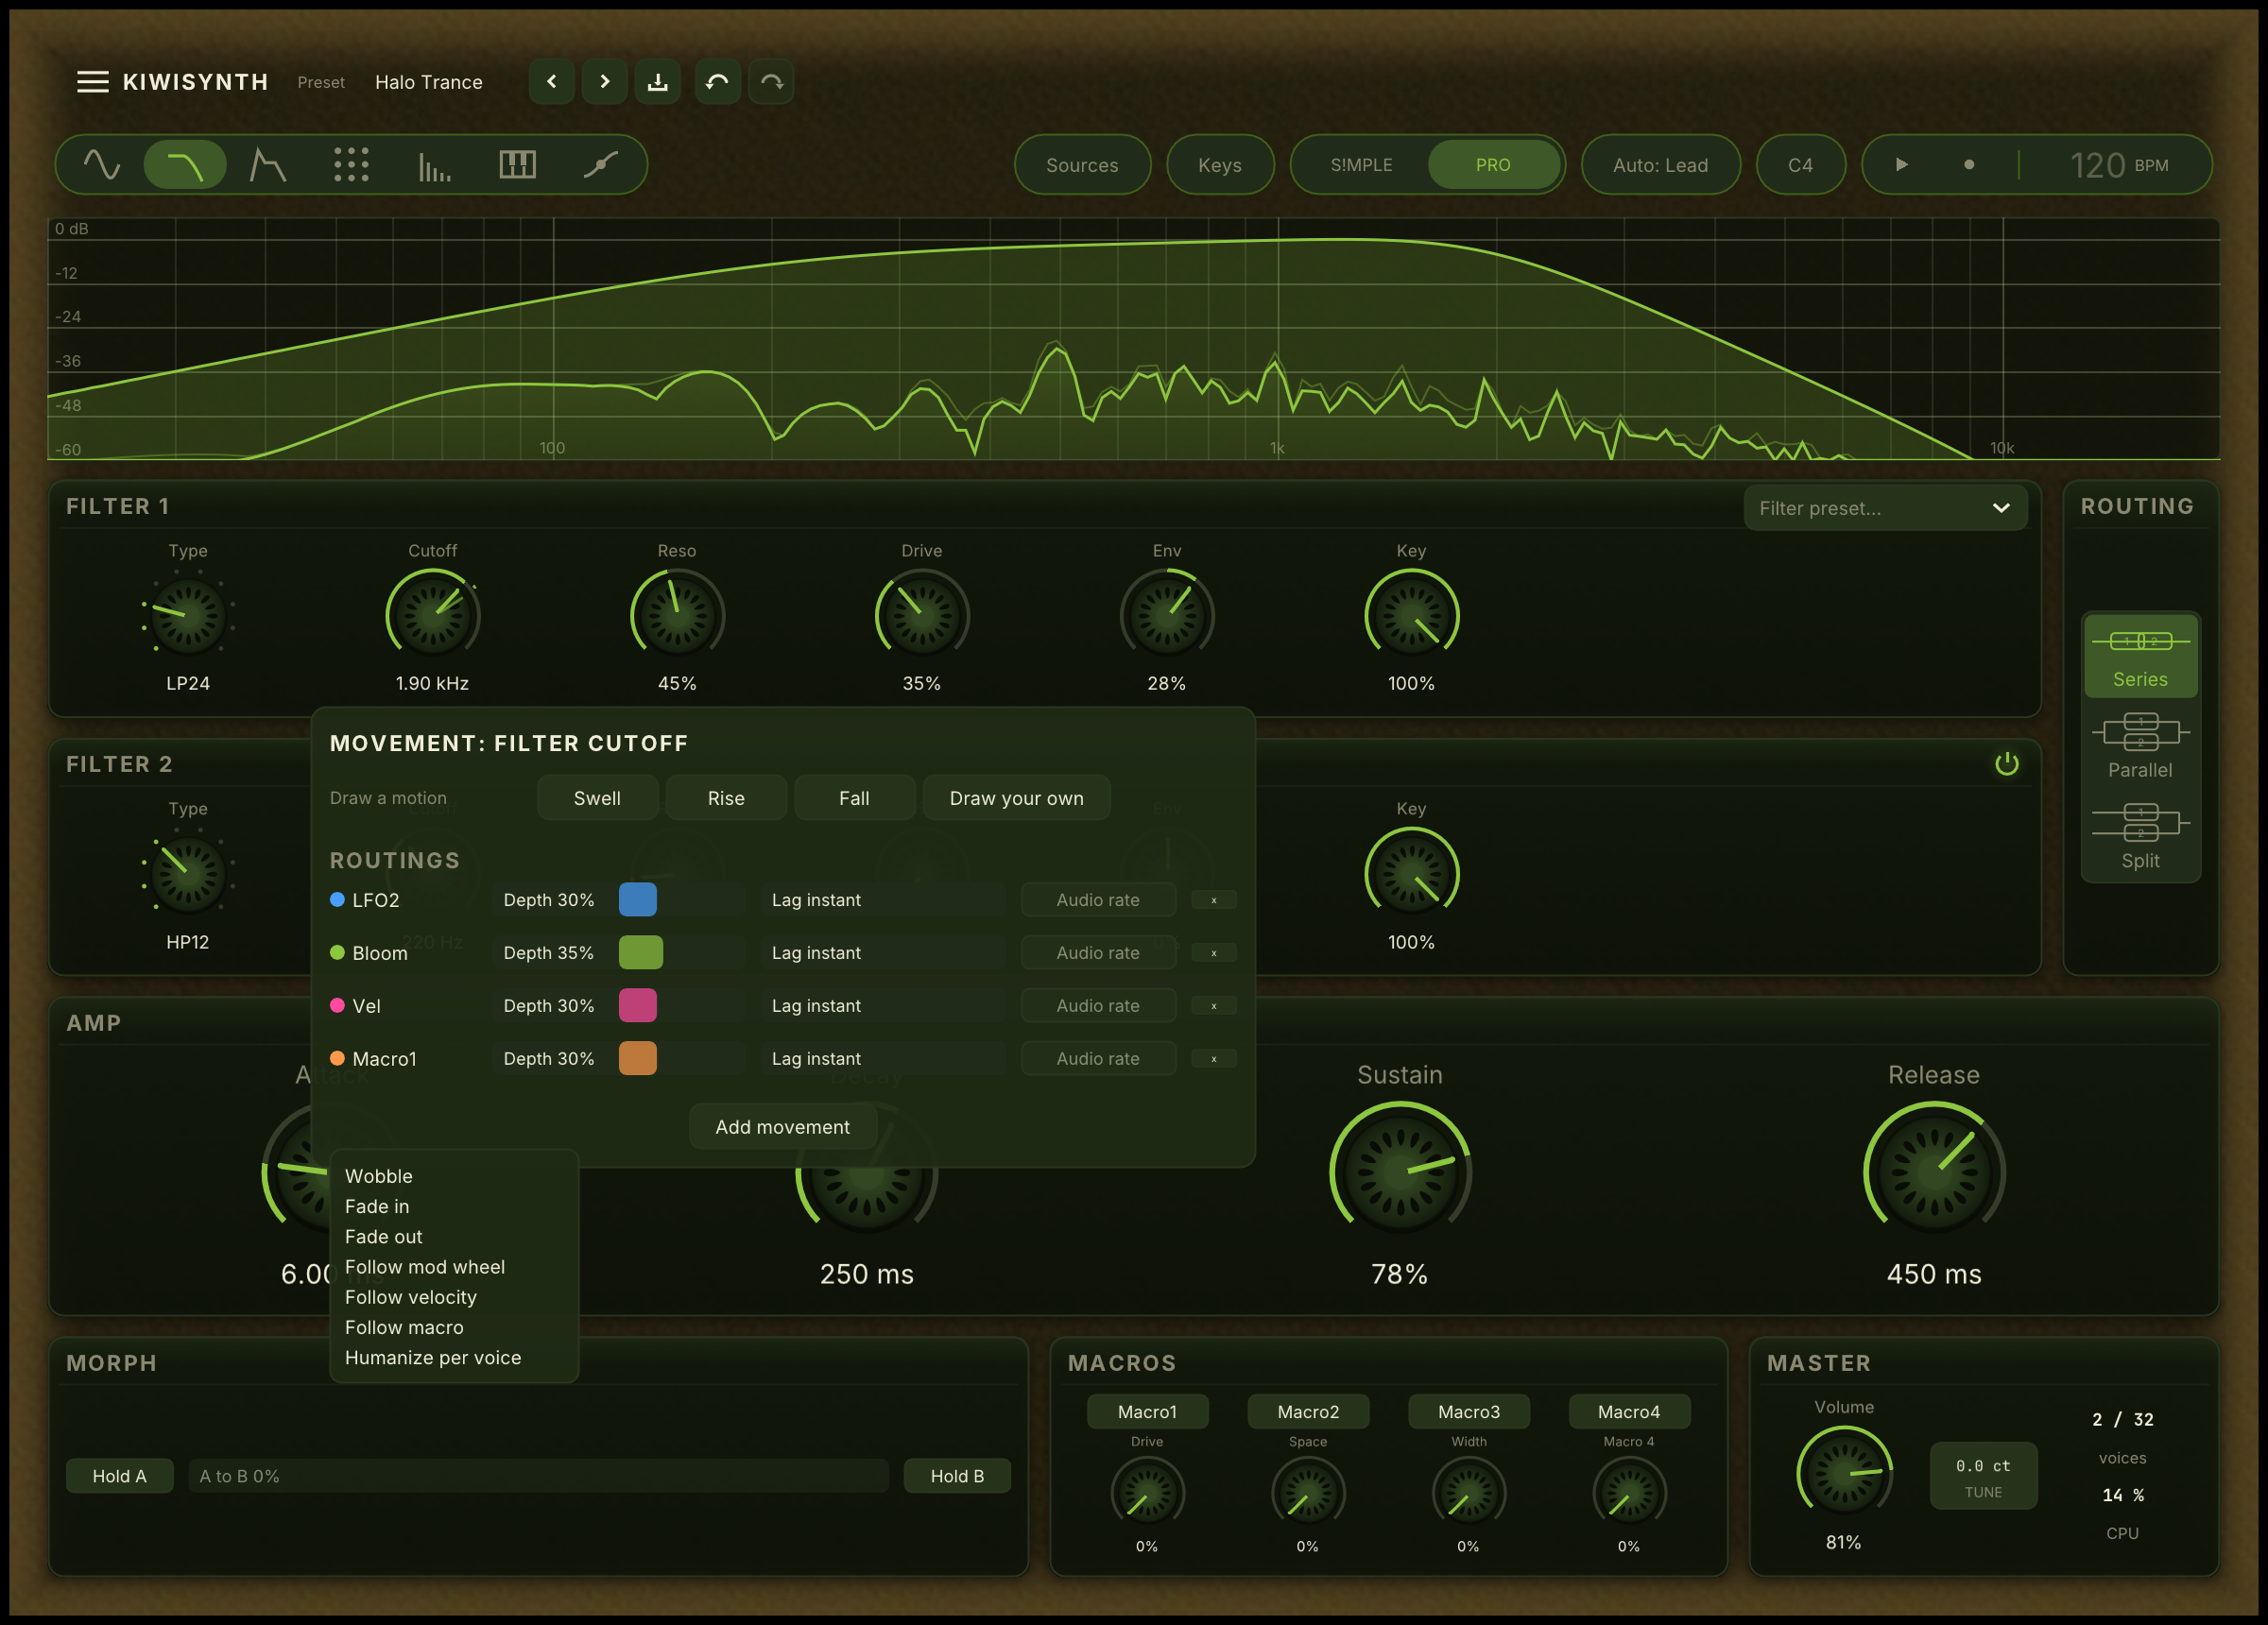
| Intent | What it does | Typical use |
|---|---|---|
| Wobble | A looping LFO | Drift, vibrato, tremolo, rhythmic motion |
| Fade in | An envelope that raises the value after the note starts | Swells, a filter opening on attack |
| Fade out | An envelope that lowers the value after the note starts | Plucks, brightness decaying as a note holds |
| Follow mod wheel | The value tracks the mod wheel | Hands-on performance control |
| Follow velocity | The value scales with how hard you play | Dynamics and accent |
| Follow macro | The value tracks a macro knob | One macro morphing many knobs at once |
| Humanize (per-voice) | A fixed random offset, new on every note | Analog-style spread across stacked voices |
An oscillator's Tune knob offers two more, below a separator, because the shape they use only makes sense on pitch:
| Intent | What it does | Typical use |
|---|---|---|
| Pitch slide up | The pitch starts below the knob's setting and settles to it | A note bending into tune, as a string or a voice does |
| Pitch slide down | The pitch starts above the setting and settles down to it | A falling attack, and the drop at the front of a synth tom |
Choose one and the modulation is created at once. Each intent inspects the knob you clicked and picks musical defaults, so the same intent suits its target: a wobble on wavetable position is a slow drift, the same wobble on pitch is a narrow vibrato.
Choosing the source yourself
The intents pick a source for you. To pick it yourself, drag the source onto the knob. The LFO section and the envelope section each show a small handle labelled with the source name. Drag a handle onto a knob to create a modulation from that source. It starts at a moderate depth, ready to edit in the knob's movement editor like any other modulation.
Use this to point a particular LFO or envelope at a knob, rather than letting an intent claim whichever one is free. The LFOs, the modulation envelopes, the MSEGs and the four macros carry drag handles in their own sections.
Sources. The button in the top bar opens a tray holding every source the instrument has, grouped by what they follow: the LFOs, the envelopes, the macros, what your hands do at the keyboard, the random sources, and what the notes themselves add up to. The tray stays open across every page, so a handle is always in reach of whatever knob you want to move. This is where to find the sources that have no section of their own, like velocity, the mod wheel, aftertouch, pressure and slide from an MPE controller, keytrack, and the per voice randoms.
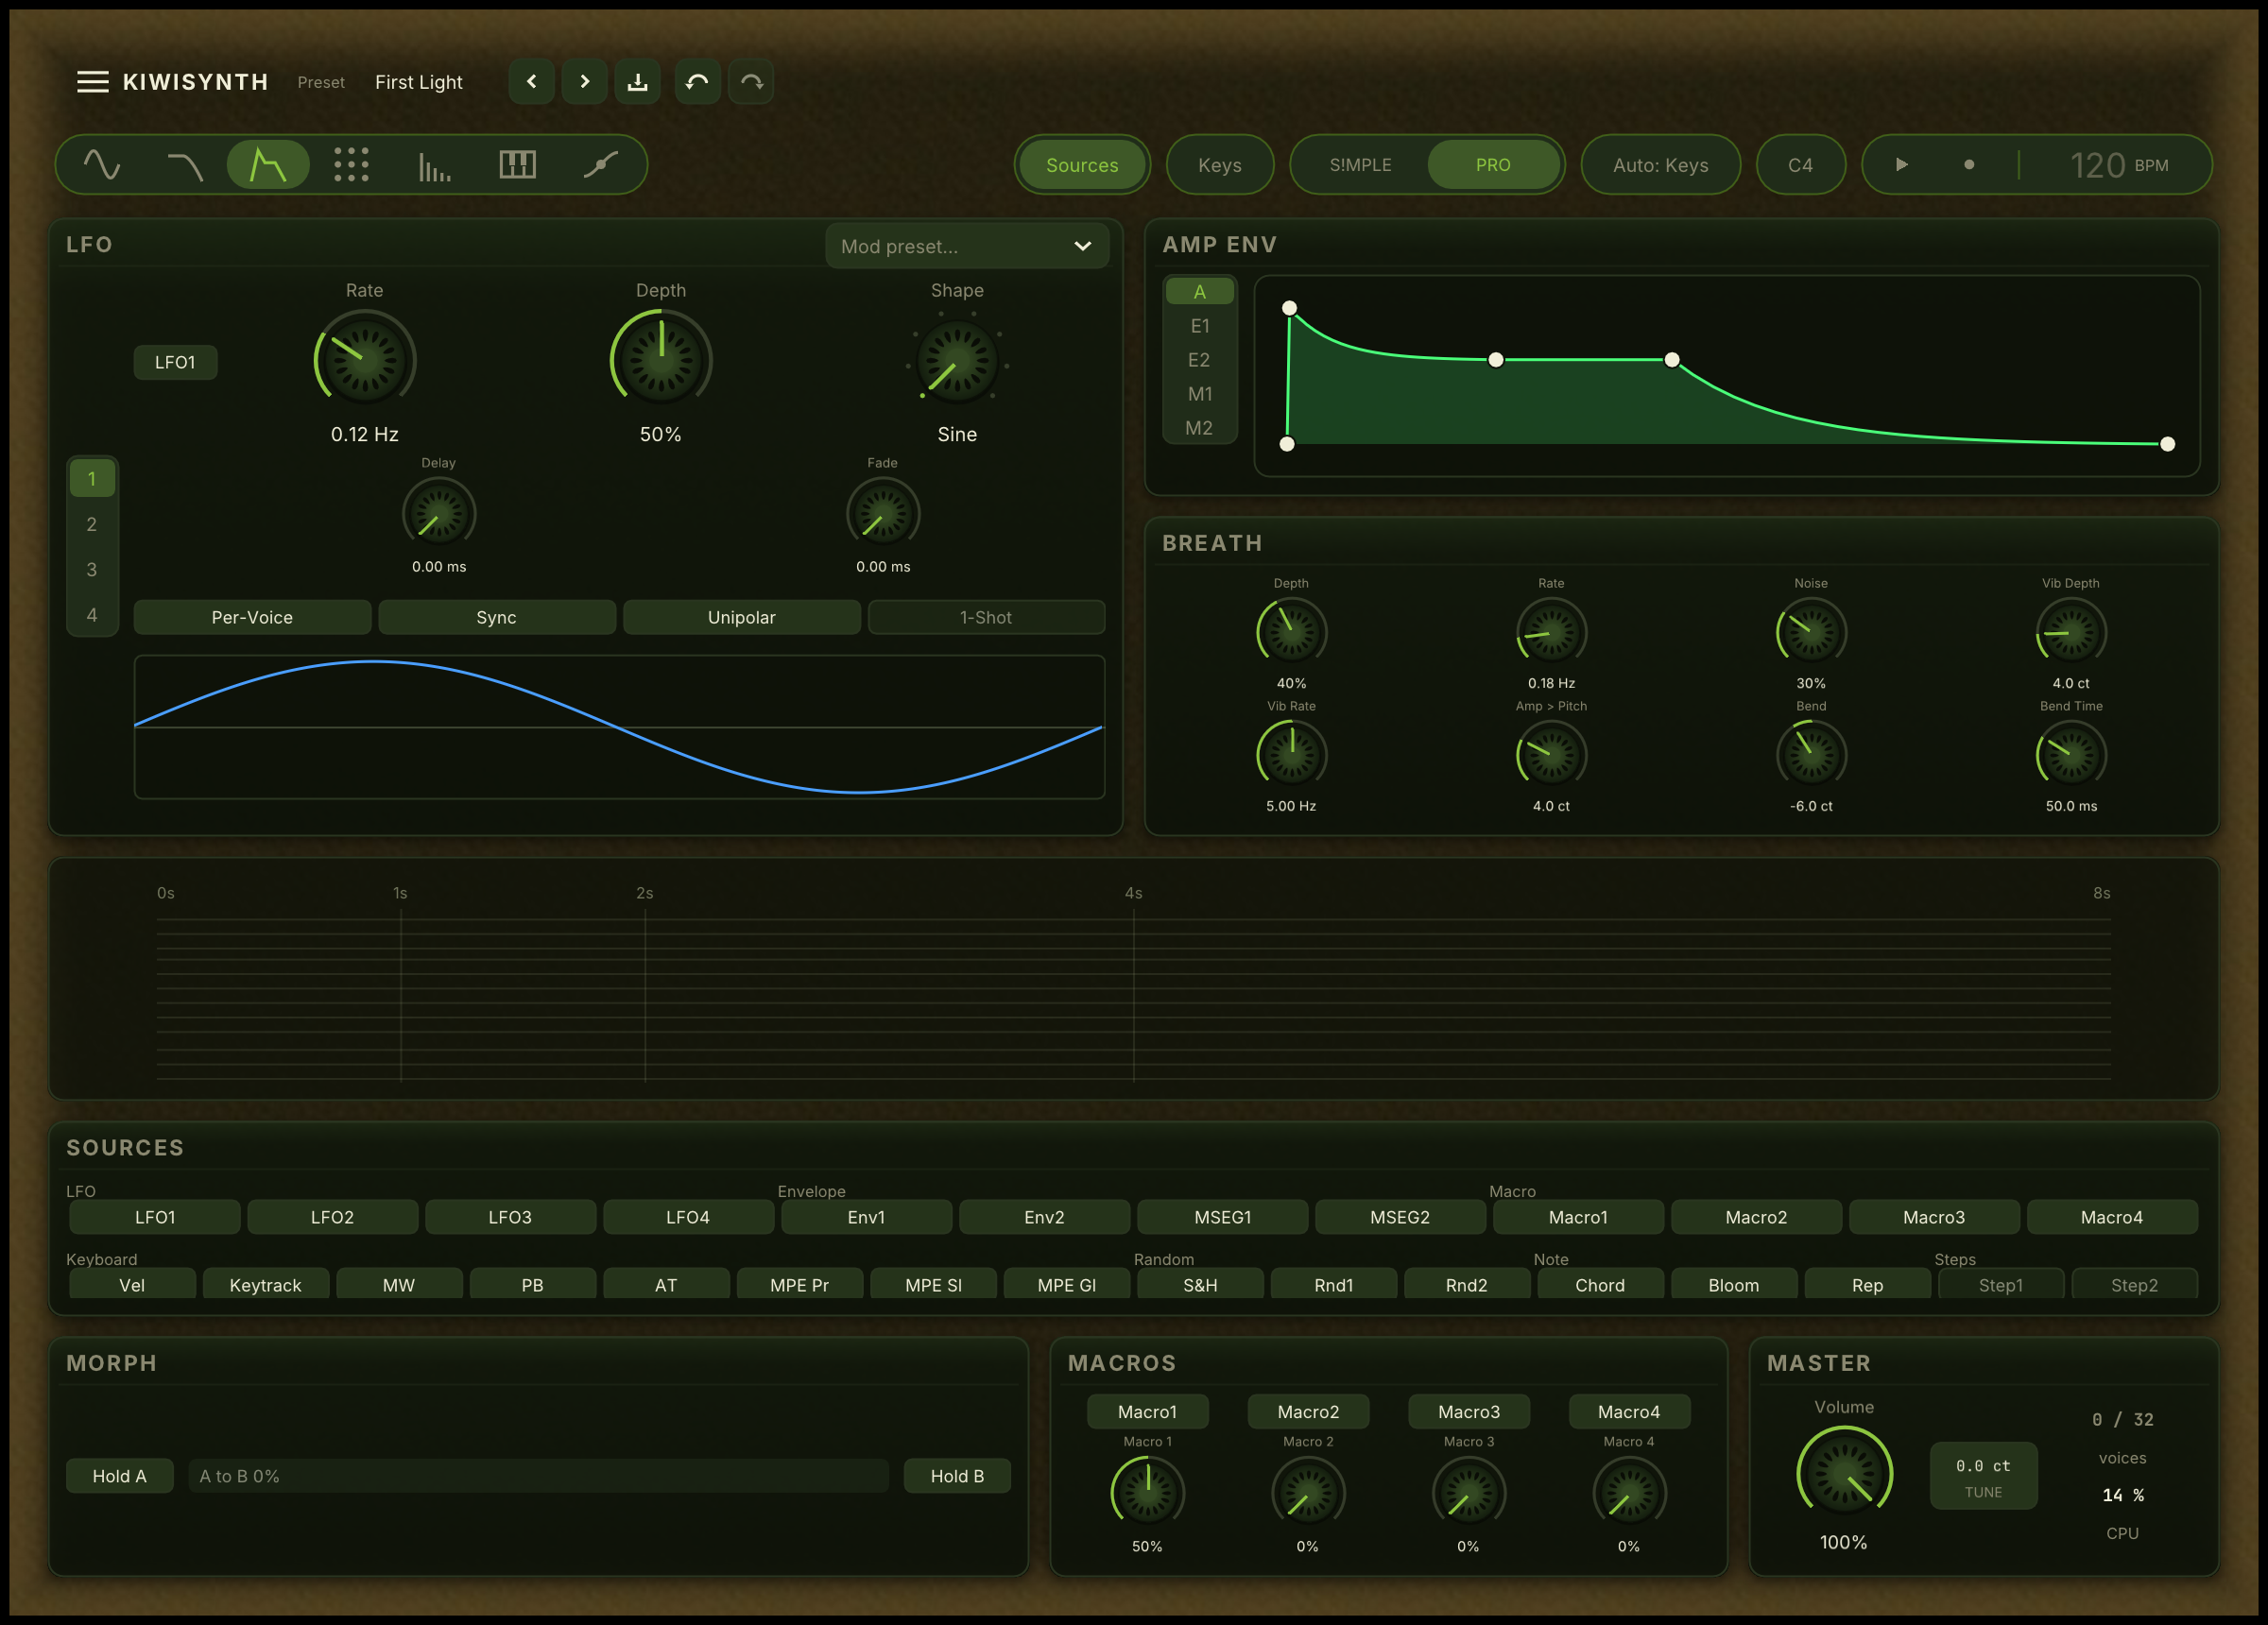
The step sequencers appear in the tray greyed out. They can only arrive with a preset for now, because there is no editor for their rows of steps, and a sequence of nothing would move nothing.
A handle can be dropped on any knob, including the knobs of the LFOs and envelopes themselves. Dropping a source onto an LFO's rate or an envelope's time makes one movement shape another.
Make a wobble grow or narrow
An LFO's Depth is itself a knob, so anything can be routed to it. That is how a repeating movement is given a shape in time instead of running at one strength for the whole note.
To make a vibrato or a wobble narrow as the note rings, which is what a struck or plucked sound does:
- Set the LFO's Mode to Per-Voice, so each note gets its own copy.
- Turn the LFO's own Depth down to zero. The envelope will supply it.
- Drag Mod Env 1 onto the LFO's Depth knob and set a depth around 0.6.
- Give Mod Env 1 a near-zero attack, a decay of half a second or so, and a sustain of zero.
The envelope jumps to full at note-on and falls to nothing, so the wobble is at its widest the instant the note speaks and has faded out by the time it settles. Reverse it, with a slow attack and a full sustain, and the wobble arrives instead of leaving.
To make a vibrato simply arrive without an envelope, use the LFO's own Delay and Fade controls, described in LFOs. That costs no modulation envelope and is the usual choice for a lead.
One requirement is easy to miss. Routing anything to an LFO's Depth only reaches that LFO when it is in Per-Voice mode. A Global LFO is shared by the whole instrument and its depth is read once for all notes, before any note exists, so a per-note source cannot reach it. If a depth envelope seems to do nothing, check the LFO's Mode first.
Macros
The four macro knobs sit in the strip along the bottom of the window, so they stay in reach on every page. A macro is a knob with no fixed job: you decide what it does by routing it.
Drag a macro's handle onto any knob to assign it, the same way you assign an LFO. Route one macro to several knobs at once and a single turn moves them all together, each by its own depth. This is how you build a one-knob morph: a "brightness" knob that opens the filter and lifts the wavetable position, or an "intensity" knob that drives reverb, drive and detune as one.
Macros are global, so one value drives every note. They also appear to your DAW as automatable controls, so a macro morph can be drawn into an arrangement or mapped to a hardware knob. Routings you make show up in the modulation overview grouped under the macro, so you can see everything a macro drives in one place.
A preset can name its macros. When a macro has a job, give it a name that says what it does, and the knob shows that name instead of the plain "Macro 1". Many factory presets are already named this way: load Reese Bass and the first macro reads "Movement", load a pad and you find "Brightness" and "Space". The name travels with the preset, so a player who has never opened the patch can still read the knob. The name is also sent to your DAW, so a host that re-reads parameter titles shows "Brightness" on the automation lane too. Some hosts cache the old title until you reopen the plugin, so the knob inside the synth is always the reliable place to read the current name.
Editing a modulation
Click the knob's ring again, or right-click it, to reopen the editor on that knob. Each modulation on the knob has these controls.
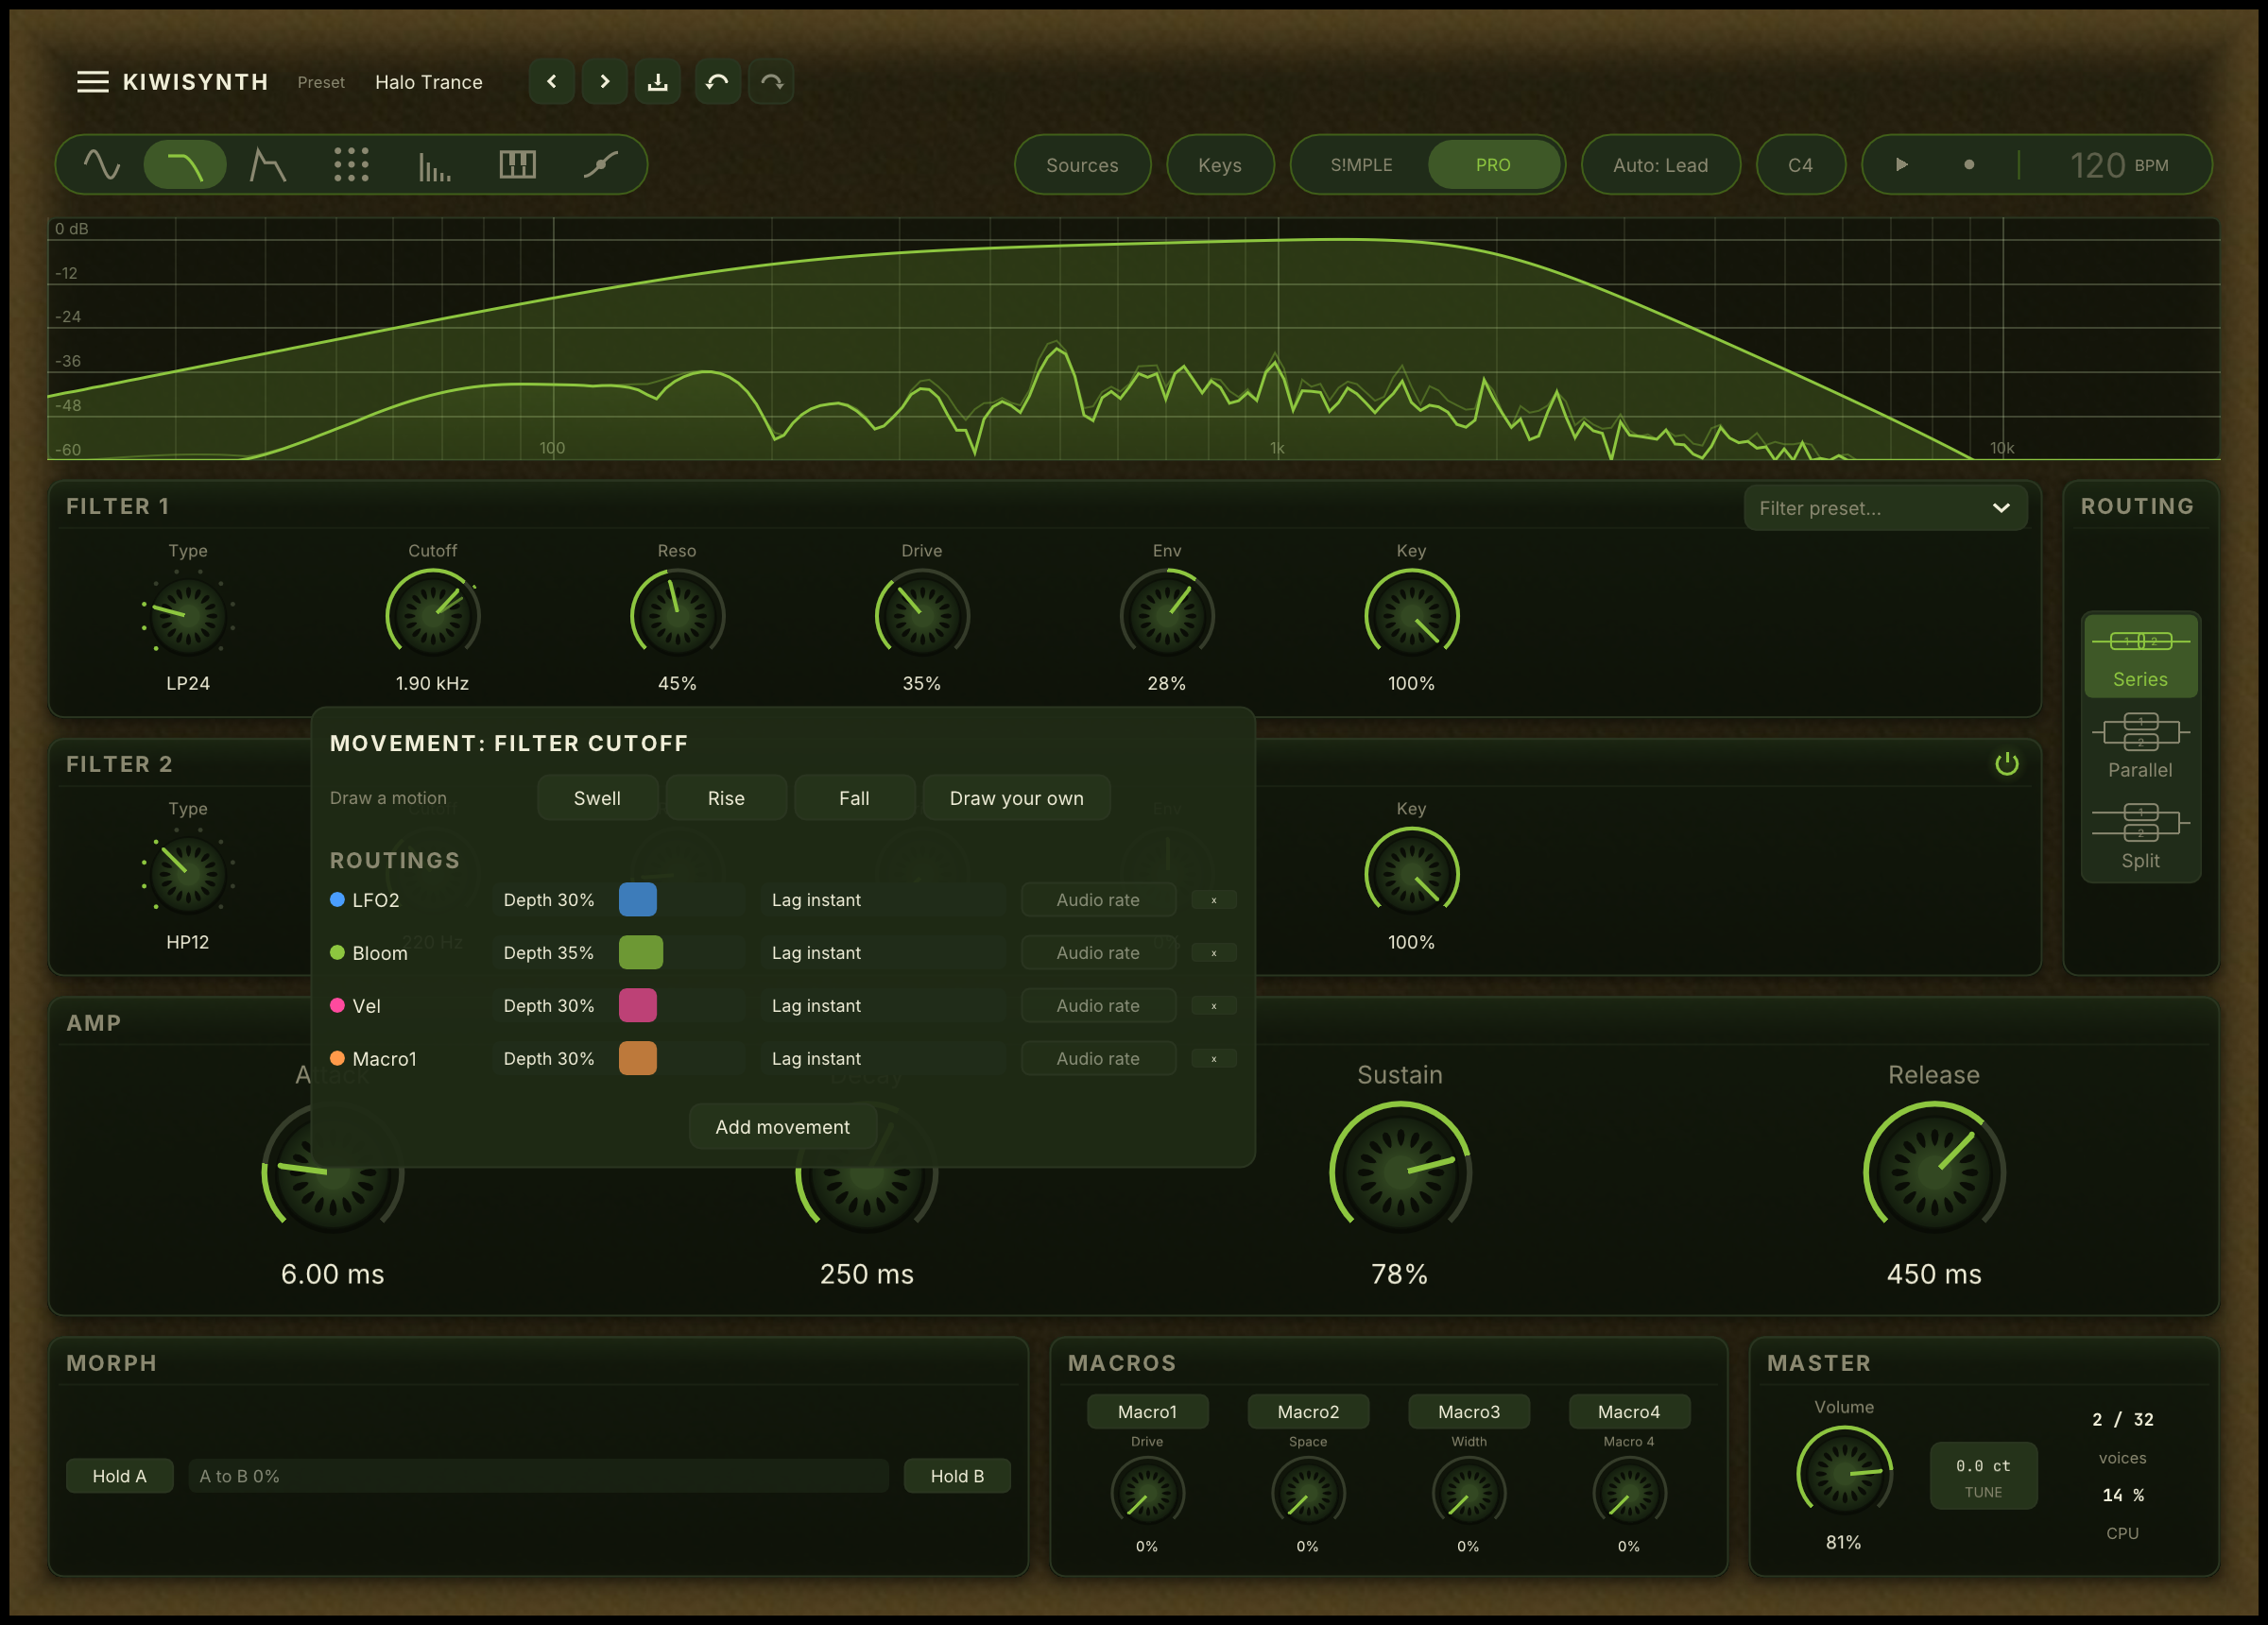
Depth. The amount of movement, from minus one to plus one. Positive and negative depths move the value in opposite directions. Double-click the slider to return it to center, which is no movement. On pitch, depth means the same number of cents everywhere: a depth of 0.25 bends 50 cents on any oscillator's Tune and on Master Tune alike, so one source routed to several of them keeps them in tune with each other.
Smoothing. A lag applied to this one modulation, measured in milliseconds. At zero the modulation follows its source exactly. Raising it slews the movement, which softens stepped and random sources into gliding motion. Double-click for zero.
Audio rate. A toggle that updates this modulation once per sample instead of once every 64 samples. At that control rate a source moving faster than a few tens of hertz is too coarse to be heard cleanly; at audio rate it is fast enough to reshape the tone itself. Push an LFO up into the audible range and route it to FM depth and you get FM sidebands; route it to oscillator pitch and you get a metallic, ring-modulated edge rather than plain vibrato. The toggle is only available where it does something: the source must be an LFO, and the target must be FM depth or oscillator 1 / 2 tune. On any other pairing it stays greyed out. Smoothing is ignored while audio rate is on, since a per-block lag would defeat the point. It costs a little more CPU per routing, so reach for it where the fast movement is the sound, not for ordinary slow modulation.
Remove. Deletes the modulation from the knob.
A knob can hold several modulations. Their effects add together.
Reading a modulated knob
A knob with modulation shows a colored ring around it. The ring marks the range the value travels under modulation. A dot moves along the ring at the live value while notes sound, so the modulation is visible as it happens.
The ring color tells you the source family at a glance:
| Color | Source |
|---|---|
| Blue | LFOs |
| Green | Envelopes |
| Orange | Macros |
| Purple | Sample and Hold |
| Pink | Performance controls and MPE |
The modulation overview
The Matrix page shows the patch as a grid of source cards, one card per modulation source in use.
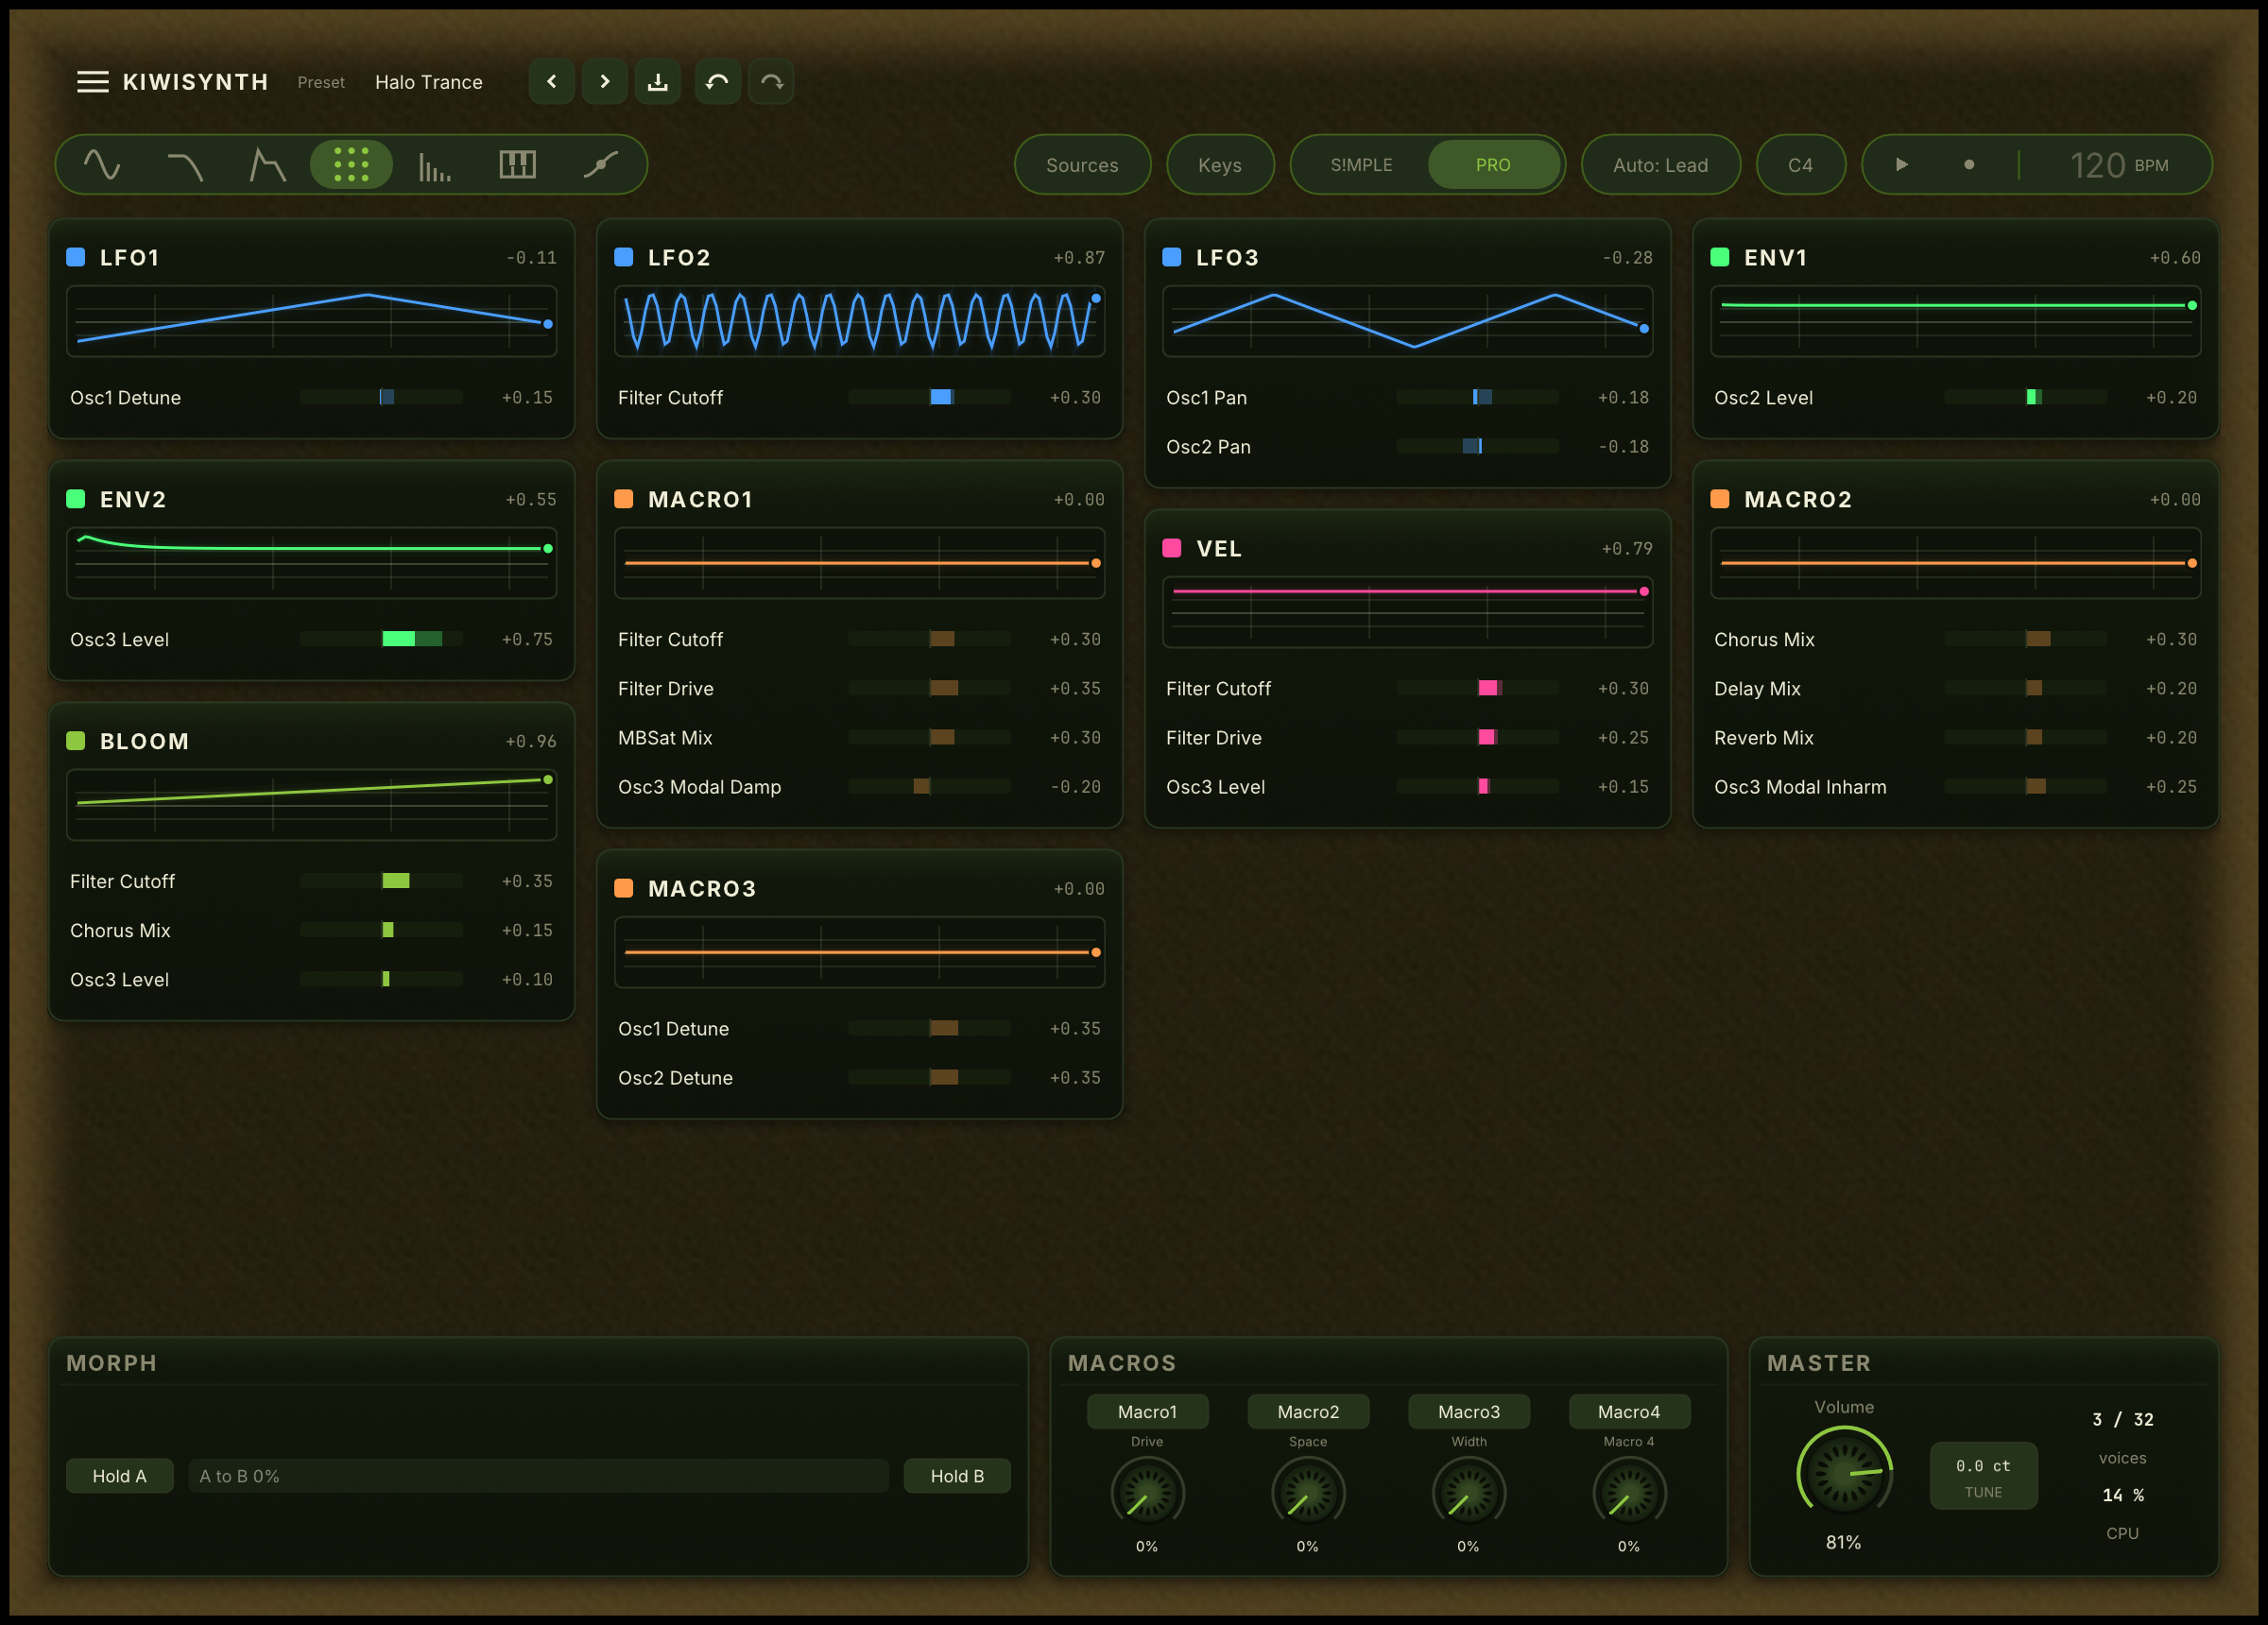
Each card carries:
- a live trace, a small scrolling display of what the source is doing right now;
- a row for every destination the source drives, each with the target name and a bar. The faint part of the bar is the depth you set; the bright part is the movement happening at this instant.
The view is read-only. Click any destination row to jump to the knob it modulates; that knob flashes briefly so it is easy to find.
The modulation timeline
The Modulation page carries a strip across the bottom that draws every modulator over the lifetime of the last note you played.
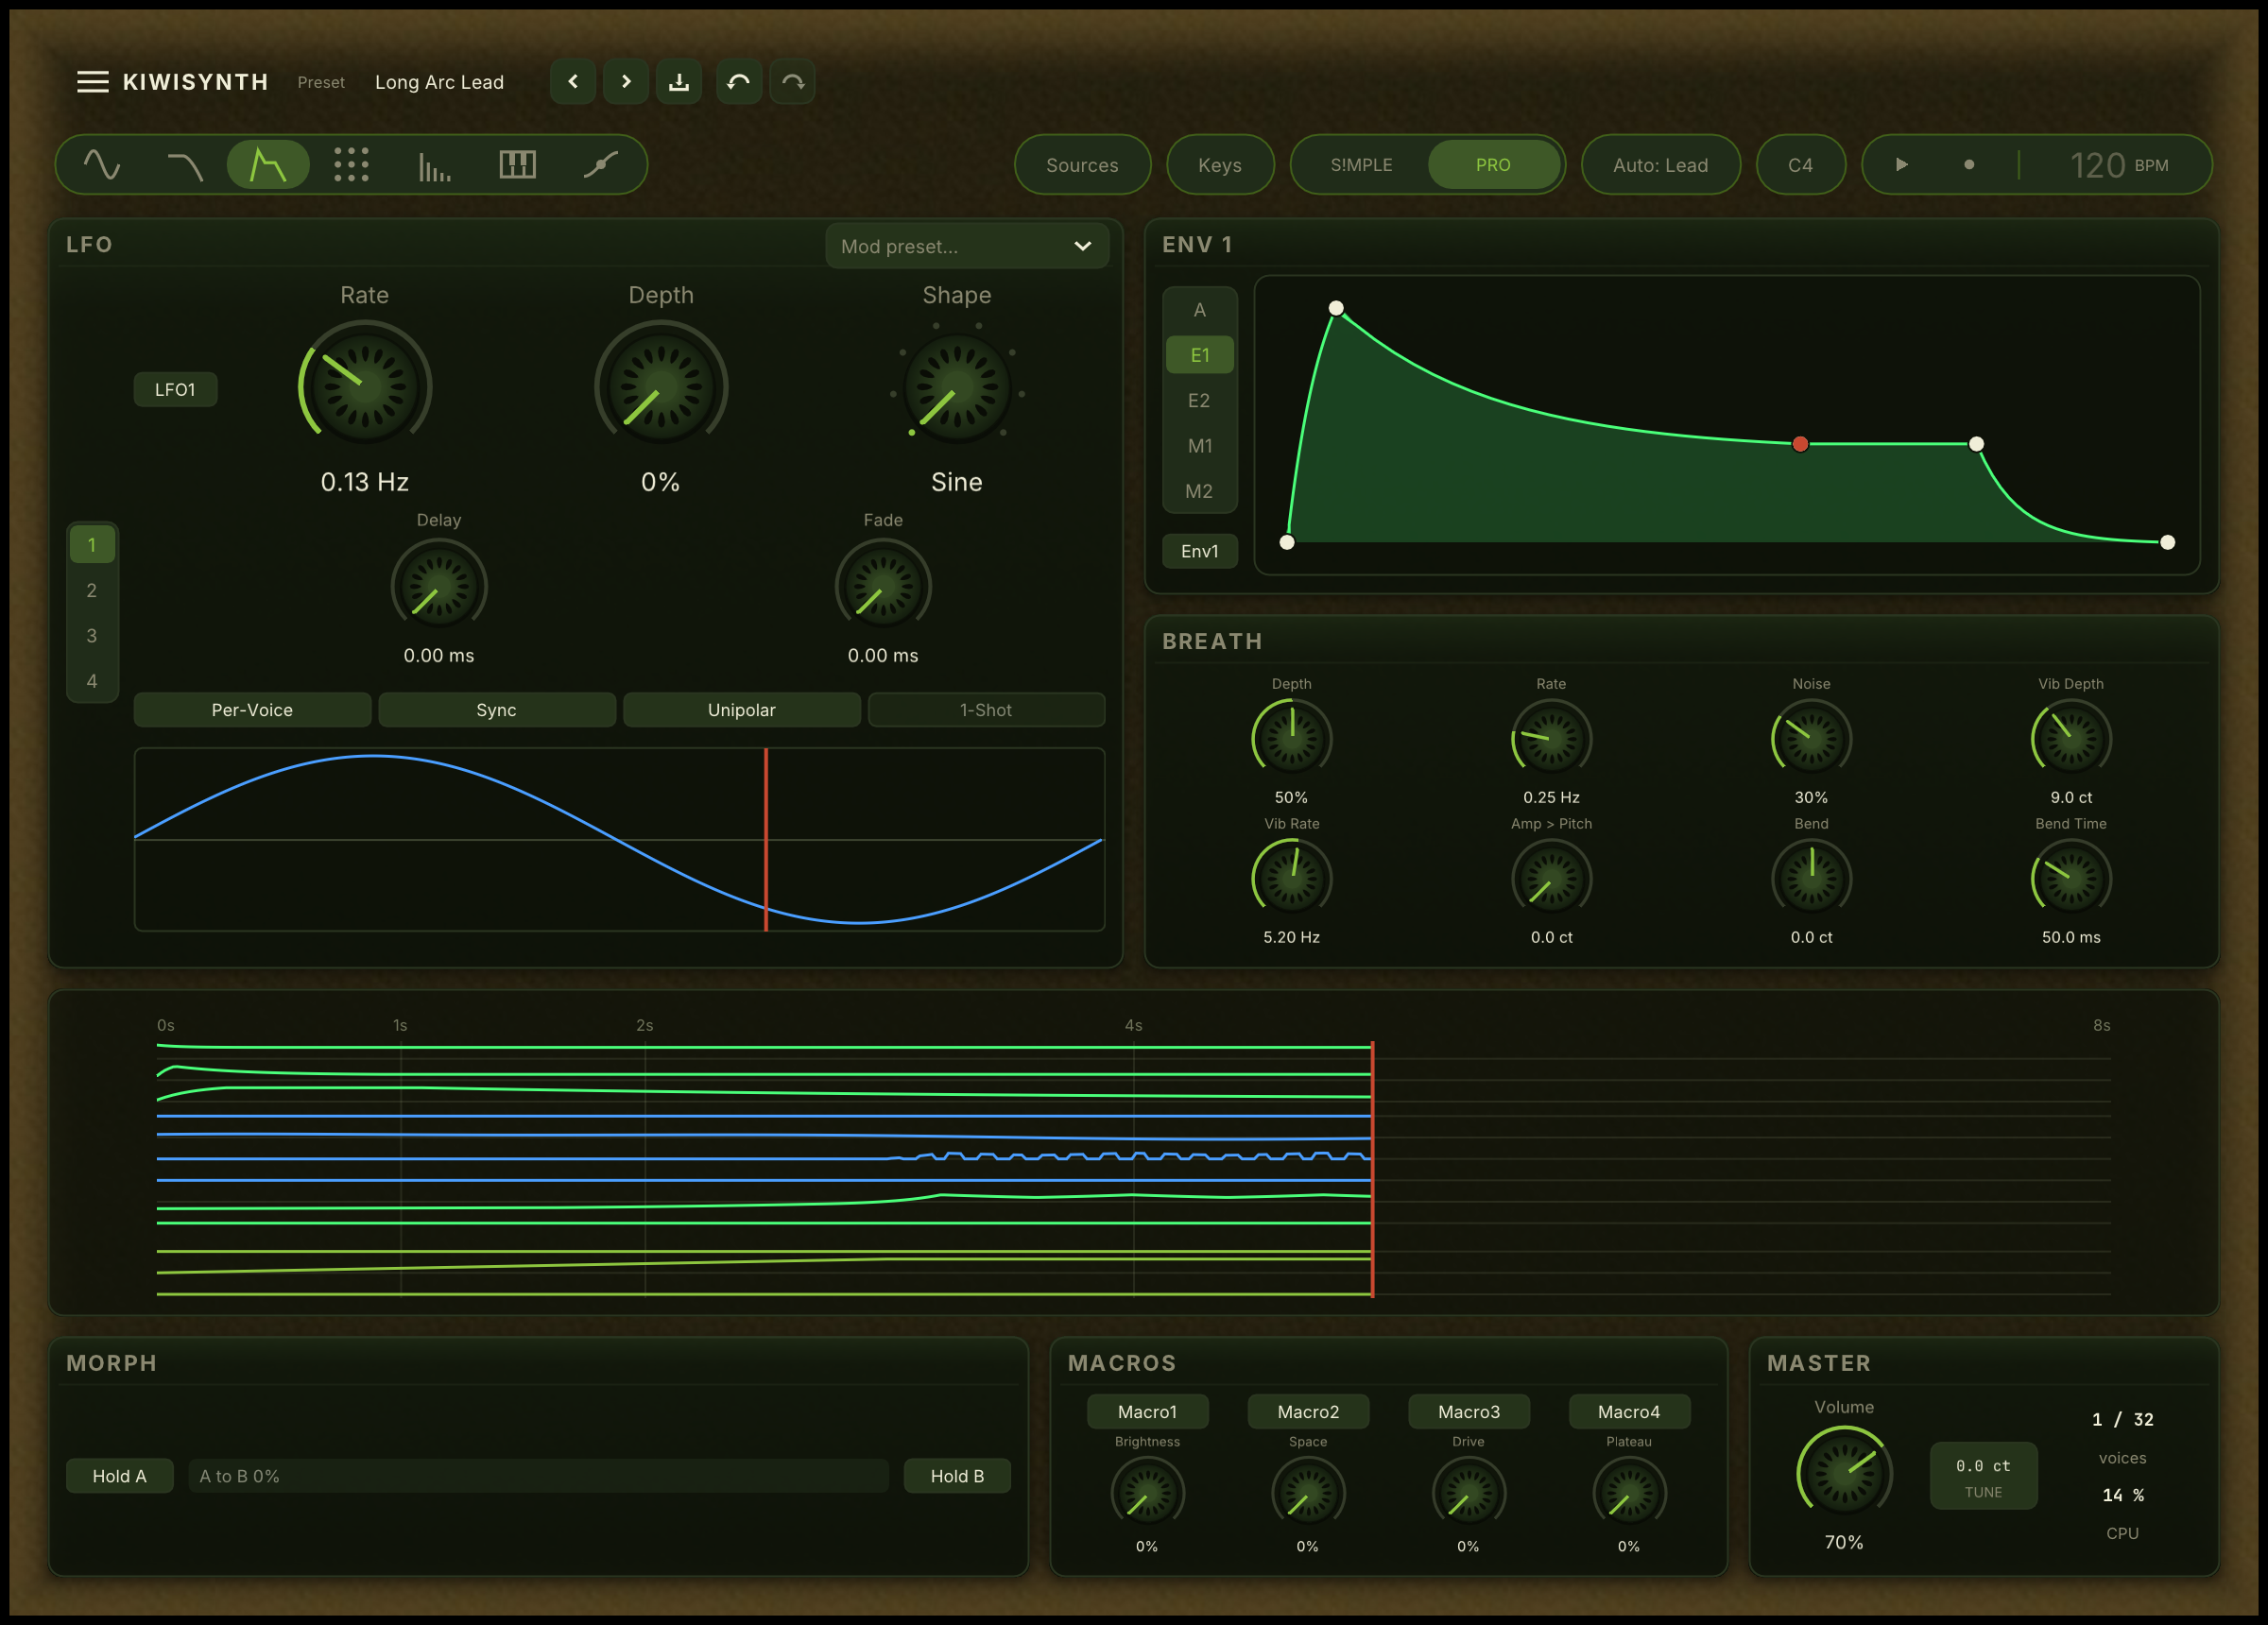
Each modulator gets its own lane: the amp envelope, the two modulation envelopes, the four LFOs, the two MSEGs, and the three play-aware Bloom sources (Chord, Bloom and Rep). Those last three are the ones hardest to read by ear, so seeing them on the same time axis as the note is the whole point: you can watch Bloom climb across a held note, or Chord rise as you add dissonance to the chord you hold. Time runs left to right across eight seconds, with marks at one, two and four seconds. A green cursor on the right edge shows where the trace is currently being written; when the cursor stops, the trace is frozen for inspection.
The timeline arms when a note starts and resets on the next note. Play something, then read it: how fast the amp envelope rose, where LFO 1 was when the attack finished, whether MSEG 2 actually reached its sustain segment before you released. The shape on screen is the same shape that is shaping the sound you just heard.
Once the trace is frozen you can scrub it. Move the pointer across the timeline and a bright cursor follows it, with the time it points at shown above. Every lane's value readout on the right switches from the latest value to the value at the cursor, so you can park on the exact moment a sound changed and read off what each modulator was doing then. Move the pointer off the timeline to return the readouts to their live values.
LFOs in Global mode are drawn from the global oscillator, so they animate even between notes once the timeline is armed. LFOs in Per-Voice mode are drawn from the most recent voice.
How sources reach notes
Modulation sources differ in when they are measured.
Some are shared by the whole instrument: the LFOs, the macros, the mod wheel. One value drives every note at once.
Some are measured per note: the envelopes, aftertouch, MPE. Each note carries its own.
Some are captured at the moment a note starts and held for its life: velocity, the per-voice random used by Humanize, Keytrack and Note length.
Each intent picks the right behavior for you, so a Wobble is shared motion and a Fade is per-note motion with no setup.
Keytrack
Keytrack turns the note you play into a modulation source. It reads as nothing at middle C, rises as you play higher, and falls as you play lower. Point it at a knob and the knob then follows the keyboard: open a filter further on high notes, shorten a resonant tail as the pitch climbs, or pull a layer's tuning back toward a fixed pitch so it moves less than the notes around it.
Like velocity, it is captured when each note starts and held for that note. It is the general way to make any control respond to pitch. One limit worth knowing: it cannot fully cancel an oscillator's own pitch tracking across the whole keyboard, so using it to hold a layer at a fixed pitch works best over a couple of octaves around middle C.
Note length
Note length turns how long a note will last into a modulation source, known before the note starts. It needs a host that plays the note from a clip and tells Kiwisynth its length. Most hosts do not. There, and whenever you play live, every note reads as long.
It reads low for a short note and rises as the notes get longer, from a staccato stab at the bottom to a note held for several seconds at the top. Each doubling of the length moves it the same distance, so the difference between a short and a slightly longer note is as easy to reach as the one between two long notes.
Point it at a knob and each note sets that knob by its own length. Routed to the filter cutoff, short notes stay dark and tight while long notes open up. Every note in a chord is judged on its own, so a chord of short and long notes plays both at once.
Like velocity, it is captured when the note starts and held for that note. It is what was scheduled, not a promise: releasing the note still ends it, even earlier than planned.
Bloom sources
Three sources respond to how you play, rather than running on a clock or following a wheel. They come set up inside most presets, and you can point them at a knob yourself from the Sources tray, under Note. You also meet them on the Matrix page, and on any knob a preset has them moving.
Chord. A reading of the chord you are holding. A simple interval such as a fifth reads low, a dense or dissonant chord reads high. Pointed at a knob, it lets the sound answer the harmony you play.
Bloom. A rise from nothing to full while a note is held, at the speed set by Note Bloom Rate on the Oscillators page. It starts as the note does, so a stab never reaches it and a held note keeps climbing. Each note carries its own. Use it to open a filter or lift an effect while a note is sustained. Keep the rate shorter than the notes you play, or the movement arrives after you have let go.
Repetition. A value that climbs each time you return to the same note. Pointed at a knob, it shifts the tone of a note you keep playing, which nudges a part toward variety.
Rhythmic patterns and trance gate
A trance gate is the chopped, gated amplitude pattern that defines a lot of trance, hardstyle, dubstep and EDM. It is built two ways in Kiwisynth, both through normal modulation. Pick whichever fits the patch better.
The per-voice path uses an LFO. Set the LFO's shape to Custom, switch the drawing surface to its step grid (8, 16 or 32), and draw the pattern. Turn Sync on and pick a long enough division, usually 1 Bar. Drag the LFO's drag handle onto the Amp Level knob, then turn its depth fully negative so the high steps open the gate and the low steps close it. In Per-Voice mode each note's gate restarts at step 0; in Global mode the whole patch shares one bar-locked gate.
The post-mix path uses the Volume Shaper effect. The Shaper has its own step-drawing surface on its FX card. Same idea: draw the pattern, set Div to 1 Bar, raise Mix. Because the Shaper runs after the voices have summed, it gates the whole patch identically regardless of how many notes you hold. That is the right tool when the gate should feel applied to the mix, not to the playing.
The fast-to-slow decel, where the gate starts fast and stretches as the note tails, is drawn into the pattern itself: short closed-open pairs at the start of the grid, wider open runs at the end. There is no separate decel control.
Step sequencers (per-step parameter changes)
The two step sequencers are modulation sources that step through a row of values in time with the host tempo, one value per step. Where a step sequencer drives a knob, that knob takes a new offset on every step: a different filter cutoff, wavetable position, or distortion amount on each note of a pattern. This is the moving, step-locked change that drives glitch and IDM patches, where no two steps sound quite the same.
Each step sequencer has its own division, a note value that follows the host tempo, so the steps line up with the beat.
You do not build these yourself yet. There is no editor for the row of values, so a step sequencer reaches a patch only by arriving in one, and the pair sits greyed out in the Sources tray to say so. The factory preset Mangler is the one to load: it runs one sequencer into the filter cutoff and the other into the wavetable position, so a single held note turns into an evolving line. You meet them on the Matrix page, where their routings can be read and their depths seen moving.
This pairs naturally with the arpeggiator's Chance and Ratchet: the arpeggiator decides which steps play and how they retrigger, while the step sequencers decide how each step sounds.
Per-oscillator envelopes (chord stacks and layer cakes)
The three main oscillators share a single amp envelope by default, but each one's Level knob is a modulation target, so you can give each oscillator its own envelope shape by routing one of the two Mod Envelopes to its Level.
The common pattern is to route ModEnv 2 to OSC3 Level so the third oscillator breathes in independently of OSC1 and OSC2. Set ModEnv 2 to a slow attack and the long tail of a pad; OSC3 then rises in after the chord is already speaking, exactly the breathing-octave behaviour of a Rhodes chord, a drawbar organ, or an evolving layer-cake pad. The same trick applied to OSC1 Level or OSC2 Level gives any of the three voices its own envelope timing.
For a pluck = transient + body + ring patch, this is the structural move: each oscillator gets its own Mod Envelope so the transient noise burst, the body decay and the ring tail each have their own attack and decay.
Fixed character
Part of what defines the Kiwisynth sound is built into the instrument. The Warmth stage is one example: you can set its amount in a preset, but it cannot be a modulation target. This keeps the instrument's character intact no matter how far a patch is taken.