Effects
The Effects page holds the effects that colour and finish the sound. There are two groups: a texture and a distortion that work on each note on its own, and a chain of effects that work on the whole mix.
The rack
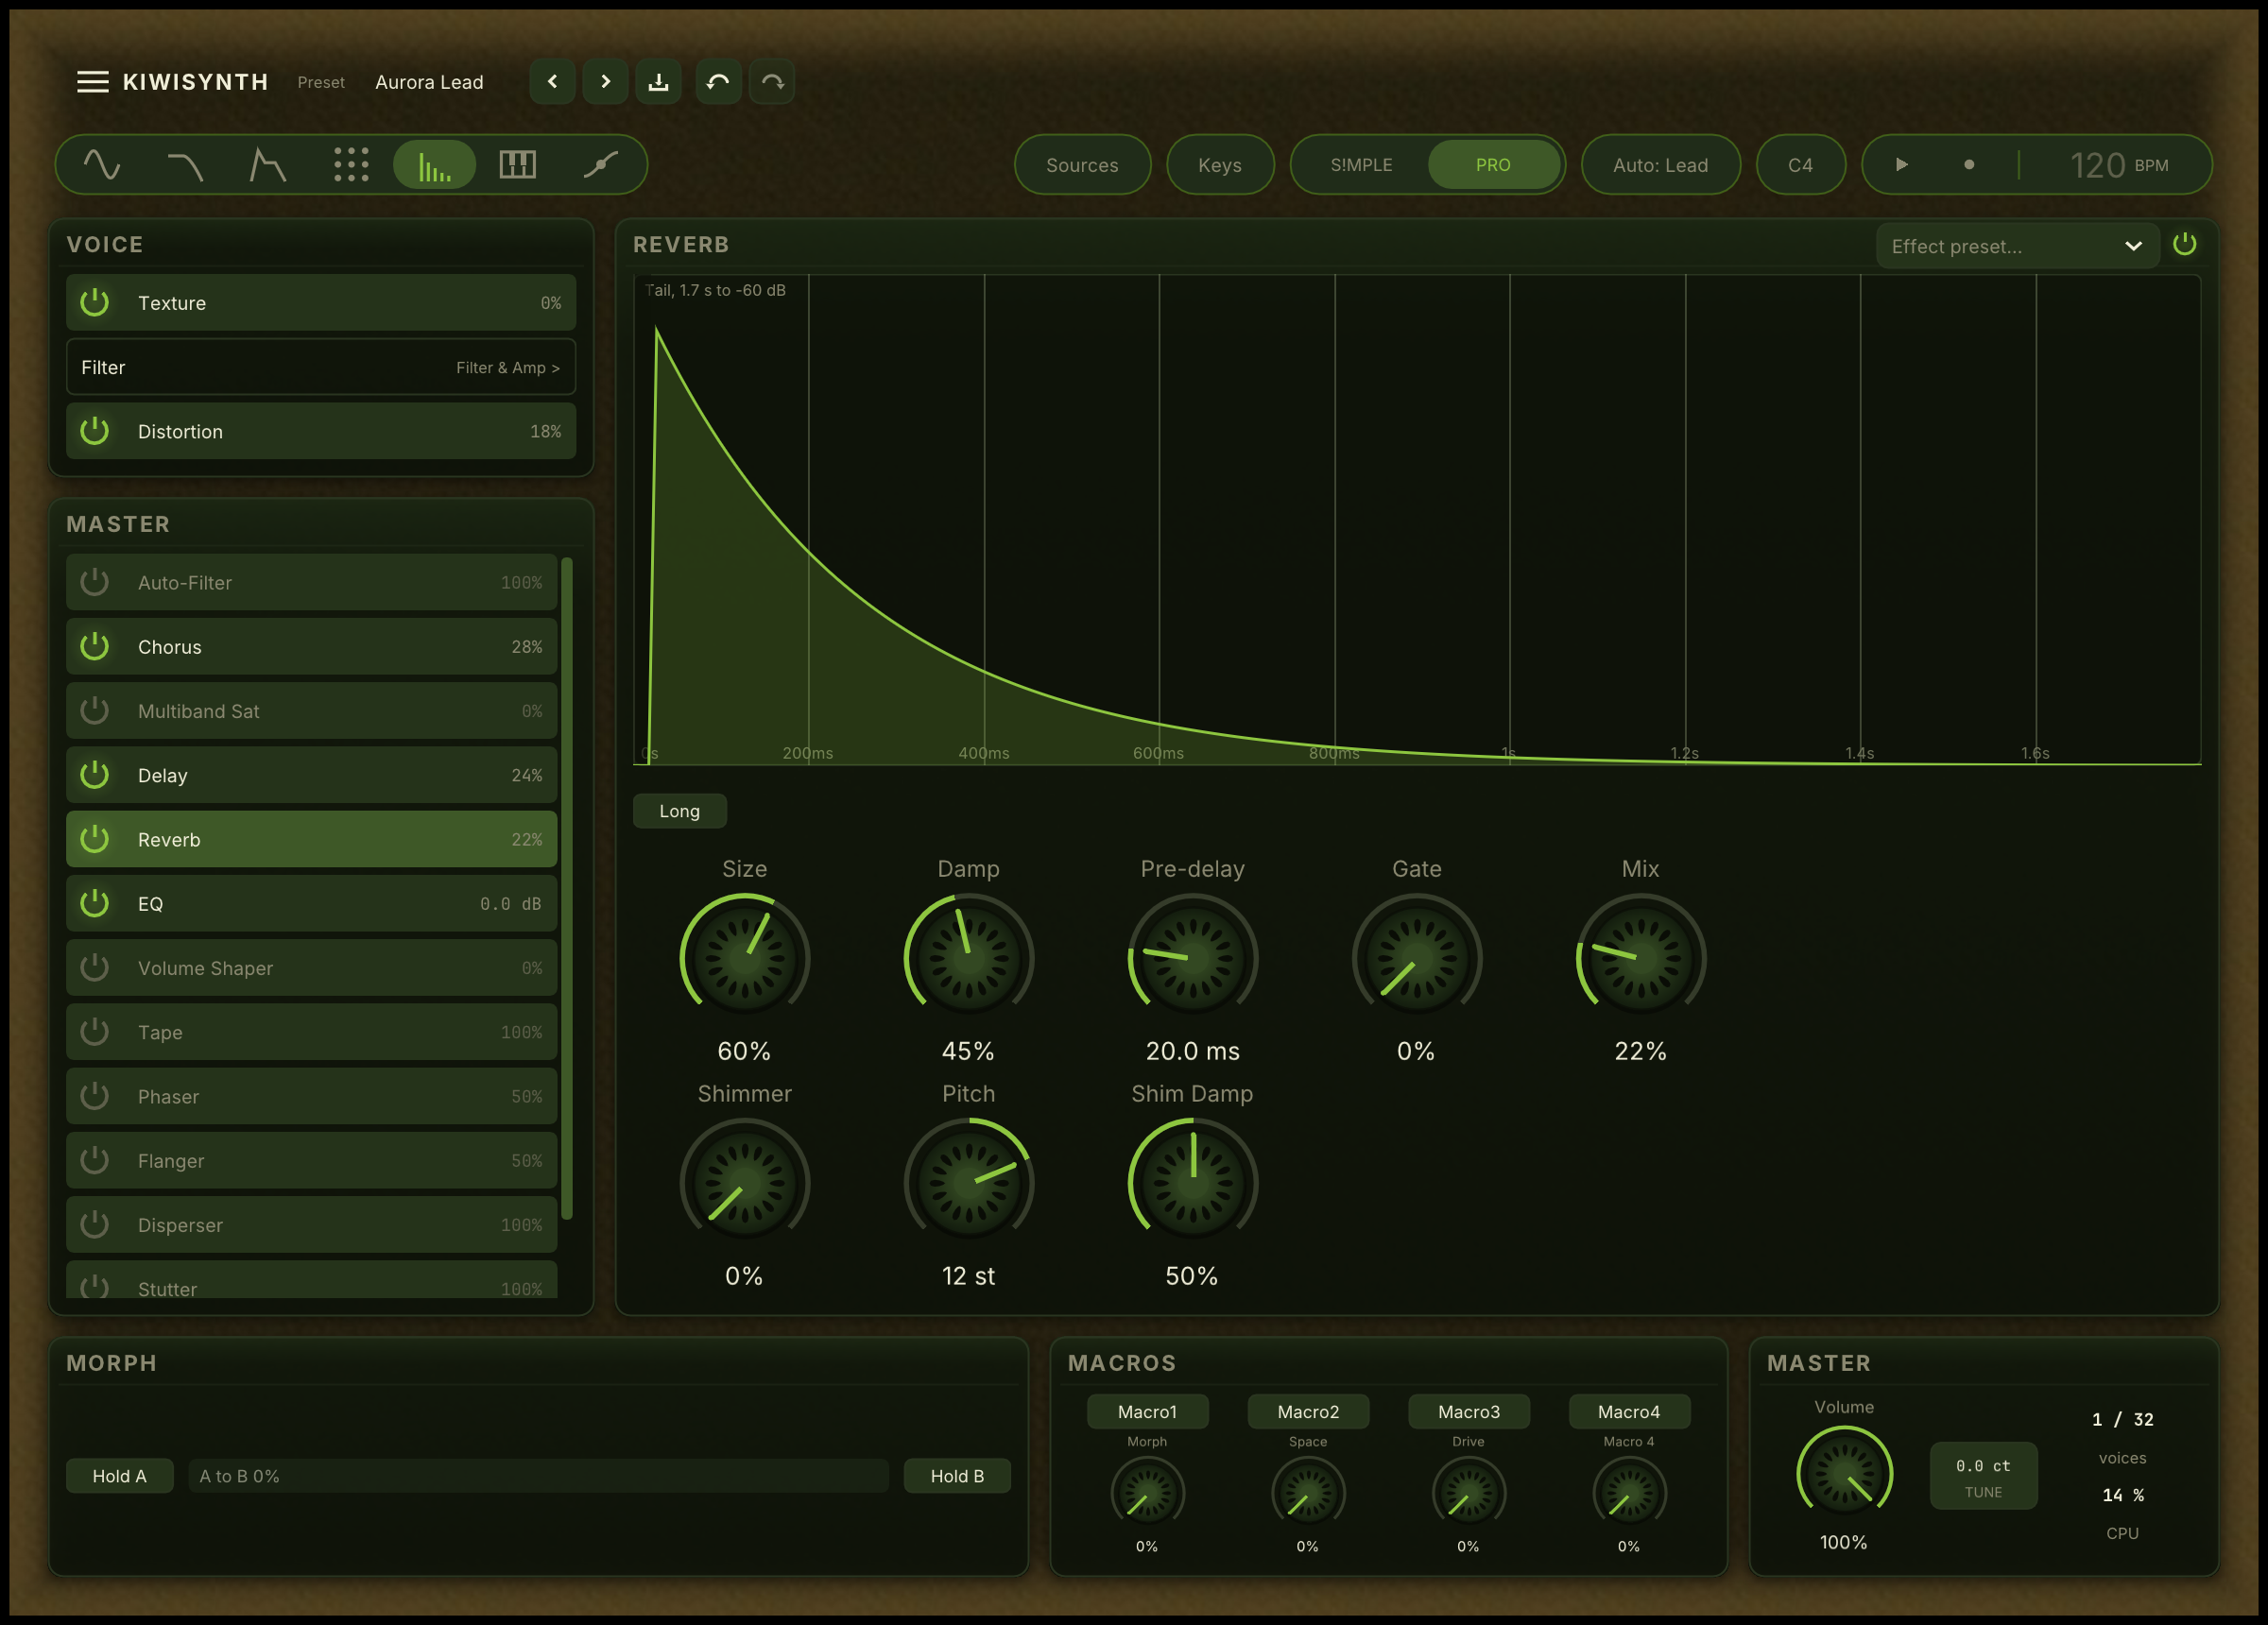
The rack on the left lists every effect in the order the sound passes through it. The Voice card holds the per-note stages: Texture, the Filter, and Distortion. The Master card holds the effects that work on the mix: Auto-Filter, Chorus, Multiband Sat, Delay, Reverb, EQ, Volume Shaper, Tape, Phaser, Flanger, Disperser, Stutter and Spectral Gate.
Click a row to show that effect's controls on the right. Each row has a power button that switches the effect on and off without changing which effect is shown, and a number on the right: the effect's Mix, or for EQ its Mid, for Texture its Amount and for Distortion its Drive. A switched-off row is drawn dimmer. Hovering a row shows a short description of what the effect does, so you can find the right one without opening each in turn. An effect that is switched off costs nothing.
The Filter row is a link: it reads Filter & Amp and opens that page. Its place above or below Distortion shows the order the two run in.
Drag a row in the Master card up or down to change the order the effects run in, which changes the sound: a delay feeding a reverb is not the same as a reverb feeding a delay. The per-note stages stay where they are.
The selected effect's card repeats its power button in the header, beside an Effect preset... menu that loads a section preset for that effect alone.
The effect picture
Most effects show a picture of what they do above their knobs, and it follows the knobs as you turn them. Texture, Chorus and Disperser have none.
For EQ, Auto-Filter, Phaser, Flanger, Multiband Sat and Spectral Gate the picture is a frequency view: low sounds on the left, high sounds on the right. EQ draws its response. Auto-Filter, Phaser and Flanger draw their centre response, and when the sweep is running, two faint lines at the low and high ends of its travel. Multiband Sat draws each band filled to its drive, with the two crossover points marked. Spectral Gate draws the threshold you set across the spectrum, which you edit by dragging on it.
Distortion shows its curve, titled In to out: the shape that turns the incoming sound into the driven one. Delay shows its echoes fading, left echoes above the line and right echoes below. Reverb shows its decay tail after the shaded gap of pre-delay, with the tail's length in its title. Volume Shaper shows the curve you draw, with a playhead while it runs.
Texture
Texture records what the note is playing and sprays short pieces of that recording back over it. The pieces are called grains. Because they are cut from the note's own sound rather than from a separate sample, the cloud carries whatever the patch is doing: a filter sweep, an FM edge, unison beating. Hold a pluck and it blooms into a haze made of the pluck.
It runs on each note separately, and it runs before the filter, so the cloud darkens and opens along with the rest of the sound instead of sitting on top of it. Each held note has its own cloud, and the cloud ends when the note does.
Texture is not a second oscillator. An oscillator with the Granular mode reads a wavetable or a loaded clip, and it makes a sound of its own. Texture has no source of its own and cannot make a sound on its own. If the note is silent, so is Texture.
Give it something to work with. The cloud is at its most obvious on notes that last, and on sounds that change while they are held. On a short stab there is little recorded before the note is over.
Amount. How much cloud is mixed over the note. Turned all the way down, the effect is off and costs nothing.
Size. How long each grain lasts. Short grains buzz and break the tone up. Long grains stay smooth and keep the pitch, because each one carries more of the waveform. A grain is loudest in its middle, so a long grain also smears the sound later in time.
Density. How many grains are cut each second. Low values are sparse and stuttering, with gaps you can hear between grains. High values pack them into a continuous wash. Raising this thickens the cloud rather than making it louder.
Delay. How far back in the note the grains are cut from. The note itself is never held back, so this does not add latency. Small values repeat what you are hearing now. Large values reach back towards the attack, so a held pad keeps re-playing its own beginning underneath itself. If you set this shorter than one grain, it is raised to fit.
Scatter. How much the grains disagree with each other. It spreads where they are cut from, spreads them across the stereo field, and detunes each one slightly. At its lowest, every grain comes from the same spot and the cloud is a tight double of the note. Turned up, it becomes a wide shimmer.
Switched off, Texture keeps recording, so switching it back on does not start from silence.
Delay and Size are worth assigning to an envelope or an LFO. A slow LFO on Delay makes the cloud wander through the note's history, which is where the effect stops sounding like an effect.
Distortion
Distortion adds grit and harmonic richness by driving the sound until it clips. It runs on each voice separately, before the notes are mixed together.
The row of choices in its header picks the kind of distortion:
- Soft Clip rounds the peaks for a warm, musical overdrive. This is the default and the gentlest option.
- Hard Clip flattens the peaks abruptly for a harder, more aggressive edge.
- Fold Back reflects the sound back on itself when it gets too loud, adding bright, metallic upper harmonics.
- Bit Crush lowers the resolution of the sound, like an old digital sampler. More drive means a coarser, grittier result.
- Decimate lowers the sampling rate by holding each sample for a while before reading the next, adding a bright, aliased digital crunch. More drive holds longer and crunches harder. Useful for the broken, lo-fi textures common in IDM and glitch styles.
Filter first, Drive first. Whether the distortion runs after or before the filter. Filter first tames the sound before it is driven, for a rawer, more present bite. Drive first sends the grit into the filter, which smooths it into a tamer growl. Because distortion changes the harmonics, the two orders sound clearly different. The rack shows the order too: the Filter row moves above or below Distortion.
Drive. How hard the sound is pushed. More drive means more grit. For Bit Crush and Decimate, drive sets how heavy the reduction is rather than how loud the sound gets.
Mix. Blends the distorted sound with the clean one. At full mix you hear only the distorted sound.
Master effects
Auto-Filter
A filter that sweeps on its own, for a moving, rhythmic tone.
Position. The centre point of the sweep, from a darker to a brighter setting.
Rate. How fast the sweep moves. At its lowest setting the filter does not sweep, and Position acts as a plain tone control.
Depth. How far the sweep travels.
Reso. Adds a sharp, vocal emphasis to the sweeping filter.
Mix. Blends the effect with the untreated sound.
Chorus
Chorus thickens and widens a sound by layering slightly delayed, slightly detuned copies of it.
Classic, Ensemble. The choice in the header. Classic is a standard chorus. Ensemble is a richer setting whose copies move in a way that never quite repeats, recalling old string machines.
Rate. How fast the chorus movement is.
Depth. How strong the effect is.
Mix. Blends the effect with the untreated sound.
Delay
Delay repeats the sound as echoes. This is a stereo, ping-pong delay: the echoes bounce between left and right.
Sync. A switch in the header. On, the echo time follows your project tempo instead of being set as a length of time.
Left and Right. The echo time for each side, when Sync is off. Setting them differently gives a more complex bouncing pattern.
Division. Takes the place of Left and Right when Sync is on: the echo's musical length, such as a quarter note or an eighth note.
Feedback. How much each echo feeds back to make the next one. More feedback means more repeats before they fade away.
For stutters and beat-repeat fills, use the Stutter effect. A sound saved with the delay's older stutter mode still plays it.
Mix. Blends the echoes with the untreated sound.
Reverb
Reverb adds the sense of a space around the sound, from a small room to a vast hall.
Long. A switch in the header that puts the reverb into long mode. The tail is stretched well past eight seconds for deep ambient washes and drones, where normal mode tops out at a few seconds. Leave it off for ordinary rooms and halls; turn it on, usually with a fair amount of Mix and a slow modulation on Size, for the kind of endless evolving space that sits under a pad. Combines naturally with shimmer.
Size. How large the space feels.
Damp. How quickly the reverb's high frequencies fade. More damping gives a warmer, softer tail.
Pre-delay. A short gap between the sound and the start of the reverb. A little pre-delay keeps the sound clear in front of the reverb.
Gate. Turns the reverb into a gated reverb. A fast gate follows the sound going in and cuts the tail short the moment the sound stops, so instead of a tail that rings out you get a solid burst of reverb that ends abruptly. This is the big, hard-edged reverb of 1980s records. Turned down it does nothing and the tail rings as normal. Turned up it bites hard. It works on short, rhythmic sounds like stabs, plucks and drums, where each hit gets its own contained burst. It leaves a held sound almost untouched, because a sustained note keeps the gate open, so it is safe to leave on. Pair it with a large Size for the classic effect: a huge space, cut before it can bloom.
Mix. How much reverb is added.
Shimmer. Turned down, the reverb is a plain space. Turned up, the reverb's own tail is lifted in pitch and fed back into itself, so the sound rises into a slowly-building cloud of higher notes. The classic cinematic-pad sound.
Pitch. How far the shimmer is pitched, in semitones. Twelve semitones up is the standard octave shimmer. Twenty-four pitches it up two octaves into something more bell-like. Negative settings pitch it down for a deeper, sub-octave wash.
Shim Damp. Damping for the shimmer feedback path. Turned down, the pitch-shifted cloud rings on with everything still in it, eventually getting busy. Turned up, the higher partials of the cloud are tamed, so the shimmer stays close to the original note's pitch range. Turn it down for a wide-eyed swell, up for a warm halo.
EQ
The equaliser lifts or trims three broad ranges of the sound.
Low, Mid and High. Each raises or lowers its part of the sound. Leave them at the centre for no change, above the centre for a boost, below it for a cut.
Multiband Sat
This splits the sound into low, middle and high bands and adds drive to each one separately. It is a way to add energy, warmth or loudness with control over where it lands.
It is a saturator, not a multiband compressor. Each band is bent by a fixed curve, so loud peaks are rounded off and quiet detail is lifted, but the effect does not follow the level of the music over time.
Low X and High X. The two crossover frequencies where the sound is split into bands. Low X divides low from middle, High X divides middle from high.
Low Drive, Mid Drive, High Drive. The amount of drive in each band.
Low Mix, Mid Mix, High Mix. How much of each driven band is blended back in.
Mix. The overall blend of the effect against the untreated sound.
Volume Shaper
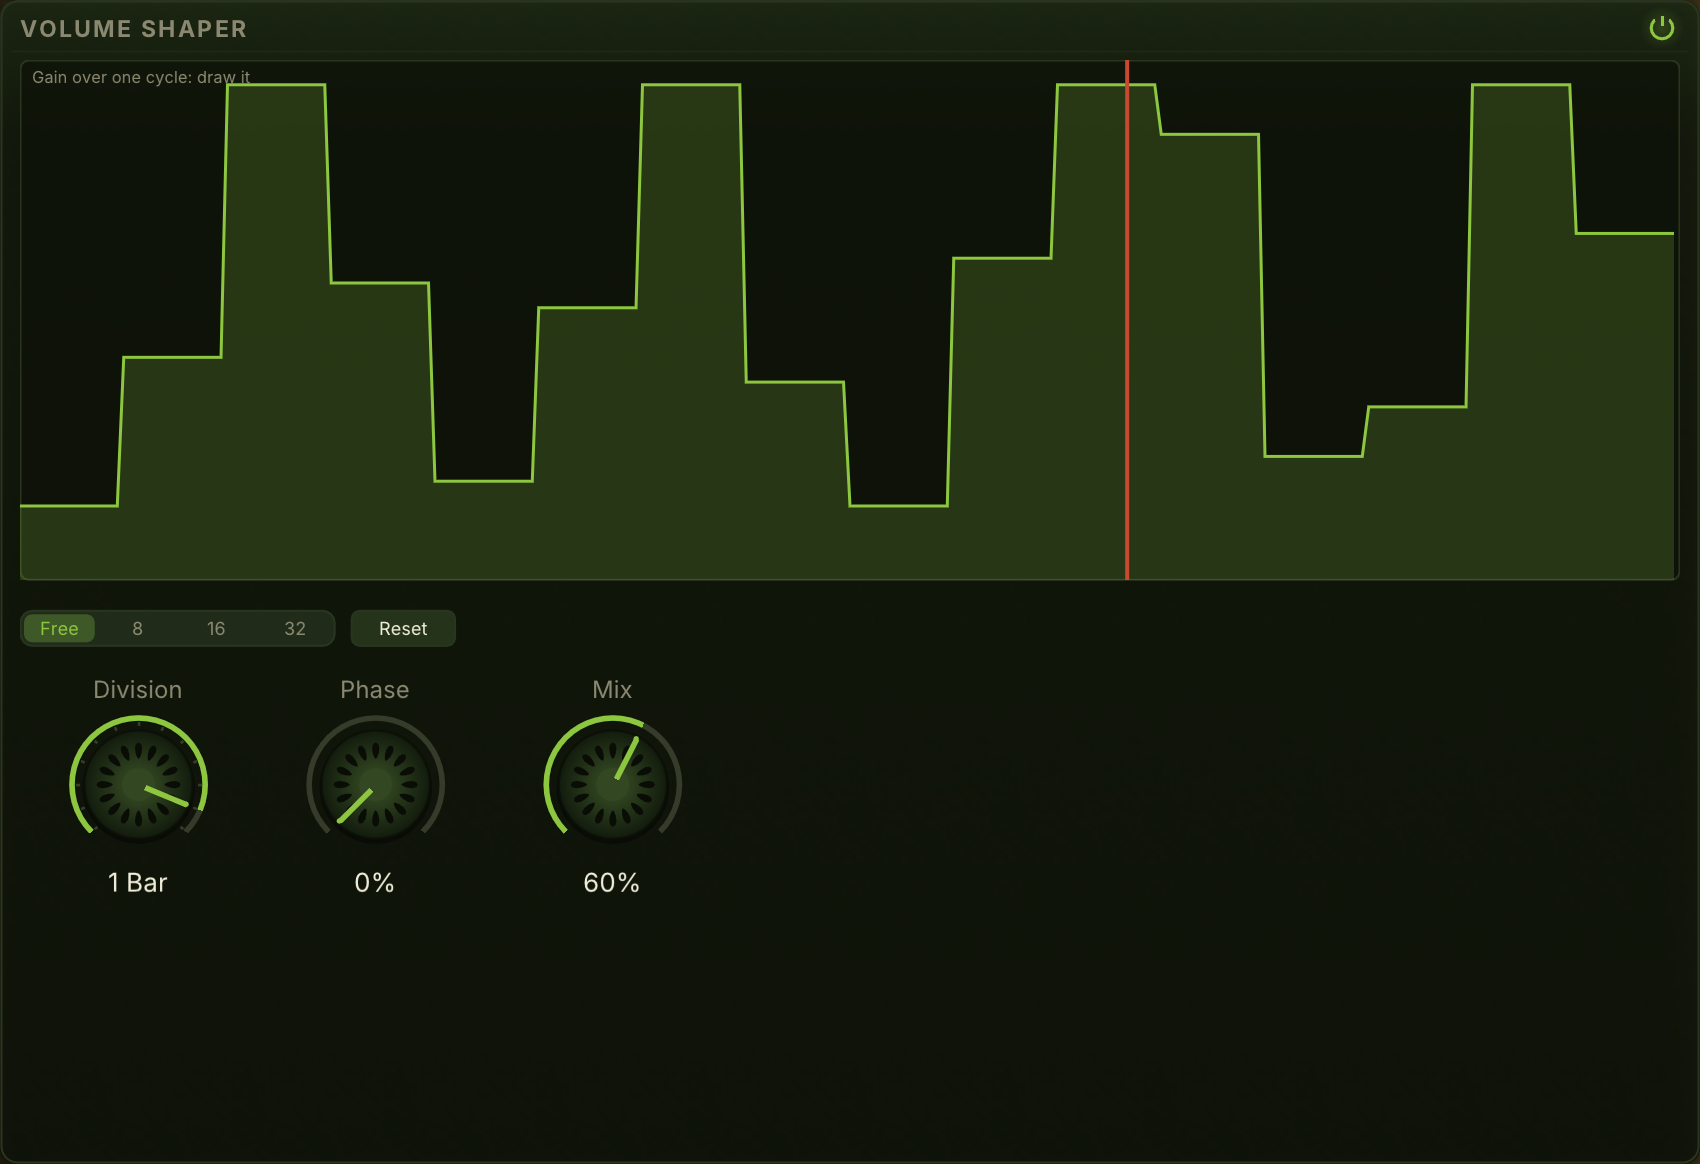
The Volume Shaper is a tempo-locked amplitude pump. It draws a single repeating curve, in time with the beat, and multiplies the sound by it. The most common shape is a sawtooth-down ramp: full volume on the downbeat, falling to silence just before the next one. Played against a kick drum, this is the "sidechain" pump that defines modern trance, house and tech-house, produced inside the synth, without needing an external kick or a separate plugin.
The shape is yours to draw on the picture. The canvas runs from fully open at the top, where the sound is not ducked at all, to fully closed at the bottom. Under it, Free, 8, 16 and 32 pick how you paint: Free is freehand, drawing the curve point by point; 8, 16 and 32 switch to a step grid, where a click paints a whole step at one height and dragging fills neighbouring steps. Reset returns the curve to the falling ramp a sidechain duck starts from. A square gate for trance-gate amplitude patterns, a soft breathing shape for movement on a pad, a fast double-pump for a 1/8 split duck: any of these can be drawn in.
Division. The musical length of one cycle: 1/4 follows the kick, 1/8 doubles the pump rate, 1/16 starts to sound like a gate. The longer 1/2, 1 Bar and 2 Bars cycles let a step-drawn pattern span a whole phrase, which is how trance and EDM build-ups use the shaper, as a fast-to-slow gate over one or two bars.
Phase. Slides the cycle within its grid position. Use it to nudge the duck slightly off the downbeat, or to offset against a host's own pumping.
Mix. How much the pump shapes the volume. Turned down, the effect does nothing. Turned up, the shape replaces the volume entirely. Most modern records sit a little below the middle.
Where the shaper sits in the chain matters. At the end, the pump shapes everything, including the delay and reverb tails, which gives the wet "pumping reverb" sound. Dragged to the front, it gives a cleaner pump that does not smear the time-based effects. The shaper is switched off in a new sound, so an older preset does not suddenly start pumping.
Tape
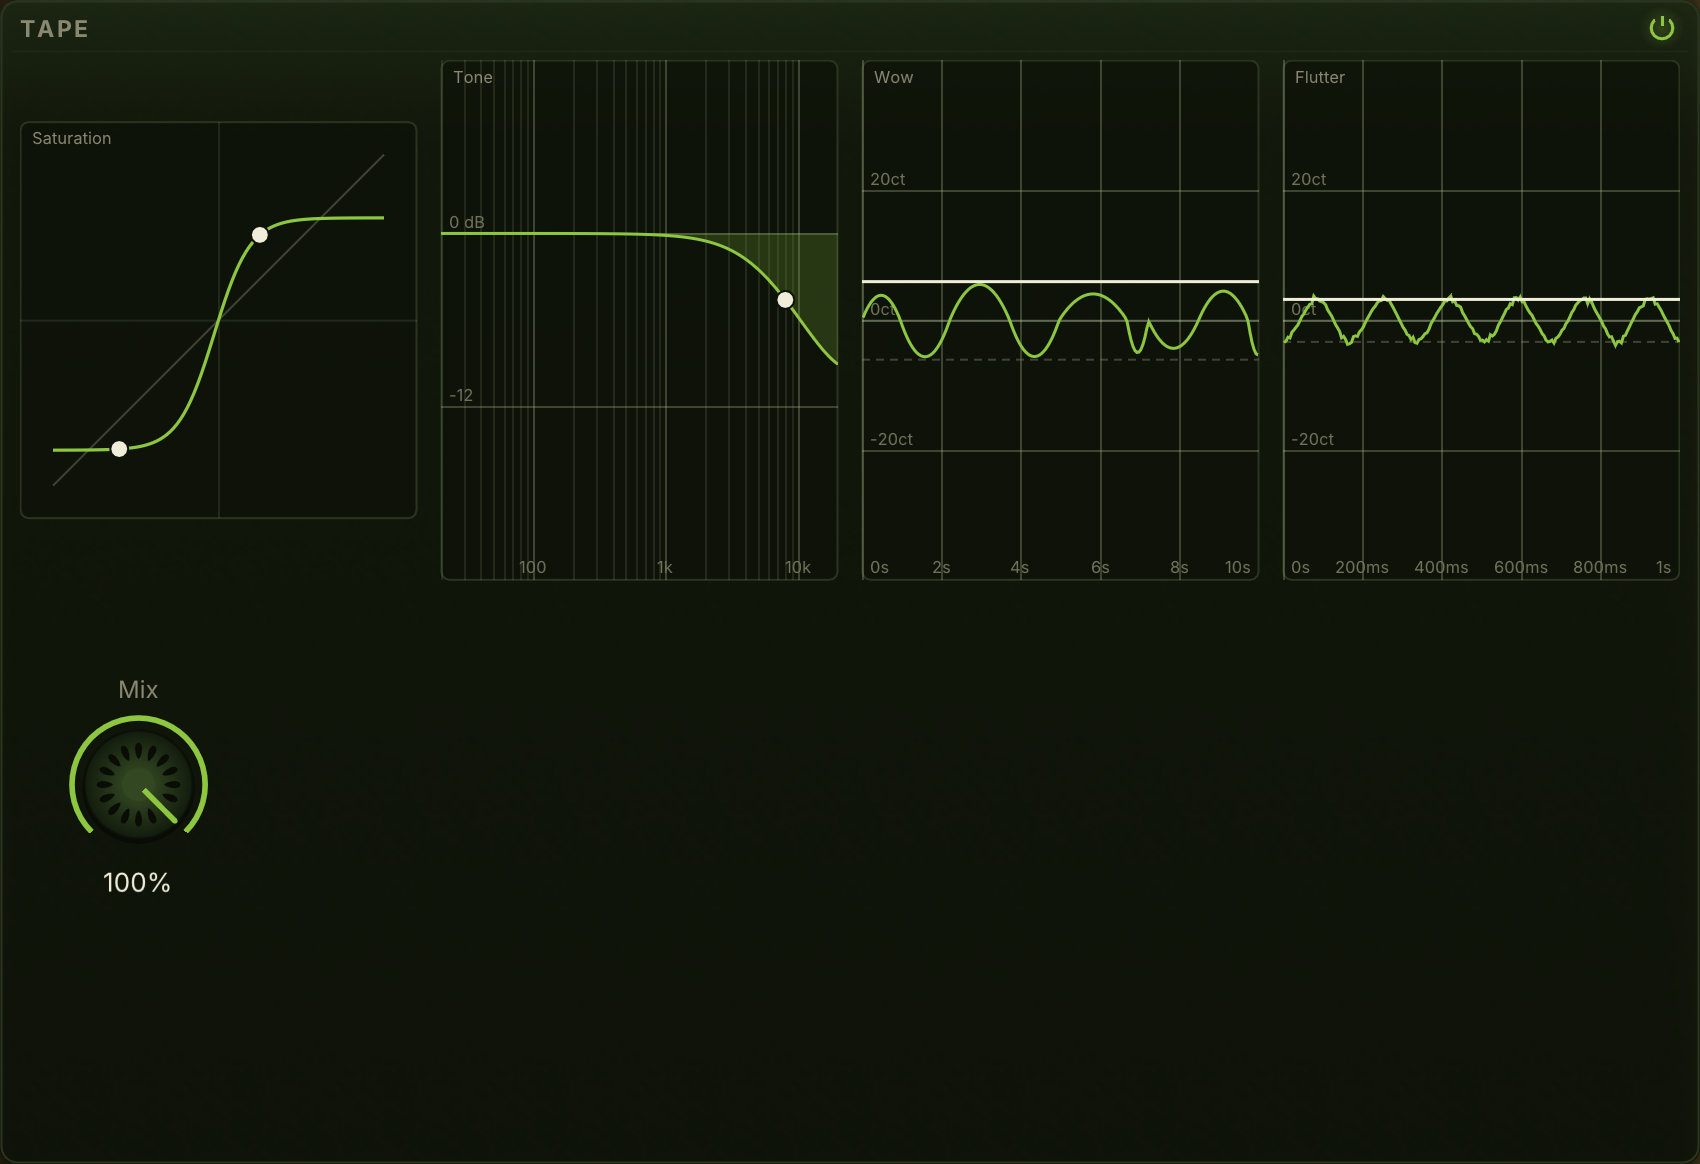
Tape adds the character of an analog tape machine to the whole mix: saturation that softens loud sounds, a top-end roll-off that takes the edge off, and small pitch wobble from the transport. It is what turns a clean digital sound into one that feels recorded.
The tape stage is not the same effect as the multiband saturator. The saturator splits the sound into bands and pushes them through a hard curve for loudness or grit. Tape works on the whole mix and adds soft, asymmetric saturation framed by a gentle high-frequency lift before it and a matching roll-off after it, so loud sounds soften and quiet sounds stay clean. The pitch wobble has no equivalent elsewhere in Kiwisynth.
Tape is four pictures rather than a row of knobs, one for each thing the tape does to the sound, and each control is a grip on its picture. Drag a grip, hold Shift while you drag for fine steps, or right-click it to type the value.
Saturation. The first picture draws what the tape does to a signal: input level from left to right, output from bottom to top, with a thin diagonal where the sound would pass untouched. Where the curve bends flat, loud sounds are being squeezed.
Drive. The grip on the upper half of the curve. How hard the tape is pushed. Drag it up and the curve bends earlier: the saturation softens peaks and adds richness, eventually compressing the sound noticeably. Down low it is subtle and the tape mostly adds warmth.
Bias. The grip on the lower half of the curve. Asymmetry in the saturation. At the top of its travel the curve is the same shape on both sides and the tape distorts evenly. Drag it down and the lower half swells away from the upper one, adding even-numbered harmonics, the warmth that draws people to tape in the first place.
Tone. The grip on the second picture, which shows the tape's high-frequency trim across the frequency range. With the line flat along 0 dB, the top of the sound is left alone. Drag the grip down and the highs roll off, for an older, darker tape. Drag it up and they lift a little, for a brighter, fresher one.
Wow. The third picture draws the pitch over ten seconds: slow drift, the kind a worn transport adds. The tape sags and rushes at no fixed rate, so the drift never settles into a regular vibrato. The line is the drift this sound plays. Drag the solid line up for more; the dashed lines mark how far it can reach. A little goes a long way on pads and held chords.
Flutter. The fourth picture draws one second of faster pitch wobble, the kind a small head defect adds. Drag the solid line up for more. Its wobble wanders a little, so some cycles run past the line. Useful as an effect more than a character, especially on plucked or sustained tones.
Mix. The blend of the tape character against the untreated sound. By default it is fully wet, so the power button is the simplest way to switch the effect on and off.
At the end of the chain, Tape colours the reverb and delay tails along with the rest of the sound; drag it earlier if you want the time-based effects to stay clean. Tape is switched off in a new sound, so an older preset does not suddenly start saturating.
Phaser
The phaser carves a row of moving notches out of the sound. As the notches sweep up and down they create the swirling, underwater motion that defines the effect, from gentle movement on a pad to a deep, vocal-like whoosh on a lead.
The phaser is not the same as the chorus or the flanger. The chorus thickens a sound by stacking slightly detuned copies of it. The phaser leaves the pitch alone and instead cancels narrow bands of frequencies; the notches it makes are spread unevenly across the sound rather than in the even comb a flanger produces, which is what gives the phaser its softer, more vocal character.
Classic, Organic. The choice in the header. Classic uses a steady sweep. Organic drifts the sweep so it never quite repeats, the way an analog phaser pedal wanders, for a more alive feel on long pads.
Sync. A switch in the header. On, the sweep follows the host tempo, and Rate becomes Division.
Rate. How fast the notches sweep. Turned all the way down the sweep stops, so you can park the notches at one spot or move them yourself with a modulation source (for example, letting a held note slowly open the phaser as it ages).
Division. When Sync is on, the musical length of one sweep.
Depth. How far the notches travel. Turned down, they barely move. Turned up, they sweep across most of the sound.
Center. The frequency the sweep is centred on. This is also the natural target for a modulation source when you want to move the notches by hand.
Feedback. Resonance around the notches. Turned up, the notches get sharper and the peaks between them ring, for a stronger, more obvious effect. It can be set either side of centre for two different notch shapes.
Stages. How many notches the phaser makes (one notch for every two stages). Fewer stages give a simple, classic sweep; more give a thicker, denser, more vocal sound.
Spread. Stereo width. Turned up, the left and right notches sweep in opposite directions so the effect widens across the stereo image.
Mix. The blend of the phased sound against the untreated sound. The notches are deepest at the halfway point, which is the default.
The phaser is switched off in a new sound, so an older preset does not suddenly start sweeping.
Flanger
The flanger mixes the sound with a copy of itself delayed by a few thousandths of a second, and sweeps that delay. The two copies cancel and reinforce each other across the frequency range, giving the evenly spaced comb of notches that produces the jet-plane whoosh.
It is the close relative of the phaser, and the difference is the shape of the notches. The phaser's are spread unevenly, which is what makes it sound soft and vocal. The flanger's are evenly spaced and move together, which is what makes it sound metallic and mechanical. Reach for the flanger when you want the sweep to be heard as an effect, and the phaser when you want it to be heard as movement.
Classic, Organic. The choice in the header. Classic uses a steady sweep. Organic drifts the sweep so it never quite repeats, the way analog hardware wanders, for a more alive feel on long sounds.
Sync. A switch in the header. On, the sweep follows the host tempo, and Rate becomes Division.
Through zero. A switch in the header. Off, the effect is the ordinary kind. On, the delayed copy passes through the dry one, so the notches sweep all the way down and the sound briefly cancels almost completely. That total-cancellation moment is the deep jet sweep of tape flanging, and it is the sound the effect is named after. It costs a little latency.
Rate. How fast the sweep moves. Turned all the way down the sweep stops and the comb sits still, so you can park it or move it yourself with a modulation source.
Division. When Sync is on, the musical length of one sweep: from a quarter note down to a thirty-second, with dotted and triplet values.
Depth. How far the sweep travels around the Manual setting. Turned down the comb barely moves.
Manual. The centre delay the sweep moves around, which sets where the notches sit. Short settings give a thin, close, metallic colour; longer ones drop the comb into the body of the sound. This is the control to reach for when you want to sweep the flanger by hand or from a modulator instead of letting its own sweep do the work.
Feedback. The resonance of the comb. Turned up, the peaks between the notches ring and the effect gets sharper and more obvious. It can be set either side of centre, and the two directions give different metallic tones.
Spread. Stereo width. Turned up, the left and right combs sweep in opposite directions so the effect widens across the stereo image.
Mix. The blend of the flanged sound against the untreated sound. The notches are deepest at the halfway point, which is the default.
The flanger is switched off in a new sound, so an older preset does not suddenly start sweeping.
Disperser
The disperser holds some frequencies back in time more than others, so a sharp attack is smeared into a short descending ring. On a drum or a pluck it turns the transient into the laser-like zap used across bass music. Turned gently it softens an attack that is too sharp without darkening the sound the way a filter would, because nothing is removed and only the timing is changed.
Its Center is a rewarding modulation destination: pointed at a note-age source it makes the smear open out as a note evolves.
Classic, Organic. The choice in the header. Classic uses a steady sweep. Organic drifts the sweep so it never quite repeats.
Center. The frequency the smear sits around.
Amount. How much dispersion is applied. More spreads the transient into a longer, more metallic ring.
Pinch. How tightly the smear is focused. Turned down it is broad and soft, turned up it becomes a narrow ringing band.
Rate. How fast the centre sweeps on its own. Turned all the way down the sweep stops and the smear sits still, which is the setting to use when you want to move the Center yourself.
Depth. How far the centre sweeps around its setting.
Spread. Stereo width. Turned up, the left and right smears sweep in opposite directions.
Mix. The blend against the untreated sound. Turned all the way up you hear only the dispersed signal.
The disperser is switched off in a new sound.
Stutter
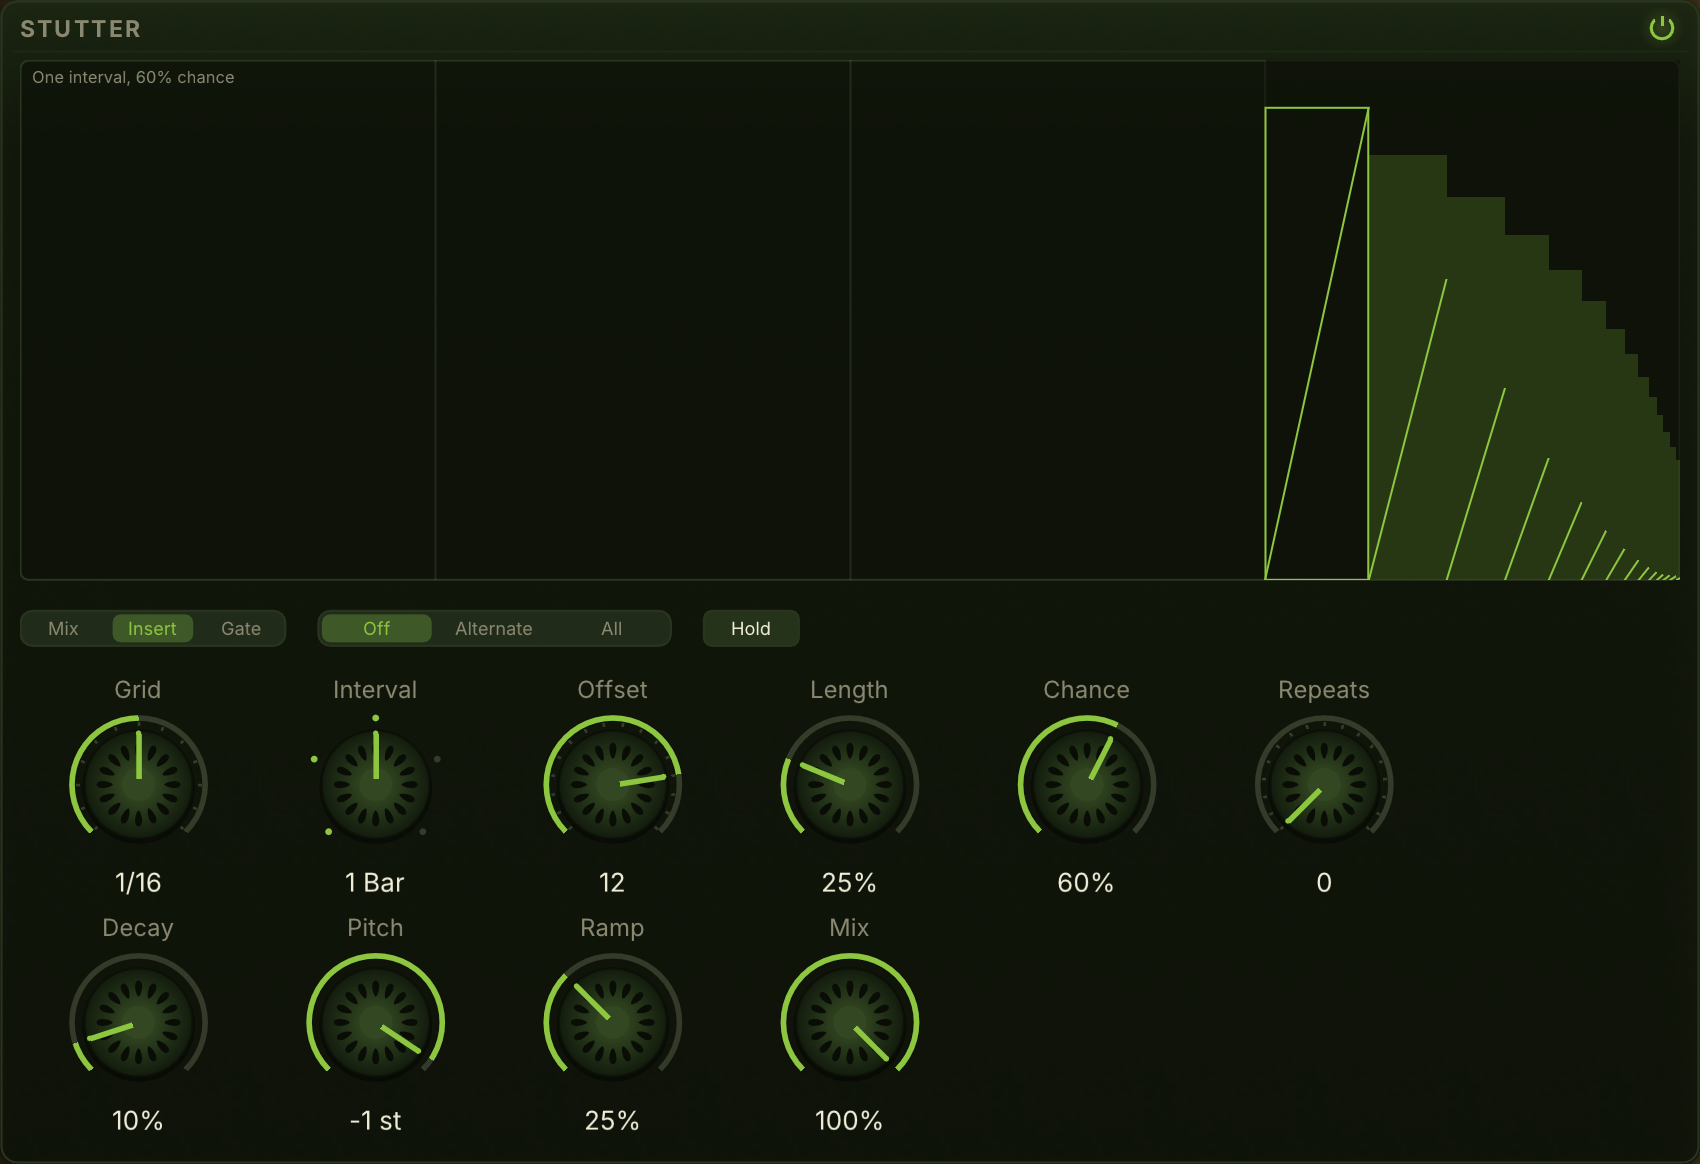
The stutter catches a short step of the sound on the beat and repeats it: the fill at the end of a bar, the machine-gun roll before a drop, the glitch that stops a phrase in its tracks. It follows the host's bar, so a fill lands on the same beat on every playback. Without a song position from the host it counts from the moment the sound starts, at the host's tempo.
It works on the whole mix at its place in the chain, not on single notes, and it only lowers the pitch of its repeats, never raises it.
The picture shows one interval, with the beats marked. The step it catches is the outlined bar, and each repeat is a filled bar: its height is how loud it plays, its width how long. The line through a bar shows which part of the caught step it plays. A straight climb is the step as it was; a shallower one is pitched down, and a line running downhill plays backwards.
When it fires. Every Interval, Offset sixteenths in, the stutter lets the first step through while it catches it, then repeats that step until Length runs out.
Grid. The length of the step it catches. Short steps buzz into a roll, long ones repeat a whole phrase.
Interval. How often it may fire: every beat, half bar, bar, two bars or four bars.
Offset. Where in the interval it starts, counted in sixteenth notes. Past the end of a short interval it starts on the interval's last sixteenth.
Length. How long it repeats, as a part of the interval. It always stops at the end of the interval.
Chance. How likely each interval is to fire. Turned down, fills come and go. The same place in the song always decides the same way, so a fill that plays once plays on every pass.
Repeats. How often a step repeats before a fresh one is caught. Turned all the way down, the first step repeats until the stutter ends.
Hold. Fires the stutter from the next grid step for as long as it is on, whatever Interval and Chance say. Route a macro, a step sequencer or the mod wheel to it in the matrix to play the stutter live.
Decay. How much quieter each repeat is than the one before, so the stutter fades out.
Pitch. How much lower each repeat is than the one before. The repeat is played slower, like a tape slowing down.
Ramp. How much shorter each step is than the one before, so the repeats speed up into a roll.
Off, Alternate, All. The Reverse choice in the header: no repeat is played backwards, every other one is, or all of them are.
Mix, Insert, Gate. The Mode choice in the header. Insert mutes the sound while it stutters, the classic cut. Mix plays the repeats over the sound. Gate plays only the repeats, so the sound is silent between fills.
Mix. The blend of the stuttered sound against the untouched one.
The stutter is switched off in a new sound.
Spectral Gate
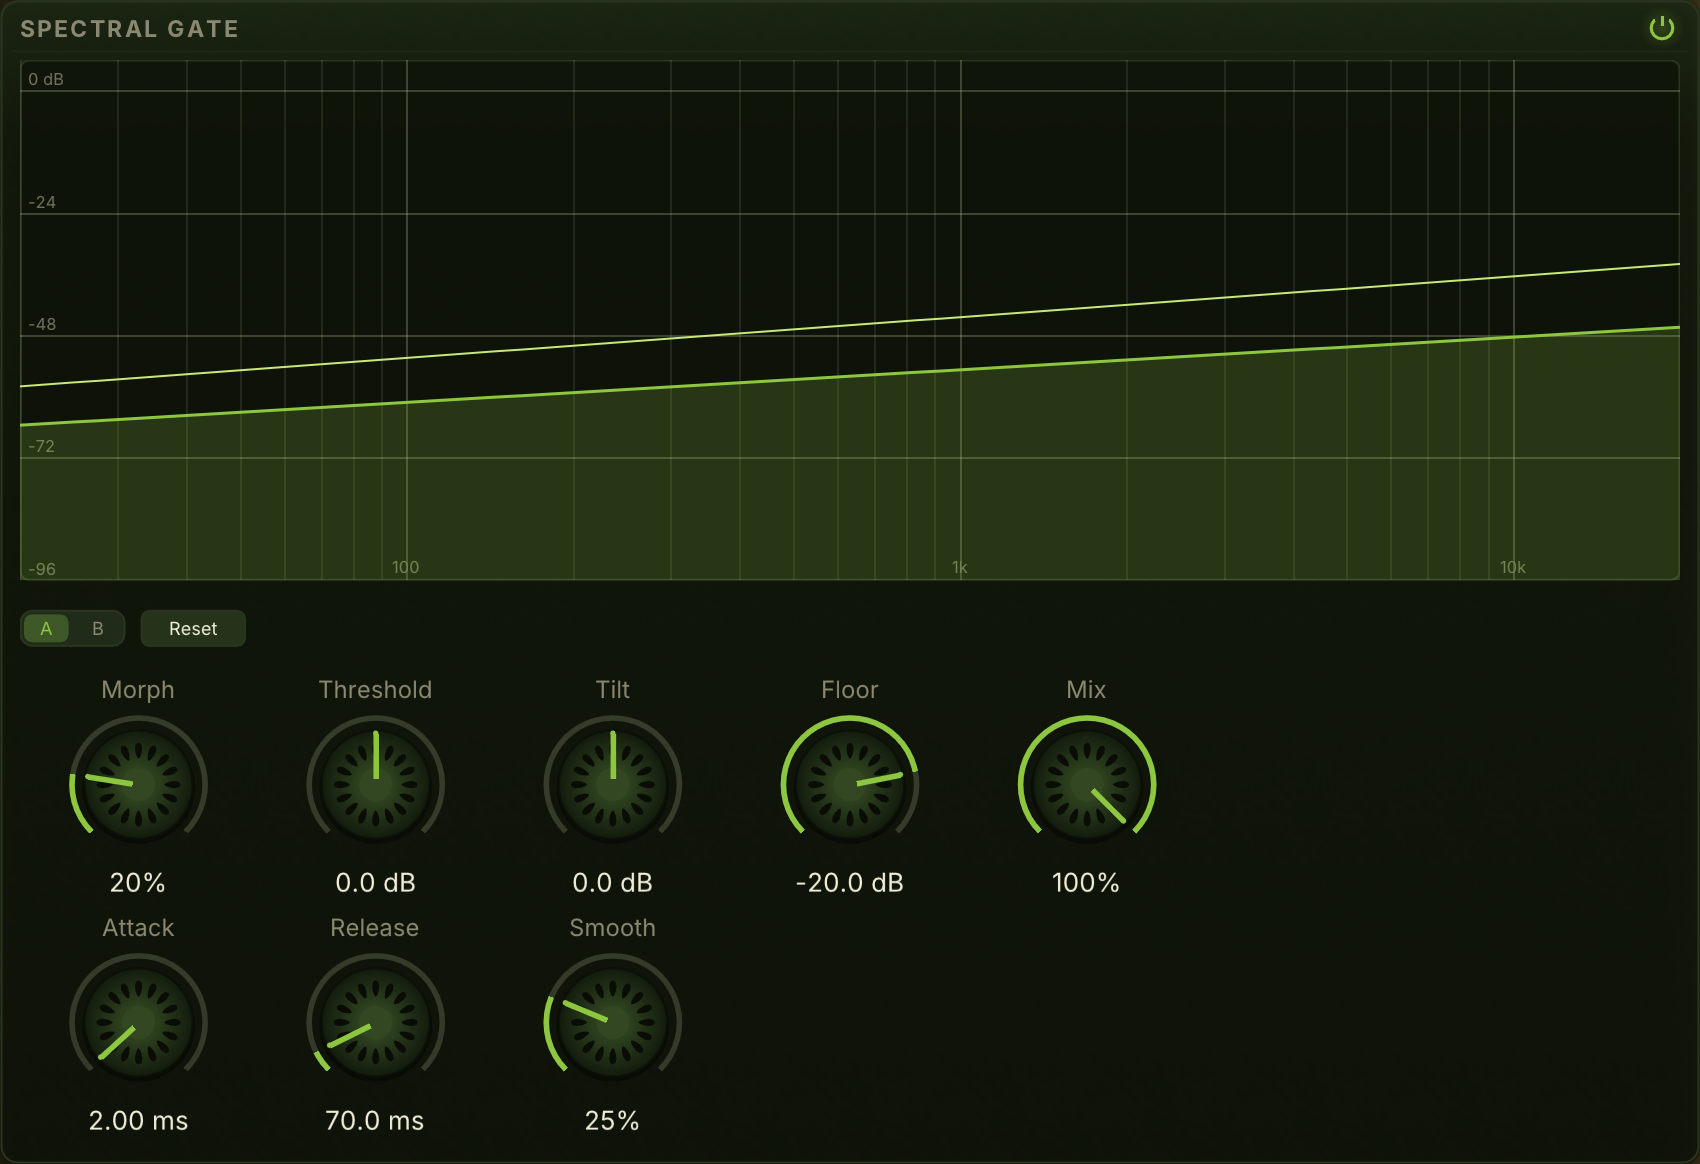
A gate normally makes one decision for the whole sound: loud enough, so it plays; too quiet, so it does not. The Spectral Gate makes that decision a few hundred times across the spectrum instead. Each part of the sound is measured against the threshold you drew at that frequency, so a pad can lose its quiet upper partials and keep its fundamental. What is left is the half-there shimmer the effect exists for: the sound heard through a sieve, with only the parts that are loud enough at their own frequency getting through.
Two things to know before you reach for it. While it is on, the sound is delayed by about 21 milliseconds, which the host is told about and compensates for in a project, but which you will feel when playing live. And it judges the mix at its place in the chain, not single notes, so a chord is gated as one sound.
The picture is the threshold, drawn across the spectrum from 20 Hz on the left to 20 kHz on the right, in decibels. Drag on it to draw. There are two curves, A and B, and the header picks which one you are drawing; the other stays visible as a dashed line. The bold line between them is the threshold actually in force, which is where Morph, Threshold and Tilt have put it, and the shaded area below it is roughly what the gate is taking away. Reset flattens both curves.
Morph. Moves the threshold from curve A to curve B. This is where the effect comes alive: route an LFO here, synced to a bar, and the gate chops the spectrum in time with the track; route a slow envelope and the sound opens as the note develops. Drawing A nearly closed and B wide open turns Morph into a one-knob spectral sweep.
Threshold. Lifts or drops the whole curve. Up gates more of the sound, down lets more through. The quickest way to find the point where a patch starts to break up.
Tilt. Tips the curve, up at the top of the spectrum and down at the bottom. Most sounds have less energy up high, so a flat curve gates the top first; Tilt is how you answer that without redrawing.
Floor. How far a shut part of the spectrum falls. All the way down is the shimmer, where gated frequencies disappear. A few decibels is a gentle thinning that keeps the body of the sound.
Attack. How quickly a part of the spectrum opens once it is loud enough. Short is percussive and grainy, long fades each band in.
Release. How quickly it shuts again. Short chops; long leaves a tail behind each gated frequency, which is smoother and less obviously gated.
Smooth. How much neighbouring frequencies have to agree before one is cut. Turned down, each frequency acts alone, which is the finest and grainiest setting, and the one that can chirp or warble. Turn it up when the sound breaks into little whistles.
Mix. The blend of the gated sound against the untouched one. The untouched side is delayed to meet the gated one, so a halfway mix is a real blend and does not thin the sound out. Mix fully down is not the same as switching the effect off: use the power button for that, which is also what releases the delay.
The gate is switched off in a new sound.