Drum editor
A drum track is a step sequencer: a grid of on and off buttons. Each row is one drum sound, each column is one sixteenth-note slot in a bar. Switch a button on to make that sound fire there.
This is not a piano roll. Drum patterns are purely rhythmic: every hit is the same pitch and the same short duration, and you control when it fires and how hard.
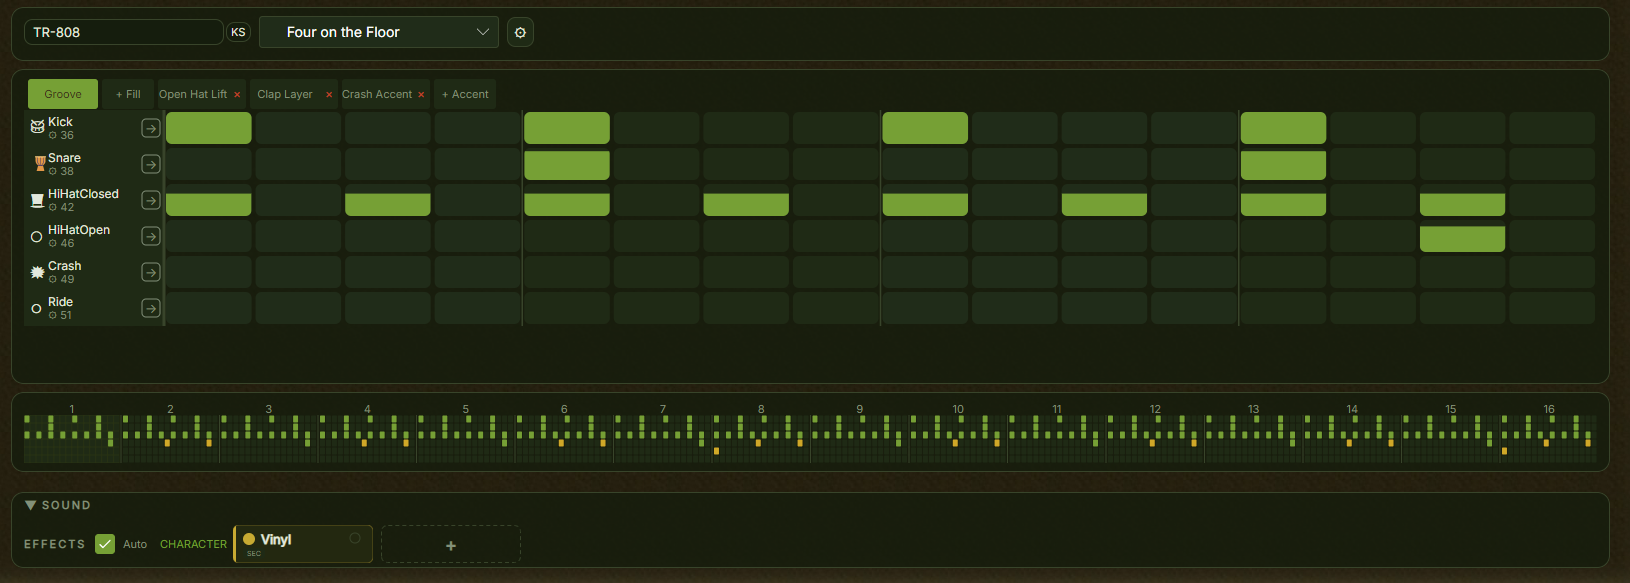
The grid
Rows are drum voices. Each row header shows an icon, the voice name, its MIDI note number, and a menu for that row.
Columns are sixteen pads, one per sixteenth note, so one full pass through the grid is one bar. The grid loops: when the sequencer reaches the last pad it returns to the first, and a section longer than a bar keeps looping the pattern.
Pads are grouped four to a beat with a wider gap between groups, so a bar reads as four clusters and the beats sit at the first pad of each. A ruler above the pads numbers the beats and highlights the one the music is in. Clicking in the gap between two groups does nothing, on purpose: it is not clear which pad you meant, and guessing would switch on a hit you did not ask for.
Pads stay the same comfortable size whatever the window width, rather than stretching into long rectangles, and shrink only when the window gets narrow.
Drum voices
Each row is one voice, a specific drum sound with a specific role. The default kit has six.
| Voice | What it is |
|---|---|
| Kick | The deep bass drum, the foundation of most rhythms |
| Snare | The sharp crack, usually on beats 2 and 4 |
| Hi-Hat Closed | The closed cymbal tick that drives the pulse |
| Hi-Hat Open | The longer, washy ring, for accents and fills |
| Crash | The loud accent cymbal, usually marking a new section |
| Ride | The steady, clear cymbal, an alternative to the hi-hat |
Toms, clap, rimshot, cowbell and percussion can be added to the pattern.
A voice's role is its identity: it decides the icon and the default MIDI note. The role is kept separate from the note, so remapping a voice to a different note does not cost it its label.
Designing the sounds in Kiwipulse
If you have Kiwipulse installed, a Kiwipulse button sits next to the instrument picker above the grid. Click it and the track plays through Kiwipulse, with its editor open on the kit.
Kiwipulse is a drum sound designer. It builds a drum as an anatomy: something that hits, meeting something that rings, in a room, rather than a fixed sample. Use it when the kit itself is what you want to change, such as a kick with more body, a snare with a shorter tail, or a hat that opens differently.
The editor edits the kit that is playing. There is no load or apply step, so a change is heard where you made it, while the pattern keeps running. Close the window when you are done and the grid is where you left it. Click the button again any time to reopen it.
Your kit is saved inside the song, samples and all. Reopening the project brings back exactly the drums you designed, with nothing to relink and no missing files.
The button only appears when Kiwipulse is installed. Everything else on this page works the same with or without it: the same grid, chance, micro-timing and ratchets drive the kit either way. The one thing Kiwipulse adds to the pattern itself is per-hit sound design, below.
Shaping a single hit
Every other control on this page treats a lane as one drum. Per-hit sound design does not: it lets one cell play a different drum from the rest of its row, or play the row's drum with some of its sound changed for that hit alone.
This needs Kiwipulse. A plugin can be told which note to play and how hard, and nothing else per note, so the controls in this section appear only on a track playing through Kiwipulse and are hidden everywhere else.
A different drum on one step. Select a step and click sound in the step strip. The list is your kit, by name, with its own drum at the top for the default. Pick another and that step plays it, while the rest of the row carries on unchanged. A snare row that plays a rim shot on the last sixteenth, or a hat row that drops a crash on one beat, no longer costs a whole extra row.
A step playing another drum shows a short form of that drum's name in its top-left corner, so you can see which hits differ without clicking each one.
Changing part of the sound on one hit. Open the lane menu on a row and pick one of its parameters under Sound design. That adds an expression row under the lane, the same kind of row as chance or nudge, and drawn the same way. Drag it to shape one hit at a time.
These rows are nudges, not settings. The centre line leaves the sound exactly as you designed it, above brightens or lengthens, below does the opposite, and the sound's own response to velocity still applies on top. So a hit dragged upward is "this one, more", never "this one, at exactly this value". Drag a hit back to the centre and the cell is as it was.
Which parameters a row offers depends on the drum, because a kick and a hat are built from different parts. A hit can carry up to eight nudges at once.
Use it sparingly. One ghost note thinned out, or one snare among sixteen opened up, does more than a row where every hit differs.
Adding and removing steps
Left-click an empty cell to add a step. A lit cell means that voice fires at that position.
Left-click an active cell to select it. Selected steps can be deleted with Delete or Backspace, and their velocity adjusted with Ctrl and the arrow keys. Right-click an active cell to remove it.
A four-on-the-floor kick is four left-clicks on the kick row, one per beat.
Velocity
Velocity is how hard a hit sounds: softer for ghost notes and quiet offbeats, louder for accents and downbeats.
Hover an active cell and use the scroll wheel, or click and drag it up and down. With steps selected, Ctrl and the arrow keys nudge them together.
Velocity is drawn as a bar filling the cell, so a full cell is a hard hit and a sliver at the bottom is a soft one.
Chance
Every active step fires on every pass by default, and that reliability is exactly what makes programmed drums sound programmed. A hi-hat that lands identically bar after bar reads as a machine. Chance lets a step fire only some of the time, so a pattern varies without you drawing a different grid for every bar.
At its default a step always fires. Around the middle it fires roughly half the time, decided fresh on each pass. At the bottom it never fires, while staying programmed so you can bring it back later.
Hold Alt and use the same gestures as for velocity: Alt+drag up and down on a cell, or Alt+scroll to nudge it.
A step below certainty is drawn faded, and the less likely it is the more ghosted it looks, so you can see which hits are uncertain at a glance. That is a separate visual axis from velocity: fill height still shows how hard, fill opacity shows how likely.
The result is stable for a given song, so the same project plays back and exports the same way every time, but the uncertain hits fall in different places from bar to bar, which is what gives the groove its life.
Micro-timing
A step normally fires exactly on its slot, and that precision is what makes a beat feel stiff. Micro-timing nudges one hit slightly earlier or later without moving it to a different step, the way a drummer lays the snare behind the beat for a laid-back feel or pushes the hats ahead to drive a section.
Hold Shift and drag an active cell left or right, earlier or later, or Shift+scroll to nudge it. The nudge is limited to about half a step in each direction, so a hit never drifts into its neighbour's slot.
A nudged step is drawn leaning, its fill sitting off-centre toward the side it is pushed. That is separate again from chance and velocity, so one cell can show all three at once.
Micro-timing works best applied per voice: drag the snare slightly late while the kick stays dead on, and the groove immediately feels more human. Keep it subtle.
Swing
Where micro-timing nudges one hit, swing is a feel for the whole kit. It delays every off-beat, the way a shuffle or a jazz groove pushes the "and" of each beat later so the rhythm lopes instead of marching. At its lowest the kit plays straight, and raising it leans the off-beats toward a triplet feel.
The swing slider sits at the right-hand end of the toolbar above the grid, with the amount reading out beside it. It is a per-track setting, so it applies to every section on the drum track, and it uses the same engine as the melodic tracks, which means a drum kit and a piano set to the same swing lock together.
A little takes the stiffness off a straight sixteenth-note groove. More gives you shuffle and swung feels. It pairs well with micro-timing: swing sets the lope and a nudge or two adds the detail on top.
Expression rows
Velocity, chance and micro-timing are all drawn inside the pad: how tall the fill is, how solid it looks, which way it leans. That reads well at a glance and badly across sixteen steps, and the modifier drags that edit them are easy to forget.
Click the arrow at the left of a row header to open that voice's expression rows. Each shows one value for every step, as a bar under the pad it belongs to.
Velocity is how hard each hit is. Chance is how likely it is to fire. Nudge is micro-timing, drawn around a centre line, with bars above the line late and below it early. Ratchet is how many times the hit retriggers within its step.
Drag up or down to set a value, and keep dragging sideways to shape several steps in one sweep, which is the fastest way to draw a velocity ramp across a hi-hat run. The scroll wheel nudges the value under the pointer. Only active steps have values.
The plus button adds the next value not yet shown and the close button hides one. Which rows are open is how you are looking at the pattern, not part of it, so it is not saved with the song.
On a Kiwipulse track a row's own sound parameters can be opened here too, one row each, from Sound design in the lane menu rather than from the plus button, because a kit publishes more of them than a button can cycle through and they differ from row to row. They behave like every other expression row. See Shaping a single hit.
Ratchets
A ratchet makes one step fire several times in quick succession instead of once, the fast burst of a snare roll or a stuttered hat. Each step has a ratchet count: at its lowest the step plays a single hit, and raising it fires that many evenly spaced retriggers inside the step. They lose a little velocity toward the end, so the burst sounds played rather than machine-gunned.
Edit them from the ratchet expression row or the step strip.
Ratchets work sparingly. One long ratchet on the last sixteenth of a bar makes a quick fill, and an occasional double on a hat adds motion without a busier pattern.
The step strip
Under the toolbar, the step strip names the step you last clicked and shows its velocity, chance, nudge and ratchet with buttons to change each. Anything you change there applies to every selected step, so a handful of hits can be treated as one.
On a track playing through Kiwipulse it also carries sound, which is where you give the selected steps a different drum from their row.
Ctrl+click adds a pad to the selection and removes it again, and Ctrl+A selects every active step in the layer. That is how you put the same chance on six scattered hi-hat hits in one go.
When a step plays
Chance makes a hit uncertain. A rule makes it deliberate: this hit plays only on the first bar, or only on the last, or every third time round. That is the difference between a loop that repeats and a four-bar phrase that goes somewhere, with the pattern still one grid.
Select one or more steps and click when in the step strip.
Every pass is the default, with no rule at all. First pass only suits an intro hit or a crash that should not come back round. Last bar only is a turnaround, an extra kick or a snare flam announcing the change. Every few passes is the workhorse: set which pass and how long the cycle is, and a ride bell on the third of every four turns a one-bar loop into a four-bar phrase.
Except flips whichever rule is selected, so first pass only becomes every pass except the first. That is usually what you want for a hit that should sit out the intro and then run.
There is no rule for the fill bar, because the fill layer already is that bar.
A step with a rule shows a small badge in the corner of its pad, with a leading mark for an except. Steps that play every pass show nothing, so an ordinary grid stays clean.
Rules and chance stack rather than replace each other: the rule decides whether this pass qualifies, then chance rolls. Unlike chance, a rule involves no randomness, so the same project always develops the same way.
Playing several hits as one gesture
Chance treats each hit on its own, which is wrong for a phrase: a three-hit snare run at even odds gives you a different fragment of itself every bar rather than the run you wrote.
At the bottom of the when popup, Play as one gesture with ties the selected steps to a letter. Steps sharing a letter share one roll, so the phrase either arrives whole or sits the bar out. It works across rows, which is how you get a ghost snare that only turns up on the passes the open hat does.
Each step still keeps its own chance, so a gesture can have a core and a decoration: put the main hit high and the ghost note low, and the ghost only ever appears inside a bar where the main hit landed, never on its own.
Linked steps show their letter in the pad badge, alone or after the rule.
Euclid
Some of the most-used rhythms in the world are simply a number of hits spaced as evenly as a grid allows. Three hits in eight steps is the tresillo behind most Latin and reggaeton music, five in eight is the cinquillo, four in sixteen is a four-on-the-floor kick. Spacing those by eye gets fiddly as soon as the count does not divide the bar.
Euclid does the spacing. Open the row menu and choose Euclid, then use the two sliders. Hits is how many times the row plays in the grid, and it starts at whatever the row already plays, so you can nudge a hand-drawn part into an even version of itself. Rotate moves every hit later, wrapping around the end: the same rhythm from a different starting point, which turns a tresillo from a pattern that starts on the downbeat into one that answers it.
The row redraws as you drag, so you judge the rhythm by looking at the grid rather than by reading numbers. Escape puts the row back exactly as it was.
Euclid only decides where the hits are. Velocity, chance, nudge and ratchet on that row are left alone, so you can shape a row and re-roll its rhythm afterwards without losing the shaping. It touches only the row you opened it on and only the layer you are editing, so running it on a fill changes the fill, not the groove.
Row length and rate
Every row normally starts over at the same moment: sixteen steps, one bar, all together. Giving a row its own length breaks that on purpose. A twelve-step hi-hat against a sixteen-step kick does not line up again for three bars, so what you hear is the two parts sliding past each other before they meet on the downbeat. That is polymeter, and it is how a one-bar loop stops sounding like one.
Both settings are in the row menu.
Length is how many steps the row plays before starting over. The default is the length of the grid, and a row cannot be set longer than the grid, because the grid is what holds its steps.
Rate is how fast the row counts, including triplet rates. A slower rate gives the row wider pads and takes longer to come round; a triplet rate puts it on a shuffle grid while the rest of the kit stays straight.
A row shorter than the grid stops early and shows a repeat marker at its end, so it reads as starting over rather than as unfinished. The ruler above keeps counting the section's beats, because it describes the song rather than any one row, and each row's own playhead ring shows which of its steps is sounding.
Steps drawn past a shortened row's end are not deleted, only unused. Shorten a row to try something, lengthen it again, and the hits come back.
Two things to know. Fills and accents stay on the bar, because they are statements about a particular bar: a polymetric row goes quiet on the fill bar while its own clock keeps running underneath, so the drift survives the fill. And rules follow the row, so first pass means the row's first pass and every few passes counts the row's own loop. Last bar still means the section's last bar, because that is a fact about the song.
Start small. Leave the kick and snare on the grid, shorten the closed hat a little, and let it move under a straight backbeat. Odd lengths get strange fast, which is sometimes exactly what you want.
Layers
A drum track is not one grid. The pills at the left of the toolbar switch which layer you are editing.
Groove is the pattern that plays in every bar unless something replaces it. Fill replaces the groove on one bar of the section, chosen with the stepper next to the pills. Accent is a variation layer that plays over the groove every few bars, with a stepper for how often.
Use the add buttons to create a fill or an accent and the close button to remove the selected layer. Only the selected layer's steps are shown, so a change always lands somewhere you can see.
The section map
Below the grid, the section map shows every bar of the section with one lane per voice. Each bar is labelled with the layers heard in it, and the line above names the layer you are editing along with the bars it owns.
That matters because editing the groove changes every groove bar, not only the one under your pointer, and the label says so before you click.
Scroll to zoom through three levels, and Shift+scroll to pan when the section is wider than the panel. Drag the top bands to move the play cursor, like scrubbing a ruler, and double-click to start playing from there. Click a bar's layer chip to switch to that layer, which is useful on a bar where the groove and an accent both play.
Zoomed in, the cells become big enough to edit: click one to switch a step on or off, right-click to remove it. Bars where the current layer is silent are dimmed and cannot be edited, so what looks editable is editable.
Layer colours are consistent everywhere: green for the groove, gold for the fill, blue for accents.
Remapping a MIDI note
Each voice fires a specific MIDI note, shown as a badge in the lower part of the row header. Notes follow the General MIDI drum map by default, which is what most drum plugins expect.
If your plugin uses a different layout, click the badge, type the new note number, and press Enter to confirm or Escape to cancel. The remap affects that one voice in that pattern, and the voice keeps its role and name.
Giving a piece its own channel
Every drum sound shares one effect chain by default. That is fine for the kit as a whole, but it means an EQ move meant for the kick also lands on the snare and hats, and boosting the low end for the kick turns the whole kit muddy.
Click the channel button on the right-hand edge of a row header and that piece plays on its own mixer channel. The button stays lit to show it has been pulled out, and the piece appears in the mixer as its own strip named after the kit and the piece. Add effects there and only that piece is affected.
Click the lit button again to fold it back in. The piece returns to the shared kit channel, and its separate channel and any effects on it are removed.
The grid never changes, so you still edit every piece in one place. Only the sound of the separated piece is routed elsewhere.
A separated piece routes straight to the master, so it no longer passes through effects you put on the whole kit. If you rely on a kit-wide glue effect, keep that piece in the kit.
It is most useful on the kick, for independent low-end shaping, and on anything you want to send to its own reverb or compression. See per-piece drum processing in the mixer for the other side of it.
Reference
| Interaction | What it does |
|---|---|
| Left-click an empty pad | Add a step |
| Left-click an active pad | Select the step |
| Ctrl + click an active pad | Add it to, or remove it from, the selection |
| Right-click an active pad | Remove the step |
| Scroll wheel on an active pad | Adjust velocity |
| Click and drag an active pad up or down | Adjust velocity |
| Ctrl + Arrow Up, Down | Adjust the selection's velocity |
| Alt + drag on an active pad | Adjust chance |
| Alt + scroll wheel on an active pad | Nudge chance |
| Shift + drag left or right on an active pad | Adjust micro-timing |
| Shift + scroll wheel on an active pad | Nudge micro-timing |
| Ctrl + A | Select every active step |
| Delete, Backspace | Remove the selected steps |
| Click the arrow in a row header | Open or close that voice's expression rows |
| Drag in an expression row | Set that value, sideways to shape several steps |
| Scroll wheel in an expression row | Nudge that value |
| The step strip buttons | Change a value on every selected step |
| **when** in the step strip | Choose which passes the selected steps play on |
| **sound** in the step strip | Play the selected steps on a different drum (Kiwipulse only) |
| Click the lower half of a row header | Edit the MIDI note |
| Click the channel button in a row header | Give the piece its own channel, or merge it back |
| Click the menu in a row header | MIDI note, own channel, expression rows, Euclid, sound design, length, rate |
| Scroll wheel on the section map | Zoom |
| Shift + scroll wheel on the section map | Pan |
| Drag the section map's top bands | Move the play cursor |
| Click a cell in the zoomed section map | Switch that step on or off |
| Click a bar's layer chip | Switch to that layer |
| Escape | Cancel a note edit, clear the selection, or undo a Euclid change |
To build a beat from scratch, see building a beat.